Banner Sponsors


For artists and collectors sponsored by Intercal...your mohair supplier and Johnna's Mohair Store

 Still cannot figure out multiple pix in 1 post.... "Edit and Save" doesn't explain enough what to do!!
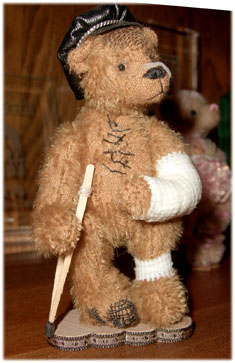
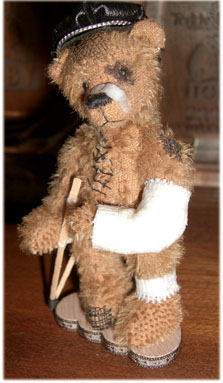
As H D-S rolledover & over, his chest was skinned up: plucked, thinning scissored and Dr sts showing.
Finally, the nap was shortened on his foream across from his chest and his toe & side of right foot got darned patches.
The crutch, Biker hat of real leather and 1 hoop earring complete the theme!
 When I began distressing my fabric bears, it occurred to me that the natural wear areas were on all of the sides that came into contact with other things.
I like to study the genuine older bears to see where the normal wear and tear areas would be.too
I've even been known to lightly sift cornstarch down onto a bear to see where it would land naturally.
Distressing areas that don't naturally wear through use just don't seem to sit right to my eyes. Also, all parts should match: if the side of a muzzle or head is abraded or 'worn out' it seems more natural to have the adjoining areas reflect this too.
One of my TOBY's was for Harley David-Son. This poor chap was in an accident: he went head over heels and his wear pattern reflects this.
His head hit first - the darning patch and turn right ear on our left.
Blackened eye on his left.
'Sticking plaster' on his nose.
This may not show in this smaller image but the bottom of his nose stitching is not as smoothly (closely) stitched on that side compared to the other.
Left shoulder hit next - darned patch
Broken left arm
Hurt ankle on left
("But they show a photo of how it looks on
the cover - why should I bother making it if I already know how it'll look?" lol)
I found this MOST interesting, Kim - only you!!! What a unique way to look at something!!
Oh Never Mind.. I think I found it. Now if my Back button works I'll be safe!
I can get the avatars and personal photo uploaded, but for the first time I have 5 bears done at once. I cannot figure out how to post them into the TB & Friends announcement area.
Can you direct me to where those instructions are??
Thx for your input, Gladys. My only problem is that you have the luxury of ALL THAT SPACE!! LOL My bears' heads are smaller than your noses!
At one quarter inch to three sixteenths inch across and a very very thin depth, I'm trying to get lots of detail into polymer. It CAN be done because sculpturers (sp?) do it - I just haven't mastered it yet...
Amelia, I understood what you wrote before. I have some #26 wire that I formed the flattened loop out of but I'm pretty sure I held the dryer on more than 30 seconds. Before that the pieces were still too soft to remove from the Saran Wrap® or foil. When they crumbled I suspected what you suggest.
I'll try the original Fimo. I've found that putting the small ball in a little baggie and tucking it into my bra for a few hours really helps my ole arthritic finger joints. Ther! How many times will the word bra appear on our list??!!!
You've given me much food for thought, about both pre-forming the bit of clay over the wire as a base, as well as creating my own molds. I never would have thought of that, as each bear's muzzle is a different shape and size.
BUT, if I think about the needle felting in a different way, I can just as easily not create the tip that the nose must fit over perfectly, or even better, cut off the tip - Thk goodness for very firm needling!! - giving me a flat surface as the backing of the clay to meet, rather than trying to create a concave shape that fits the needle felted tip perfectly. And a thicker nose will look the same on the outside but be much stronger. I think that's going to be my next experiment!
As to price, I should think that the embossing gun at a craft shop will cost more than a heat gun at a DIY. Have you found this to be true?
DH said yes, he has a heat gun 'somewhere' in the garage... In the meantime, he suggested I try a hair dryer. I have one that's almost too hot to put nearer than a few inches from skin surface.
Needless to say, I'm still planning a trip to Home Depot. The surface of a tiny nose firmed up, I lifted it off the alum foil and when I pressed the wire as you described into the back, the whole thing crumbled.
I was thinking about the title of this thread; you called it a resin. I tried both Premo & Sculpey III with the dryer. Are we using two different materials?

ignoramus
No you're not if you can spell that!! LOL
It's a One Of A Kind.
I'm sending off a bear this week, for Bear Path's Feb Plum Club special. I'll post an unedited pic. I made one from the same image (Rob't Norlag (sp?)) but flipped the image this time. As NFing is always OOAK, byt quite similar, I too was wondering hoe to describe this...
I'm starting my first formal air-brushing class next week with Judi!
We've had a compressor and glass carving cabinet in the basement for 20+ years. I'm ready with everything from the Copic system through a tabletop model from the hobby shop to Mr Giganto downstairs. I'm psyched!!
Oh no! your set-up is what mine used to be... Now I put it all on the dining room table, put my minis up on boxes at eye level for neck problem-alleviation, drape fabric over the box and up over a cardboard backdrop support, camera on tripod (I use both floor model & table top models) swithch on the lights and I'm ready to shoot.
I like that he gave the K(elvin) temps and the CRI - Color Rendering Index - important info! That's an informed seller. I'll bet he's got a regular supply business.
I didn't answer the question - yes, the cool bulbs shaped like these are similar to mine. A delight to work with after the hot HOT photobulbs of the past.
I have 3 different collapsible 'light boxes' - plastic & nylon - that I'm going to let go of, because I gfind using this set-up adequate for spreading the light and not needing the materials as buffers.
I also noted the bracket holding the reflector to the rod.
I'll be curious to see if it's the same aluminum material that some of the reflector shades (as seen in Home Depot) have on theirs (and were in my firast purchase 12 years ago. They're the same curved matching-set brackets.
It's a soft metal that will take continual tightening; mine evntually flattened/straightened out, but slipping a washer over the wing nut on each side gave the right tension again.
Daphne, these are a good price/pkg. In fact, I think I'll bid on one of the sets myself. Having similar equipment from different sources, put together piecemeal, I think I spent at least this much. And Free shipping!
I use one light overhead and two adjustable table-top sidelights, with tulip shaped reflectors; sometimes I've wished for wider bowl-shaped ones.
These will be a nice addition - I'm glad you posted it. There may be better deals that come down the pike but sometimes you just have to jump in and start Somewhere! It's all nice to deal in theory but nothing like getting the experience of using items like these.
I'm off to bid now..
Thx, Kelly. In the overall scheme of things this makes good sense in interpreting the web stas for our sites.
We're glad knowledgeable and sharing ppl like you and Nancy are out there!
You can test that for yourself. Make a note of what your current hits / visits number is, then visit your own web site.
Kelly, would you already have been counted once as a unique visitor (from the same computer) and the numbers not change due to this?
Would it make more sense to log in from a different computer?
Dictionary/Thesaurus & Maps are still my favorite ways to get names.
LOL - from the # of e-s I've gotten, there are a whole lot of you out there who cruise through YouTube more than I do!
 Can you tell I'm filling in an hour before an appt instead of working for an hour????
Snopes.com reports this rumor as true:
http://www.snopes.com/computer/internet/google.asp
Type in a US ph # into Google and the address & a map link will usually pop up.
Here's ours:
Now I'm off to follow the directions to remove it from their files.
Haven't tried this yet but I'm saving it - wew do business with a number of the listed companies:
US - based:
...and about scared the wits out of a the baby!! LOL
Just thought I'd pick up on your Cute Daily Animals, Tami!
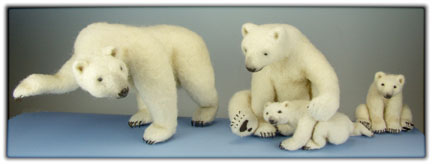 This is my favorite Family group. They are in the Heartland Museum in Clarion Iowa until next spring.
Into the Unknown exemplifies a period in our history, when the Pioneering Spirit was at its peak.
The Father figure is urging the family forward.
The Mother is reluctant to follow. knowing the deprivations and hardships ahead but not outwardly refusing.
One Cub is shyly sitting behind her and the younger Cub is squirming and struggling to get on with the Big Adventure!
I used my favorite handmade, hand-inserted metal claws.
Father is 4.5" long.
Mother sits 3.5" tall.
Cubs are 1.5" tall and 1.75" long
Sizes approximate - from (stressed) memory!
The museum set-up is with the Father appearing to step through a pane of glass (Into the Unknown): I sliced his body diagonally through from his right shoulder to his left back hip. He was bonded back (together) on each side of the glass so he appears to have stepped through the (theatrical) 4th Wall. The others sit behind the glass pane.
When they're returned to me, I'll remove his body from the glass , re-needle him together and sell them without the 24" sq museum scene they are in.
The link didn't paste:
"Speaking of new tools, I look for new & unusual items for some of the writing I do. DH sent me this link today in an e.
Subject: Information, Just Not For You - $140 each"
http://www.kk.org/cooltools/archives/001538.php
Surely there're some bear uses hiding in this tool. Give me some reasons for owning one!
This is the work of Rotraud Ilisch, who(m?) I've talked with in Germany. She is German and this work is on her Teddy Bear Design CD.
Speaking of new tools, I look for new & unusual items for some of the writing I do. DH sent me this link today in an e.
Subject: Information, Just Not For You - $140 each
He knows my coping-style strofoam cutter was under 20. Ratzzz... never should've told him what a good deal I got.
On to bear claws - 'gnite all!
Wendy, the air dry we have here 'may' crumble. The brands we have here recommend allowing 24 - 48 hrs drying/curing. I know it's hot there with humidity around 50 - 60% - I let mine dry more than a week (needle tops) and still have had some tops loosen where it suirrounds the shaft. Which would be good to make your 3 or 4 needle holder right next to each other cuz you could break them free if/when one breaks.
Amelia, I've got sevral bears nearing completion now. I put their noses on today. They measure 1/4" across and 3/16". As both Premo and Sculpey III (the only ones I have on hand) are quite soft thriough handling I had the devil's own time getting the shape to hold while I transfered them to the baking sheet. I should say that first I stretch clear Saran® wrap over the head tightly and create the noses in situ. That way they fit the curve and the shape & size.
I'd like to get more detail in the flares of the polar noses, but it mishapes when I move them so I just kept the side slots.
Thx for the recommendation on the heat gun. That would set the surface and I can then play with the details. Home Depot here I come!
I haven't painted over the noses yet for a bit of texture & then seal them. The wool surfaces get their final grooming when all details are complete. The claws come now and polymer foot pads/toes, #42 needle goes to work and they'll be done.
Let's see if I've figured out how to upload multiple shots yet.
http://www.teddy-talk.com/upload3/N3.jpg

