Banner Sponsors


For artists and collectors sponsored by Intercal...your mohair supplier and Johnna's Mohair Store
Topic closed
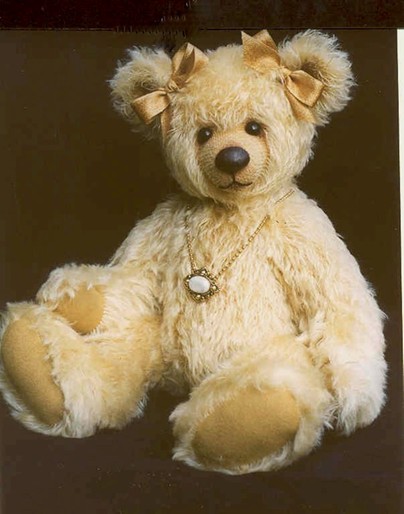
 Past Time Bears
Compliments of Sue Ann Holcomb and Teddy Talk
Pattern intended for entertainment and educational use only. Sale or distribution of patterns and/or finished bears are prohibited.
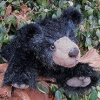
Use different lengths and different densities....for totally different looks!
SKILL LEVEL
Beginner
PATTERN PIECES
Click here to download pattern.
You'll need Adobe Acrobat Reader to view this pattern which has been made available as a .pdf file. Please click here to download this freeware directly from the Adobe website.
MATERIALS
1/3 yard mohair of your choice
1 piece wool felt
1 pair 10 mm shoe button or glass eyes
Thread to match fabric for machine and hand sewing
10 hardboard disks - six 1 1/2" (head/neck/arms), four 1 3/4" (legs)
Your choice of jointing methods. I used screws and locknuts.
# 5 black perle cotton
Fiberfill, plastic or glass beads, and steel shot (BBs)
Optional - your choice of accessories
INSTRUCTIONS
Notes
Unless otherwise noted, all pieces are sewn with right sides together
All seams are 1/4" unless otherwise noted and are included in pattern
Turn the fabric so the nap points down, and lay out pattern with arrows pointing down
If you have any questions, please post to the "Goldie" Classroom or PM or email at sueann@pasttimebears.com.
1. Pattern
Trace pattern pieces onto template material, transferring all marks. Carefully cut out pieces.
2. Cutting
Lay all pattern pieces (except paw and foot pads) on back side of fabric with arrows going in the direction the nap lies. Using a fine-tip marker, trace around them, marking all notches and joint holes. Using sharp scissors, cut out each piece, being careful to snip through the backing only, not the fur pile. Lay out the paw and foot pad patterns on the back of felt. Trace one, reverse, and trace again. Cut out pad pieces.
3. Sewing
All pieces are pinned with the right (fur) sides together and the backing sides facing out. Pin ear pieces with right sides together. Sew, leaving bottom open. Repeat with other ear. Turn ears right side out. Sew head sides together from nose to neck (chin seam). Fit the gusset between the head sides at the nose, centering the gusset on the seam. Sew gusset to headside pieces from nose to back of neck on each side, easing the fabric to create a symmetrical finish. Turn right side out. Stitch darts on both body pieces. Match the two pieces and sew together, leaving the neck edge and between the notches open. Gather around the neck opening, pulling the edges together, and knot securely. Make sure there is a small hole left through which to insert the neck screw. Turn right side out. Sew paw pads to inner arm pieces making sure they curve the right direction. Sew inner arm to outer arm, matching curves, and leaving open between notches, then turn right side out. Match leg pieces and sew together, leaving open between notches. Pin foot pad into bottom opening, matching toe mark to toe seam. Sew and turn right side out. Brush all seams to free fur caught in the stitches.
4. Stuffing Head
Stuff the head firmly, especially the nose, leaving about 1/2 inch unstuffed at neck edge. Using heavy thread, sew a running stitch around neck opening, leaving needle attached. Insert joint so the disk is in the head and the screw is sticking out . Pull the running stitch tightly around the screw, gathering the material as closely to the screw as possible, then close with a tight whipstitch. Finally, lock your stitches and cut thread. I glue (use epoxy or other STRONG glue) the screw in the disk of the head joint so it will not turn when tightening the nut.
5. Ears and Eyes
Use an awl or the tip of scissors and poke small holes at each eye location. Use your favorite method of inserting and securing eyes. Sew ears to the head with a whipstitch or ladder stitch. Position eyes and ears to your liking.
6. Nose and Mouth
Trim fur on the snout where you intend to embroider the nose. I usually embroider the nose over a felt template, which gives it more dimension. Use your favorite method of stitching the nose and mouth. If you want to wax the nose, melt a little bee's wax, then apply it to the nose with a small artist's paint brush. Be careful not to get wax on the fur around the nose. When the wax has hardened, shine with a piece of plain white paper. You may trim fur on the face to resemble my bear if you desire.
7. Jointing
Insert the head joint screw through the hole in the neck of the upper body and attach to disk inside body. Using an awl, poke a hole at the spot marked for joint placement on each of the inner arms of your bear. Insert the arm joint, then poke hole through the mark on the inside of the body and attach to another disk. Repeat for the other arm and both legs. Make sure all joints are equally tight . . . they will loosen when you stuff the bear.
8. Stuffing and Closing
Put about 2 tablespoons of steel shot in the bottom of your bear's body, then pour plastic or glass beads up to the bottom of the back opening. Finish stuffing with fiberfill. Close the back opening using a ladder stitch. Using small pieces of fiberfill, stuff the arms and legs, checking that each limb is stuffed equally and shaped properly. Close all openings with a ladder stitch.
9. Finishing
Trim fur to your liking, and if you desire, add some hand painted details on the face, ears, and paw/foot pads. I use permanent markers with a blender to do this. Congratulations - your bear is done!
FUR SUGGESTION
370S/C - Color 595S (golden)
Those of you who have worked with 370S/C know what I mean when I say it feels soooooo good! And this color is pretty . . . a soft and buttery look.
For references: Quality | Color
To purchase this Quality/Color combination, click on CREATE YOUR OWN KIT. Other items may be required to complete the finished bear. For details, check the Pattern Description.
ADDITIONAL FUR SUGGESTION
KID3/W - Color 340SD (honey tan)
I can't say enough good things about this KID quality. It is heaven to touch - soft and silky - and has a little "tweak" to the finish. Honey tan is a great "beary" color, too.
For references: Quality | Color
To purchase this Quality/Color combination, click on CREATE YOUR OWN KIT. Other items may be required to complete the finished bear. For details, check the Pattern Description.
ADDITIONAL FUR SUGGESTION
325S/CM - Color 549S (chocolate)
LOVE this quality for a vintage look. You can either leave it "as is" or brush it out for a different look. Can anyone think of a more tempting name for a mohair color? My mouth is watering!
For references: Quality | Color
To purchase this Quality/Color combination, click on CREATE YOUR OWN KIT. Other items may be required to complete the finished bear. For details, check the Pattern Description.
ADDITIONAL FUR SUGGESTION
KID2/H - Color 545S (sand)
Aaaaaah - another KID quality, but a little shorter than KID3W. You certainly can't go wrong with kid mohair. Sand is another popular bear color . . . or you can dye it.
For references: Quality | Color
To purchase this Quality/Color combination, click on CREATE YOUR OWN KIT. Other items may be required to complete the finished bear. For details, check the Pattern Description.
ADDITIONAL FUR SUGGESTION
380S/CM - Color 528S (cream)
This quality is wonderful to work with and has that curly matted finish that you can brush . . . or not. Cream is a lovely color and you can do a lot of creative shading with it.
For references: Quality | Color
To purchase this Quality/Color combination, click on CREATE YOUR OWN KIT. Other items may be required to complete the finished bear. For details, check the Pattern Description.
POST YOUR CREATIONS IN THE SHOWCASE FORUM
If you use this Free Pattern, join in the fun and post the result in the "Goldie" Classroom. Don't be shy....!!! The purpose of the free pattern and the different fur options are to illustrate the many and varied results you'll obtain.....by using DIFFERENT furs.
Topic closed

