Banner Sponsors


For artists and collectors sponsored by Intercal...your mohair supplier and Johnna's Mohair Store
 Posts: 1,153
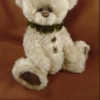
Girls, I want to submit a little friend to Teddy Bears and Friends for their Bruins & Buddies.
I read their photo criteria, but I don't know how to do what they want.
I have this new Elements and don't know how to use it...plus a book that is a million pages thick.
All I want to do is to make the picture the way they want it.
~~~~~~~~~~~~~~~~~~~~~~~~~~~~~~~~~~~~~~~~~~~~~~~~~~~~~~~~~~~~~~~~~~~~~~
We also accept electronic files. They should be submitted via e-mail or CD in the following format: at least 300 d.p.i. resolution, sized 3x5" or 4x6", and TIF, EPS, or JPEG format. Please include printed "thumbnails" of each file.
~~~~~~~~~~~~~~~~~~~~~~~~~~~~~~~~~~~~~~~~~~~~~~~~~~~~~~~~~~~~~~~~~~~~~~~
It is so frustrating not to know how to do this techie stuff.
Thanks for any help you can send my way.
Nanc.......
 Back Road Bears
Nanc....
Well, I know how to do it as I'm in the process of doing the exact same thing to submit to TB&F!:D
Problem is, I don't think I could put it into words!! I'd have us both going in circles!:/
I'm sure Shelli or Laura Lynn or one of our other computer guroos/gurus/gooroos (like the last one best!!) will make it all sound so simple when they pop in!!
Daphne
PS. The printed thumbnails part is a bit questionable if one is submiting the whole think via email. Which I believe can be done.
 Not so easy to explain in less than ten thousand words.... Hmmm...
Nancy, some thoughts:
(1) 300dpi refers to image resolution; how many dots, or pixels, per inch your image contains. The more dots per inch, the higher the resolution... the larger the picture can be... the finer the quality of print.
Resolution is first determined by the size PHOTOGRAPH you shot of your work. If you shot the pictures at 72dpi, you can't upsize to 300dpi without losing image quality, which makes your submission photos pointless because for print work they need to be EXTRA high resolution, very crisp and clean. Do you know whether you shot your pictures at least 300dpi?
(2) If you want to submit via CD just copy your edited photos to a CD and snail mail. If you want to submit via e-mail you need to ATTACH the 300dpi photos, sized at 3x5" or 4x6" as they instruct, to an email to Mindy Kinsey, I'd imagine.
(3) I think when they ask for "printed thumbnails" they are referring mostly to snail mail. If all they get when they open the parcel is a CD it takes them time and effort to find out what's on the CD. So just print out small examples of what you've included. I'd do the same thing with email; sometimes I "insert picture" -- which is a very small photo embedded within the body of my email that just "appears" alongside my email text -- IN ADDITION TO attaching the full-size image file, which is designed to be opened/downloaded manually. Nancy, you might recall I sent your avatar to you in this fashion.
(4) File type (TB&F has listed three) is just a matter of preference, usually determined by the ultimate use of the image (print, web, tiny ID card shot, giant poster, etc.) When it's time to save your image, just choose which type of file you want. Click File>Save As and choose. .tif is stable and high quality. I'm less familiar with .eps. .jpeg is the web norm but one word of caution: every time you save as JPEG you lose a tiny amount of image quality. So I tend to work in PhotoShop's own file type (.psd) or .tif (like SCRUFFERS, here) unless I NEED TO use a .jpeg format. Saving and resaving .jpegs, over time, leads to a loss of quality.
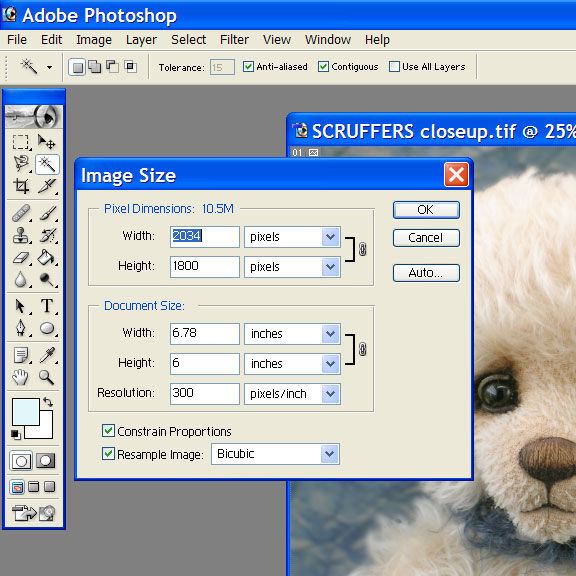
(5) Here are the specific PhotoShop 7.0 instructions. I think Elements should be nearly identical.
Refer to the screen capture above.
-- I have a photo open of my bear, SCRUFFERS.
-- I have gone to Image>Image Size to get to the window box you see, above.
-- It's in this window box where you can manually set BOTH resolution AND image size.
-- In this case you can see that the resolution of this photo is 300dpi -- high resolution, for printing or enlargements. The image size is unusual at 6.78 x 6 inches. That's just the size it ended up when I cropped it.
-- If I needed to resize this photo to 3x5 or 4x6 specifically, I could do that, too.
-- To do that, go to Image>Canvas Size... and you get a similar window box as the one you see, above.
-- Set your image size as you wish, using inches, pixels, or whatever as your unit of measurement. It's your choice.
-- See what happens!
Hope this helps some. This can be confusing...
Posts: 1,153Shelli...how can I say THANK YOU.
I don't think they have a font size...big enough to shout...THANK YOU!!
I have copied and printed all that you sent.
I was just going to try to figure this all out today. I went to TB&F's site to get the demensions and I was sitting there, thinking...I know I won't be able to do this.
Now I have something, I can work with because your generosity!
You are a love!!
Nanc........
Posts: 1,153Hi Shelli...
I just did what you advised.
Here is what I found out, and if I could have copied my 'screen' as you did, it would have been easier...but I could not. I am sure there is a way.
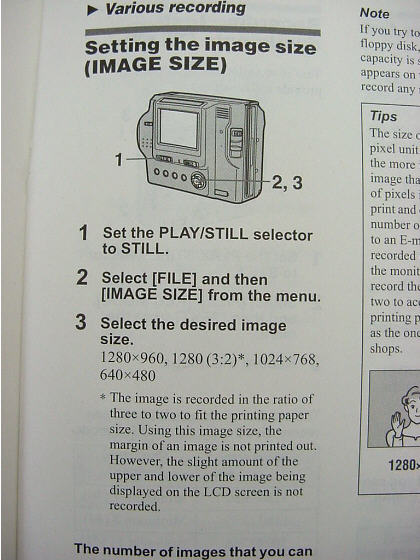
My camera takes photos in these sizes.
1280 X960
1280 (3:2)
1024X768 (which is what I always use)
640X480
Now, the 1280 (3:2) showed this on the Image Size screen:
Pixel Dimension: 3.11m
W = 1280
H= 848
Document Size
W= 17.68 inches
H= 11.778
Resolution 72 Pixels
The 1280X960 showed:
Pixel Dimension:
W = 1280
H= 960
Document Size
W= 17.778 inches
H= 13.333
Resolution 72 Pixels
I am using a Sony Mavica..perhaps I can't send a photo to TB&F.
Altho Mindy called me here at home one day and asked me to submit some pictures of my crocheted bears (for the thread bear issue). She told me just to email them to (I can't remember her name) and they took it from there.
I had submitted some photos on a floppy and she said they had no way to view them from a floppy (that is why she called me)
My Mavica takes pics using a floppy or a memory card. It has to have a memory card adapter and after purchasing the camera, I didn't want to spend the additional monies for the adapter and the memory card, so I put floppies in the camera. Anyway, they couldn't use them on a floppy.
My new computer has a cd/dvd burner so I can do that ok...but it looks like my camera isn't capable of taking 300 DPI's :(
Thanks for trying Shelli. I can't afford a new camera right now...so I guess I will just forget about this venture.
Nanc.......
DON'T FORGET ABOUT THIS VENTURE!!!
Something here doesn't make sense to me.
Nancy... I'm getting murky here in terms of my personal knowledge, because camera-button-knowhow, especially on someone ELSE's camera, is not my strong suit.
However...
Your info above is mostly telling me about image SIZE, which is the outer dimensions, or "edges", of your photos. It looks like your camera is taking gigantic pictures -- do you really want or need an 18 x 13 inch photo??? -- so in order to keep the file size low enough to reasonably fit on your memory card, your camera is lowering the resolution.
Does your Sony have a separate adjustment for RESOLUTION? Sometimes resolution is referred to as image QUALITY. On my camera, for example, I can pick from something like BASIC, STANDARD, FINE, and HIGH... or something like that. I'd have to refer to my manual to remind myself which resolution (72dpi, 220dpi, 300dpi, etc) each word stands for; I don't believe I can access that information directly on my camera. Just FYI, I shoot in FINE mode. I get images at 300dpi.
Also just FYI, my image SIZE settings are located on an entirely different part of my camera's settings wheel. That's not necessarily standard. Again, I'm murky here.
I would be very, very surprised indeed to find that your Sony Mavica doesn't allow you this same flexibility to adjust image SIZE, and image RESOLUTION, separately, especially if it's a camera purchased in the last several years.
Size and resolution are difficult concepts to understand, and around which I still feel a little uncertain at times. But it's basically just math. In your examples...
A 1280 pixel width, at 72ppi, ends up giving you a 17 inch image width. If 1inch = 72 pixels, and you have a total of 1280 pixels...
1280 pixels
72 pixels/inch = 17.something inches
If you can't find your manual, or figure out where RESOLUTION might otherwise be located, look up your camera model (Sony Mavica XYZ123) online and check out its listed features. I believe Michelle Lamb -- whose photos are enormously high resolution, since she sends them to a professional print shop for her greeting card and calendar printing -- also uses a Sony Mavica, although it might not be the same model as yours. Her camera stores photos direct to CD (just an interesting tidbit, and not relevant to our discussion here.)
I'm just intuiting that what you're looking at, as you reference above, is NOT the "only" way your camera can take pictures... but rather, how you've somehow got your camera already "setup."
POST THE MODEL NUMBER OF YOUR CAMERA HERE OR MAIL IT TO ME AND I CAN DO A LITTLE LEGWORK. My hubby, who is even more internet addicted than I am (how could that be?!?), tells me that most camera manuals are even available online.
This just doesn't sound right to me, that your camera would "only" take pictures at 72dpi. Somehow, somewhere, someone set it to take them at that resolution. And that's why, when you choose the SIZE 1280xwhatever it was (can't see your post right now), you end up with a 17 inch wide picture!!!
Good luck and don't give up. I really don't think there even ARE "real" cameras that only take photos at 72dpi. But then, what do I know? Anybody else want to chime in?
 Flying Fur Studios
Can't add any more than Shelli, and sure can't explain it any better. How do you explain things soo darn well?? Amazing
Heather
Posts: 1,153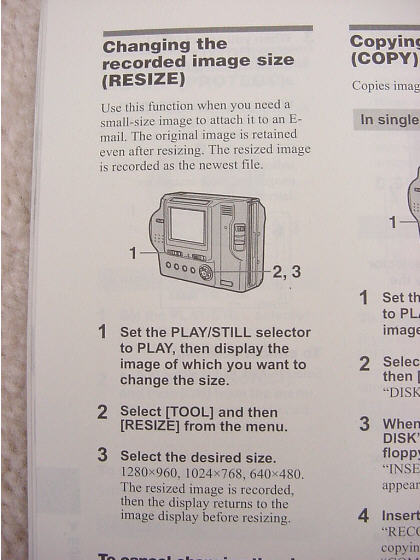
 Shelli...I do have the manual. I never lose those kind of things because I ALWAYS need them. :lol:
My camera is a MVC-FD87 I think I bought it in 2000. We were still at the farm in MO.
I don't have much time here...we are getting a nasty storm coming thru.
But...
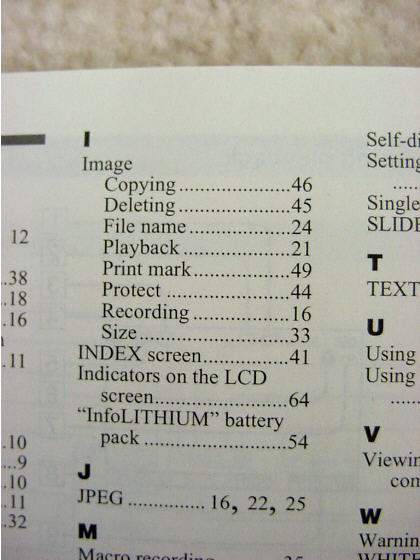
In looking in the index, this is what I find under IMAGE (being the top picture.)
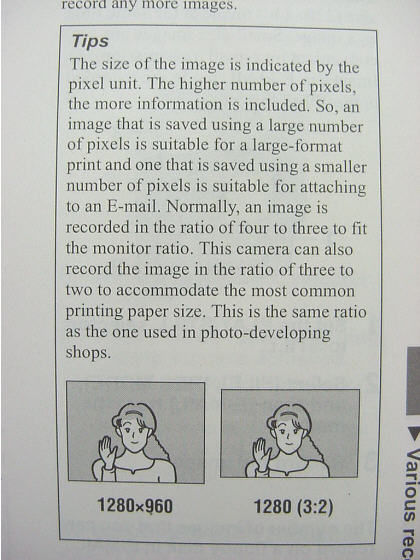
Then I found some of the following pages that seemed to be in the criteria.
Who set the camera? WELL, that would be mwaaaa!! who knows nothing about cameras...I just knew I needed one and this Mavica seemed to be the most user friendly camera available at the time. I really love my Mavica and hope it will work for me.
Tell, hubby thank you too. I am so glad he loves cameras, perhaps he can figure out my mistake.
I had my mothers 3D camera (you are way too young to remember those) but she used a light meter and all that stuff...took gorgeous pics that had to be viewed thru a 3D view finder. I gave it to my daughter because I could NEVER figure that one out. That must have been the 'gene' from my mother, I didn't get! :(
Hugs to you and hubby,
Nanc....
Well, I did a little web research -- and boy, do you work for your answers, Nancy -- now that I have your model number, and I found a general article on floppy-use cameras that read,
"3.5 inch Floppy. With this feature, the camera stores its images on the same floppy disks that
you use in computer. To transfer the images to your computer, you would remove the floppy from
the camera and put it into your computer’s floppy drive. You don’t need any specific cable to
connect the camera and computer. Memory capacity is 1.4 MB per disk. The problem is that floppy
storage capacity is very limited, so you won't find this media used in high-resolution cameras.
Examples of product which use 3.5” floppy are Sony Mavica series (e.g., MVC-FD87, MVC-FD92)"
Also, it was particularly helpful to see your table of manual contents for IMAGE, which do not refer to resolution as separate from size (also reinforced by the other scanned pages you posted.)
It might, in fact, be the case after all, Nancy -- now that I've seen a bit more here, and online -- that because your camera only uses floppies, and because floppies can only store very limited data, it is in fact true that your camera is AUTOMATICALLY setting image resolution at 72ppi to accommodate the limitations of the storage media. And it looks like, in fact, you can NOT set resolution separately. Hmmm. That's a new one on me. Then again, this is my first intercept with floppies as storage media.
Please don't take my word as definitive proof. I am by no means an expert. But that's what I'm thinking, at this point. That it's just time to grab a new camera, or borrow one. :(
With enough lead time, you can also send your pieces for photography to a friend (pick me! pick me!), or take them to somewhere like Sears or The Picture People, and then scan your results. Be sure to give photo credit in that case, though, to avoid any copyright infringement. If "your" pictures get published, you could get in a heap of trouble, if anyone is watching. I've seen this done before; "GILBERT, a bear by Joe Blow. Photo courtesy of Sears Portrait Studio." And so on.
Cameras are like computers; the minute you buy one it's already outdated.
Sorry to be maybe the bearer of not-great tidings.
Having said that... you CAN use your camera for fabulous web imaging, auction shots, website photos, etc. That's not affected at all by your camera's print limitations.
Hugs,
Posts: 1,153oh thanks Shelli, for your time to search it all out.
I wonder if I bought the memory card attachment and the memory card for the camera, if that would work.
I just cannot spend the money for a new camera. That is not in the stars at this time.
My daughter has several cameras and I know she would be happy to take the pics, but she is 9 months pregnant with 3 other children and I didn't want to bother her with this too.
I will check into the attachment and card, if they still make it.
Thank you so much for the offer to take the pics (that is just like you)...you're a sweetie, but I would never impose.
I will do some checking.
Nanc...........
Back Road BearsWow, Shelli!!
You are just amazing.... it's always fun and interesting to read what you have to share, and in such complete detail, yet in plain english. You have the patience of Job to write all this out, with visuals!! Now I know WHAT stuff is... I've just selected the right settings without knowing what they really were or why or how they effected my photos. Now it makes a whole world of sense!!! Big THANK YOU's from me too!
By the way, not that I've ever needed to do it but, how do you copy the image/window currently on your computer screen like you did? Please, only tell me if it's simple!! If it's 3 clicks and I'm done that's great.. more and, well.... forget it!!
Daphne
It's three clicks and you're done. Well, okay... maybe four clicks. It's called a "screen capture." Meaning that what you're doing is "capturing" what's on your monitor, or "screen," to show someone else, or save for future reference.
1.) Get what you want onto your monitor screen. It must fit within the confines of the visible window. What I mean by that is, if you're on a scrolling web page, you won't be able to "screen capture" the entire scrollable portion; only what shows right in front of you.
2.) Press and hold ctrl>print scr Make sure to depress the control button first, and hold it down while depressing the print screen button. This action takes a snapshot of your current window -- it creates the "screen capture" -- and places it on your clipboard. In other words, it's kinda like the command COPY. Only it's a a monitor "photo", rather than a highlighted or selected item, instead.
3.) Go to any graphics program (Paint, which all Windows PC's come with I believe, or PhotoShop, or whatever) and create a NEW DOCUMENT.
4.) Then edit>paste.
And what you should end up with is a new document, within your graphics program of choice, that contains the screen capture you just "copied" and "pasted" therein.
Let me know if this needs clarifying.
Thank you all, too, for the nice compliments. One of the things I enjoy about TEDDY TALK is the teaching aspect being a Help Advisor allows me to explore. I don't remotely think I own all the answers or am the be all/end all of bearmaking, photography, editing programs, whatever. But I do know SOME useful things, and am one of those co-dependent, mommying types, and a teacher by training -- that's what I studied for my Master's degree. I also have an elementary teaching credential, but never put it to professional use, choosing instead to be home with my sons for the last twelve years. The best, hardest, job ever! And very like teaching, actually. I'm just happy to be able to flex those instructional chops a bit here, and to write, which I also enjoy. And to make new friends in the process, who can also be professional networking for me, and a way to stay in touch with an industry that's become important in my life. And I'm happy it what I contribute benefits someone else as well. That's the gift part, for me.
I learn something here every day myself, so it's not a one-way street. Keep in mind, too, that while I type manifesto-length posts, I played piano for ten years and took two years of typing in high school (why, I can't explain; ask my mom, it was her doing.) End result being, though, that I type at lightning speed; kinda in a stream of consciousness way. So what might look like a two hour post to you I did while watching my kid perform a magic trick in about three minutes. That's not bragging; that's my way of trying to humbly say, don't give me more credit for long explanations than I'm due! I think I have an easier time than most just shooting-the-breeze in typed form.
I help for selfish reasons, too. My bearmaking has definitely improved since participating in forums like this and it can only help to keep eyes and ears open to new techniques. You never know when that "miracle" bit of information, to solve just that one particular niggling problem, will drop in your lap here.
Hugs,
 Baird'sBears
 Shelli, You're Wonderful!!
I had no idea what thoes little buttons on my keyboard were for, and was going mildly insane trying to find out!! :P
I'm saving your photo instructions, as usual. Much clearer than the manuals!
Eileen
 Irenours-bears
YEAR!! Shelli, I tried and it's work. There's are MANY buttons on my computer which i don't now how to use  Thank you for the teaching talent and time
 Kiprie Bears
Shelli, I just want say BIG THANK YOU to you. Oh boy I'm learning new thing
everyday. :D
Nancy, I hope you you manage above and take good pictures ! good luck :D
Hugs/Marie
Posts: 1,153 I have my 'Shelli' folder. I print it off, so I can read and absorb later. I am glad you were an ELEMENTARY teacher Shelli and not a COLLEGE PROF......your way of explaining things is just marvelous.
I know I have mentioned it before and you chose to just ignore me;)...but you should really become an author. With your lightening typing speed and a mind that obviously can keep up with your fingers...you certainly have a talent with giving the reader a visual image from you words....well, you would be a natural.
I am a big, big reader and I would love to have one of your 'books'.
Please just think about it, what a wonderful talent you have been given, plus your education has only improved upon it. What a shame to waste it.
I hope I didn't come off as a mom scolding her young one...but!
Nanc
Baird'sBearsDitto to all Nance says . . . and I think you should be a college prof, Shelli!
Somewhere, there's got to be an art school that teaches 'soft sculpture' or whatever they're calling it now.
Eileen
Back Road BearsShelli - sounds like you have lots of ideas on things to do once the boys leave the nest!:lol:
I was thinking you ought to do online courses... your could start off at Nancy's site doing 'How to edit your photos'; 'How to post an avatar'; 'What all those little buttons with lots of words on your keyboard mean'......... we'd all pay for all this juicy info, ya know!!! Or do these tutorials on your own site and we can download them for a couple of bucks each.... your info is worth thousands, really... in all the time and stress you save us!!!
Now that I know how to do a screen capture I can quickly put your posts in MY "SHELLI" folder (do we all have one of those??:lol:) for future reference!
Anyway, more big THANK YOU's!!
Hugs,
Daphne
 Apple Dumpling Designs
Shelli, I completely agree with what Daphne and others have said. You really should consider putting all your great advice into an easy to find place...whether it be your own website, a book or whatever works for you. I don't have my own Shelli file but I think that's a fantastic idea and will start one soon. How does that make you feel to know we all have a file with your name on it?
Now to figure out your pull, push, pinch, nip, tuck...soft scultping tips I read about somewhere....I think I must be educationally disadvantaged...without pictures it takes me a bit to figure it out...:rolleyes: I do all of that but then let go and well...I'm right back to where I started in about 2.5 seconds. Poor little bear...
I'm gone...gotta migraine coming on...:mad:
 Canna Bear Paint
Nanc, if 1280x960 is the largest format your digital camera can take pictures in, what I'm about to say isn't going to help you very much. But maybe it can help somebody else? IF a digital camera takes large enough images, even if it's only capturing the image at 72 dpi, you should still be able to come up with a reasonable quality image for magazine submissions at 300 dpi. Keep in mind this in not what you should be doing if you're planning on printing out calendar or poster size prints, but for magazine submissions you're talking about something that is going to be printed out a couple of inches wide.
Shelli posted a screenshot above where you can see width, height and resolution listed for the image on the screen. If you have a very large initial image at 72 dpi, here's an experiment you can do. Before doing anything else to the image (no cropping, nothing) FIRST change the resolution to 300 dpi (pixels / inch or whatever your program calls it). Watch what happens to the width and height of the image when you do this! The width and height will decrease as the program takes the pixel information that it has and crams it into a smaller space. There are more pixels per square inch in 300 dpi (dots per inch) than 72 dpi, right? Taking those spread out pixels at 72 dpi and packing them together at 300 dpi means that the image takes up less vertical and horizontal space, making the image smaller in both height and width. Hope this makes sense, but try it and you'll see what I mean. I think you will also find that your image quality is not going to suffer noticeably, even if you're doing this all in a jpg file format, which inherently loses data. Here's the catch though. IF your original image was large enough in height and width to take this process and STILL have at least 3" x 5" or 4" x 6" in height and width, which is the minimum size requirements for a submission, you're still in good shape. All you need to do is crop carefully as needed to get your image to an exact 3" x 5" or 4" x 6" submission size. Anyway, Nanc, I do not think 1280x 960 is large enough to do this, I think you will find your image size squishes to about 3" x 4" when you change 72 dpi to 300 dpi, which is not enough to work with.
Hope this helps!
Kelly
Great point, Kelly; and one I was not going to bring up lest people start tearing out their hair.
I know exactly what you're talking about as I was working with a photo from Louise just yesterday that she sent me at 72dpi and about 17 inches wide, and I did just what you said; changed the resolution to 300dpi. Which gave me a photo at about 4x4 inches, with no visible-to-the-eye loss of quality. I printed it out as a test, and it looks good enough for use on stationery, etc. But I would not enlarge it past those small 4x4ish dimensions.
Again, it comes down to math. Begin with an image that's 1280 pixels wide.
1280 pixels
72 pixels/inch
... Results in image that's 17+ inches wide. And each of those inches will contain 72 pixels (little squares) of digital information.
BUT...
1280 pixels
300 pixels/inch
Results in an image that's 4+ inches wide. And each of those inches will contain 300 pixels (little squares) of digital information.
In short, if you have an enormously huge image (17 x 13 inches for example) shot at 72dpi, you CAN increase the resolution to 300dpi IF YOU ALLOW THE COMPUTER TO RESIZE THE IMAGE TO NEW DIMENSIONS FOR YOU... and you can do so without a major, visible loss of quality. In fact, if you do it JUST THIS WAY, the quality actually seems to improve, because now instead of having only 72 data points per linear inch of your photo, you've got 300 data points. Just what Kelly said.
One additional reminder, though, as you contemplate doing this...
You will run into image quality problems, especially if you plan to print, with this "upsizing of resoluton" concept if -- instead of doing what Kelly mentioned, above -- you begin with an image that's 4x6 inches at 72dpi, and then try to upgrade the resolution to 300 dpi WHILE KEEPING THE DIMENSIONS AT 4x6.
That's because the computer will look at the difference between the 72 known pixels of information per inch you HAVE, and the 300 pixels you are telling it to FILL IN per existing inch, all the while trying to maintain that 4x6inch size you so want. Your computer will be merely guessing about how to to fill each inch of those inches with 300-72 = 228 unknown pixels of information. Usually, this kind of resolution increase (increase resolutoin, force/maintain size) results in a very pixellated image; you can "see" the little squares.
And this becomes even more problematic and confusing because monitors display at 72dpi, so your image will APPEAR just fine onscreen. It's when you go to print it out that the loss of quality becomes so terrifically apparent.
So... in short... As Kelly said... Be sure, if you're going to try to ramp up your photo resolution from 72dpi to 300dpi, that you:
1) Start with a particularly large image (17 x 13 inches, etc.)
2) Change ONLY the resolution (from 72 to 300ppi)
3) Allow the computer to resize the image proportionally, so you keep as much quality, with as little predictive guessing and "filling in" of missing pixels, as possible.
Great, great, great info, Kelly... especially for those who've got a grasp on the initial size/resolution concept and would want to take it the next step. Thanks so much for adding it.
WOW!!!! I've been pretty good staying off the computer... or at most just reading a few posts here and there... Shelli & Kelly I've got to say a big "Thank you" for all of your knowledge sharing... again!!
I had no idea about the "print screen" button either -- that's VERY handy!!:D
Posts: 1,153Kelly, I know exactly what you are saying. I changed my dpi to 300 and it shrank way down. I didn't think, tho to look at what the actual inch size was of the picture, once I crammed all those 300 dots into one inch. I will go back and try it.
Oh...it would be so wonderful if I could get it to work.
I wonder what the lady at the magazine did to my other pictures to make them work? I used my Mavica for those too? My pictures were published smaller than some others but were the same size as others as well. I wondered at the time, why mine were smaller. :rolleyes:
Do I crop first and then change the dpi's or change them first and then crop?
You gals are always thinking!! YEAH!
Nanc........
Canna Bear PaintHi Nanc,
I would always change the dpi first before doing anything else. With the size of images your camera takes, this is going to shrink them down tiny, you won't have much size left to work with at the higher resolution. But that is interesting that the magazine has been able to use pictures from your same camera before, though. Could you email the woman you worked with for your initial submission, and find out what she did with those original submissions that made them acceptable for publication? I think that would be your best bet.
Good luck!
Kelly
 Just Us Bears
After reading and taking a few DAYS to absorb this thread, I have discovered with dismay, that I am in the same situation as Nance, in that my camera will only take pics at 72dpi. But what's confusing me (and hubby...who knows more than I'll EVER know about digital cameras and dpi and ppi and pixels and....) is that upon searching the internet...we are yet to find an ad for a new camera which mentions being able to choose what size pics you take in dpi. Many give pixel size options sizes but not dpi.:/