Banner Sponsors


For artists and collectors sponsored by Intercal...your mohair supplier and Johnna's Mohair Store
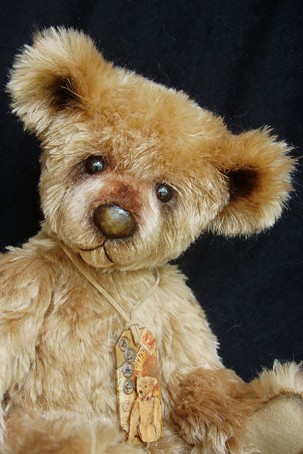
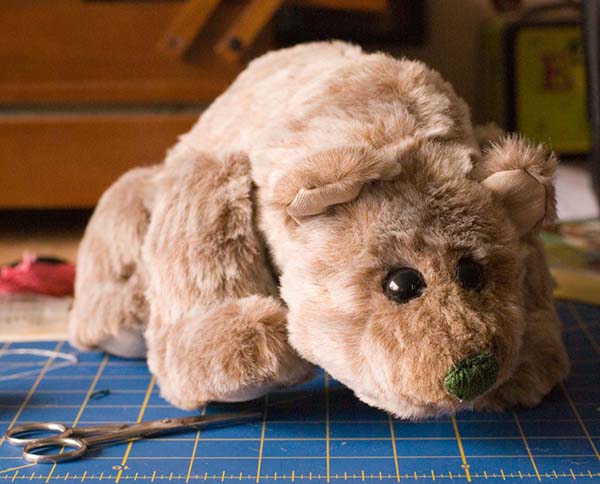 Berkeley is the first bear I've made since signing up on Teddy Talk, or read through Tilberg's 101 Bears to Make. He is based off the Nanuk pattern by Suzanne Parkes, which I picked up through Beary Cheap Bears.
Stuff I did differently, thanks to the TT forums:
-German synthetic fur. Krishna on a clam shell, I never knew what a difference a woven backing can make!
-Finished each limb separately, including the tail and ears, and then tested various positions before finalizing their placement.
-Likewise, I used True Eyes to pick eye placement, and then used an awl to make the holes. Unfortunately, the only eyes I own are all 15mm. Fortunately, by testing placement of the eyes before making my final decision, I could make that choice work.
-Copying the pattern pieces onto cardstock, and tracing the pattern directly onto the fur made a huge difference.
-Trimming down the seam allowance before sewing resulted in much fewer machine gaffs that needed to be corrected by hand afterward.
- SueAnne Holcomb's suggestion regarding the ears definitely helped, although I think I should probably do a more pronounced u-shape next time.
I heartily encourage people to offer suggestions for further refinement of my skills.
 Past Time Bears
Hey, Amul . . . you did a great job!! You were very brave to tackle an all-fours so early in your bear making career . . . bravo!
You did a wonderful job. Great to hear that the advice shared here was so helpful. That's what TT is all about. Thanks for showing your bear to us.
 Little Bear Guy
Great job Amul, it's amazing all the little tips and techniques you pick up from TT. I like the big eyes they really work and I think the ears are great.
keep up the good work and thanks for showing us
hugs
Shane
What a great little guy for a first go! Good job Amul....
 FenBeary Folk
Amul he is lovely :clap:
Oh, praise! The things I do for it 
SueAnn - I've been sewing for nearly half my life (that percentage is frightening to say), so I wasn't particularly worried about the shape. The size is a different story! I've never had to make anything so small. Five mm seam allowances! *shudder*
Thanks to everybody else for your kind words, but I would love some feedback - assuming you can see anything with just one photo.
Amul, by a more pronounced U shape to the ears do you mean to get rid of the sort of pointed stitch areas in a few areas? or is it the overall shape you are talking about? The only thing I can see from the one pic is that the lining of the ears has some little pointed areas every so often. What I do to make the lining and fur joint nice and smooth and not have any "pointy" areas...is to do small stitches...and if you are doing it by machine...lift the foot and turn the fabric a bit with needle down every few stitches in order to make a nice curve as you go around the ear. ... don't just turn the fabric as you stitch or it makes a little zig or zag. Also.. clip the seam allowance close before you turn... pick out the fur that is trapped in the seam..... then.... after you turn the ear...use haemostats or something similar to gently push the seam out nicely so that none of it is left pinched or just not fully pressed out after turning. Be careful not to poke straight through the seam!! Now, pick out any more fur from the right side that may still be trapped inside the seam stitching... give the whole ear some gentle tugs here and there and press it out flat with your fingers to smooth it even more... ....
Other than that.... and a bit more practice to get the stitches smooth and the tension equal on your nose embroidery..... you did a fabulous job... it is great for your first try. Hope this is what you wanted...
Veronica,
Thanks very much for the input!
By over-pronouncing the U-shape seamline of the ears to the head, I hope to create a more pronounced ear pocket, so that the interior of the ear gets somewhat shadowy.
Your input on stitching the ears is something I had not thought of before. I think it may be a question of the effects of scale for me. On a human-sized project, apply an in-motion curve is the best way to go about it.
I'm quite distressed by your suggestion to trim my seams. It's something I do for my larger bears, but this little guy had a 5mm seam allowance - practically microscopic to my mind. I had trouble keeping the stitch even at such an unfamiliar shortness. I don't know how I'd be able to trim the seam any shorter. I did trim the fur inside the seam allowance, but I guess I did not trim it short enough (I'd say I reduced the pile length by half).
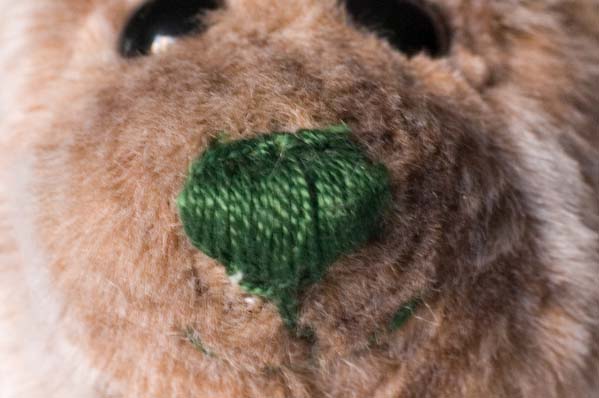
Past Time BearsOkay, Amul . . . I would really like a better look at the nose - most of it is in a shadow. Seems as though the threads are a bit uneven, but the remedy for that is just doing a TON of noses. The old "practice makes perfect"
cliche. And I don't know if the nose color is actually green, but that's how it shows up on my monitor. Is it green?
I would really like a better look at the nose - most of it is in a shadow. Seems as though the threads are a bit uneven, but the remedy for that is just doing a TON of noses. The old "practice makes perfect"
cliche. And I don't know if the nose color is actually green, but that's how it shows up on my monitor. Is it green?
Hrm....my monitor has been recently calibrated, and I can see the shadowed nose detail just fine. I would check your monitor's grayscale range....Here's a randomly discovered grayscale chart: http://www.vub.ac.be/BIBLIO/nieuwenhuys … index.html
At the bottom of the page, you'll see several grayscale charts. Can you see every step in them?
Yes, the nose is green. It was the middle of the night, and the only colors I had were black, green, and pink. I definitely need help with the nose and mouth, as you can see from this photo. The mouth practically disappears under the fur.
I tried making a very complex nose shape (see the sketch), but it didn't turn out at all the way I wanted it to, so I just shrugged and tried to do the best I could. I didn't mention the nose because I figured it was the sort of thing that requires practice to figure out.
One tip I did pick up about noses was to cut a shape guide and attach that, and then satin-stitch over that, to prevent fur from poking out. So at least my noses have improved a little. I really like the idea of the stuffed leather noses mentioned in Tilberg's book, so I think I'll just buy some scrap leather and use that. I tried to do it with microsuede and denim on Berkeley, and it didn't work.
Past Time BearsHmmmmm - I did look at the gray scale charts and found that the last three in the darkest areas (80. 90. & 100%) seemed to look the same. Maybe I do need to adjust my monitor. If you keep working with embroidered noses, you will eventually get accomplished at it. It took me forever. You may like using the leather noses, too, so investigate several different methods and you will find one that suits your style. You might try trimming the muzzle a little more in the mouth area so that the threads show up more.
Past Time BearsAmul, this is what I mean by trimming the muzzle so that the threads still show. This is a very dense mohair and though it looks simple enough, sometimes it takes forever to scissor sculpt . . . taking off enough, but not too much.
Thanks, SueAnn.
Could I possibly get a super-close up of his face?
PS - Greetings from the UK!
 Tami Eveslage Original Teddy Bears
Hey, Amul . . . you did a great job!! You were very brave to tackle an all-fours so early in your bear making career . . . bravo!
I was thinking the same thing! Good work! 
Past Time Bears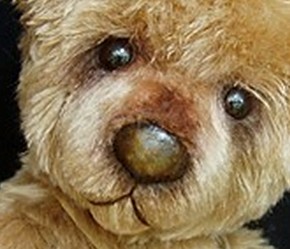 Hope this is what you had in mind, Amul. You're in the UK? Hope you're having a great time!