Banner Sponsors


For artists and collectors sponsored by Intercal...your mohair supplier and Johnna's Mohair Store
 Posts: 3,540
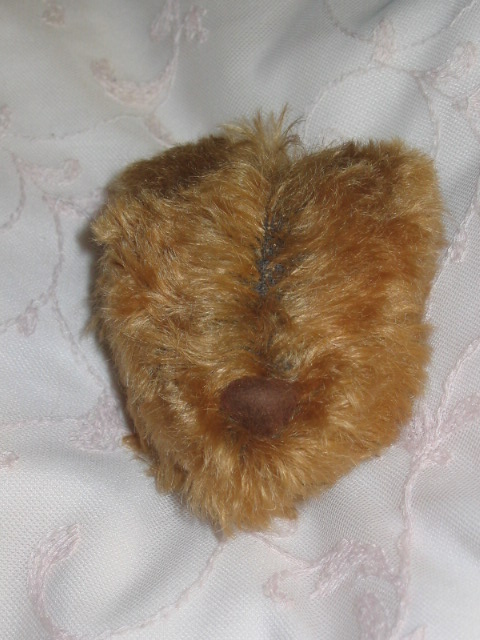
 Okay, I've just managed to make my first centerseam head... (thank you Vkallum for the tips!
  )
)
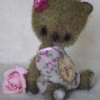
Although I like the overall shape of the head...very appley... I've got a 'bald spot' near the center seam. This was despite my laying the pattern out to match the direction of the fur etc, etc. I've posted a picture (I hope) to show what it looks like.
Is there anything I can do to correct the bald spot?? I know I can wet the fur, come and then use tape. Should I somehow use this technique to comb the fur?? I'm at a loss.
PS...sorry I've only got the nose in for reference right now...
 Flying Fur Studios
You have the right idea! Just wet, comb and tape the hair to where you want it. It's not a bald spot per say, it's just that all the fur is going AWAY from that spot.
Pics when he's done please!
Hi Debbie
You could also remove some of the mohair above the nose and up to the eyes and then airbrush or use the oil paints to add some colour. Have a look on e-bay at Cathy Lynn Forcino's bears. I believe most of her bears are centre seam
Hugs
Gail
I've seen great bears with the mohair deliberately trimmed back from the centre seam to enhance the characteristics of the bear - some of Gregory Gyllenship's work springs to mind.
 Wild Thyme Originals
Debbie... I bet you can correct the lie of the mohair if you want to.... I use hot steam from the tea kettle.... and brush it with a cat brush while I hod it over the steam till it's kinda wet from the condensation... then I tape it into place with scotch tape and let it dry. I don't know if it will eventually revert back to the "old" nap direction or not..... I mostly have used the technique on a few stray locks here and there...
I also think it's GREAT advice to go ahead and make the best of it/try to make it a part of your bears character and personality...
Beary truly yours,
Kim Basta
Wild Thyme Originals
Posts: 3,540:hug: Thank you all for the ideas. I can see I'll just have to play around with this bloke and see who/what comes springing forward. At this point, I'm not sure any amount of combing/taping will keep the fur where I want it.... it looks rather unruly, like its got a mind all its own.  Which means this should be an interesting fellow once he's come to life.
I promise pics when he's finished!
Hi Debbie
You've made one - very appley!
I agree with Paula and Kim - if I'm not too late, I'd hang on in there and wait until his muzzle is trimmed, his eyes are in place and he has ears. The shape's great and you may well find that the centre parting isn't as obvious once everything else is in place - it may just give him a different look, then if you still don't like the way the pile is laying you can "style" it in another direction.
As Heather said it's not really a bald spot it's just the direction of the pile and it should be fixable. When I have a bear with unruly hair, I cut off the stretchy part from the top of a stocking or pop sock - (I'm not sure if that's what you call them?) and then I damp the fur, brush it in the preferred direction, pop the elasticy bit of the stocking around his head to hold it in place and stick him somewhere warm for the night. Because it's stretchy it stays in places well and allows the fur to dry underneath, it usually does the trick.
PS In case you're wondering if I'm wandering around with saggy, wrinkly stockingsv  because they've all had the tops chopped off - it's OK I don't wear them! I buy them to make little bags for steel shot that I put into arms and legs.
 Winneybears and Friends
Clever idea...Winney
 Just Us Bears
You can also use a hair dryer to blowdry it in the right direction.
Another thing...I think in this kind of instance, it would really make a difference to trim the mohair from the seam allowance before stitching, just makes the seamline less obvious if that is what you are after. Having said that, Wanda accentuates her centreseam parts with painting too...and they look fabulous! Let us know how you get on!
DebbieD
I have made very few centre seam bears but here are some things you can try
1. Use a spray bottle with water, spray area, then brush hair in direction you want, dry with hair dryer, (suggest you always test a piece of mohair first- some mohairs can matter if its a cheap mohair) Do this before applying nose wax, paint features.
2. Travel steam cleaner (Rowenta make one) If you want to do the above and be fancy.
3.Before cutting out, place your template onto the right side of the mohair to see exactly how the pile is lying, that is if you are using a clear plastic template. Most quilting shops will sell clear plastic templates.
4. Cut out your head, tack it together, then see what it looks like, if it is horrid, then rather use those pieces for the ears, and start again, as your head is the first thing people are going to see, that is if you have enough mohair for another head piece.
Posts: 3,540:doh: Fredbear...ironically I did lay my clear template on the mohair, just so I could see that fur was going the way I wanted! I think what happened was that when I went to cut it out, the underlying fur, has a section, right next to the seam where I can see the 'tufty' bits did come through the backing. In otherwords, I can see apricot coloured dots (the fur woven in I assume) but they don't fluff through from the backing. ....okay, I don't think that made sense  I think I much prefer your idea of checking it first, then ripping it apart if I don't like the seam after I've made it.
Hayley... I did very carefully trim the seam allowance, as I wanted this to have every chance of being a nice and neat center seam. Actually, I'm very proud of the seam, its nice and tight, and runs evenly....its just that one side of the seam is fluffy and the other side is not as fluffy.
Vicky...I'm so very proud of my first attempt, and I think its all down to your wonderful instructions! :hug: Now its just a matter of finishing him, and seeing what comes to life. I agree, I've had some *oh my!*  occasions with my real fur bears, that turned into a bonus with some camoflaging...or enhancing in some cases.
 Country Bears
PS In case you're wondering if I'm wandering around with saggy, wrinkly stockingsv
Oh Vicky, this made me laugh!! I've got all sorts of tights, stockings, pop socks etc hanging around for the exact same reason, I sometimes wonder what people think when they visit!! 
Country BearsOoooh Debbie, meant to say, I love a bear with a centre seam which is shaded and very noticeable. Have you seen any of Wanda Carson's lovely bears?? She is a member here, they're lovely  Can't wait to see him finished
 Posts: 3,177
If this is any use - always cut the pieces with the pile running downwards on them - there's a lot less chance of a baldie bit that way.
Penny :hug:
Posts: 3,540:hug: Vicky your comment on your socks made me giggle too  This little chappie is pretty tiny, though (roughly 9 or 10 inches) so I don't think a sock will work for him.
  Unless I get disgusted and stuff the whole bear in!
I've been working on his wee little head today, and have reached a point where I'm going to wet a side of his head and reposition the fur. I like character as much as the next person, but the left side of his head looks like a two year old that's woken up from a bad nap! So a little more redirection I think before attaching his second ear. It shall be very interesting to see the little person that emerges.
Thank you one and all for your kind tips! :hug: 
Posts: 8,574if you have scrap you can trim close to the fabric in small clumps and needle felt into the bald spopts.....think hair plugs.....Deb the Dr. Bosley of the Teddie world
 Luxembears
Great tips here! Also, I just want to add..... make sure that you really dig out every bit of mohair in the seams on the wrong side first , then the right side....just my 2 cents! :dance:
Clare,
Thank you for the kind compliment on my bears. So sweet of ya!
Deb,
When I lay out my center seam head pieces, I made sure the gusset pieces have the nap of the fur running away from the center seam toward the outside seam of the gusset. And then to make sure the fur is heading the right way, I use a steam iron and steam the fur combing it away from the center seam. Let it cool and then trim all the seams on the head pieces before stitching them together. And as Judi stated, make sure you comb the hair out of the seam both on the inside and outside.
You should be able to steam the hair to coax it in the right direction even after it is stitched. I have steamed finished heads in the past, but it is easier to do it before stitching. With all the good remedies suggested here, you should have a very nice center seam when finished.
Hugs,
Wanda
 Annapolis, Maryland
Mind if I throw in my 2 cents?
I noticed in the past when I used a center seam (or any major seam, like the front tummy seam) that sometimes the fur just "parted" oddly, looking sort of bald. Very irritating!! 
After unstuffing the piece, I experimented and found that it was caused by THE WAY THE SEAM ALLOWANCE WAS PRESSED INSIDE THE BODY against the stuffing. Does this make sense? When I pressed the seam one way, and stuffed, it was noticeable and bald, then when I reached in past the stuffing and flipped the seam allowance to the other side - like magic - no bald look! The seam practically DISAPPEARS! :dance:
Now as I am stuffing each piece, I experiment with the seam allowance position inside as I am stuffing.
I should note that it really happens with curly or wavy mohair. Not sure if it happens on straight fur.
Am I the only one who has tried this? ( I was too chicken to try to wetting or steaming the fur! I'm braver now. )
Lynne
 Baird'sBears
:dance: WooHoo, Lynne!
No, you're not! I do that too, probably because I fiddled so much with seam-allowance pressing in my quilting days.
I like the curly fur, but it does have a mind of its own, or lack a sense of direction, or something
Turning the whole seam allowance in one direction, or letting each side lie in a different direction, can make all the difference to the way the fur looks on the outside.
I first had trouble with the look of the fur at gusset seams. The fur was clipped short, but since the muzzle was so firmly stuffed, even the short fur was standing up at odd angles. Wetting and combing didn't work on the short pile. I more-or-less destroyed that head, trying to fix it  :doh: , but I did discover that by unstuffing and changing the directions the seam allowances lay, I solved the problem. In this case they both worked best turned left.
The stuffing will hold the seam allowances where you want them, but you could also glue-stick or baste them down.
Eileen
Winneybears and FriendsEileen...I have that " flipped seam " problem all the time..I never saw a remedy on any board and really wondered if I was the only one that had the problem !!! that can drive you nuts.
I dont even bother to unstuff my bear..I just use a hefty needle to enter at one side of the offending seam and sort of flip it over to the other side...works great...altho I was thinking about gluing the seam before hand I did not think that would work because how can I tell how the fur will lay later before its stuffed ?..
Annapolis, MarylandDouble Woo-hoo! It's nice to know I'm not imagining things!! 
Thanks Eileen and Winney!! :hug:
Lynne
Baird'sBears:dance: And double Huzza! These days, I welcome any evidence that I'm sane! Ish.
Great needle idea, Winny!
Eileen
Posts: 3,540:hug: I've done the needle shifting for my seam allowances before with my real fur bears with great success...soooo I decided to try it with this little tyke.....HA, not! He said. So I ripped the stuffing out of his head ( :twisted: ) and redid it, moving the seam around to get the fur to lay the way I wanted....presto! No bald spot Yeah!!!! :hug:
I eagerly put on his ears....and just love the shape of his head Went to put the eyes in, and discovered I don't have any eyes small enough Soooo, he's set aside, eyeballs are on order..and he'll have to wait. I just hate when that happens, but I want his expression to be right... and goo goo big girlie eyes were not it!