Banner Sponsors


For artists and collectors sponsored by Intercal...your mohair supplier and Johnna's Mohair Store
 Just Us Bears
Now that Edinburgh is up and running again, I managed to fing the post Eileen was talking about concerning the double neck joints. I have cut and pasted the conversation between Judi and Eileen(which Judi was going to do when she gets back) below...and it sure spells it out much easier than I thought it would be!:lol:
Judi said.......There are a few ways to do these. This is how I do it: They are made up of three pieces. The middle section when laying out flat looks like a stretched out triangle with TWO ends equally cut off. Those two flat ends are sewn together, creating a cylinder, with one side haveing a pointy end,,,the tip of the triangle.
The two open ends have circular discs of mohair sewn in where a hard board disc will joint one end to the head , the other end to the body. The neck edge that is attached to the body is a bit larger. SIde view of this looks like a wedge.
Eileen replied.....Ok, so I'm picturing the triangle, long side down, shorter equal sides & apex up. When the cutoff points are joined, the circumference at the base of the triangle is going to be shorter than the circumference formed by the two sides, right? So if the base circumference is smaller, would it go on the head side?
In the pictures it looks as if the base circumference goes on the body end, and the circumference of the combined sides goes on the head end, slanting upward to the back.
Judi said.....You've got it. You could also reverse the straight edge and put that at the neck edge.
Thanks, Hayley. This will be of use to many, I'm certain.
 Posts: 8,574
Hayley and Shelli
it is as clear as mud :/:P:/
When Judi says "they are made out of 3 pieces"
is she speaking of fabric?
I feel like I am missing the very begining instructions. can one of you help me get up to speed - or is already spelled out somewhere else?
 I am sorry
 Thanks for any clarifying
dilu
I feel like BOB in the commercial- "somebody help me...."
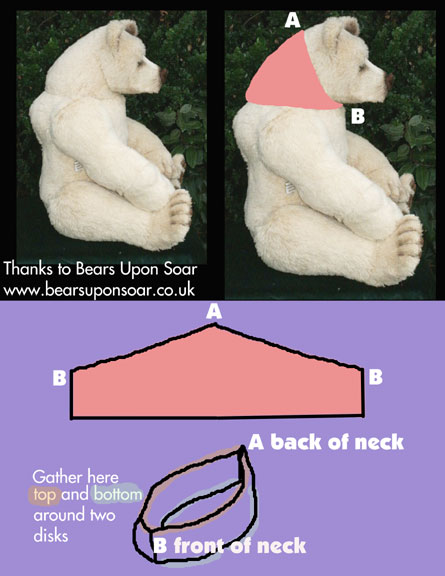 I tried to make a quick and dirty photo of what's been explained about the double jointed neck piece. Although I admit I haven't made one myself, yet.
The picture I'm posting here suggests GATHERING at the top and bottom of the wedge-shaped double joint piece. Judi and Eileen were talking about intead INSERTING A CIRCULAR PIECE OF MOHAIR at top and bottom of the double jointed piece. Either way would probably work, although it seems, intuitively, that inserting circles woud produce a better result.
Does this help anyone visualize things at all?
Please do advise about the "best" way to do this, in your estimation, esp. if my picture is misleading.
PS I Googled "double jointed bear neck pattern" and came up with this little darling. This artist has many more similar, realistic, and very inspirational bears on her website. Do check it out if you're interested; I don't know her at all but want to give credit to her photography for inspiring my diagram!
Thanks!
 Past Time Bears
The only thing I know about the difference between gathering and inserting a circular piece is that gathering supposedly produces a "snowman" effect. As I have only tried the circle piece technique, I can't say for sure if that is the case. Very nice graphic, Shelli!
 Doodlebears
I have made quite a few double neck jointed bears and would definitely recommend to insert circles of mohair and not to gather. I also have found that inserting a circle into the head and pushing the joint though give a much better finish. I also trim the mohair pile down on the circles to allow fairly tight jointing. I know Lisa from Bears Upon Soar and she makes the most wonderful polar bears. They look good on her website but to see them in the fur is even better.
Jane
Posts: 8,574Thank you thank you thank you!!! :D
Shelli your graphics made it all clear. I love it.
Question; couldn't we steam shrink instead of gathering? If need be?
Do a running stitch around. gently pull it up while steaming? It would decrease the bulk and then after it sets, trim the mohair as suggested?
I can hardly wait to try this...
thanks you guys
Dilu
Yeah, with more thought, I think the gathering idea is a bad one. Do insert circles at both ends of the "wedge" piece. Keep the triangle point at top, back.
Jane, I'm delighted that you know the artist at Bears Upon Soar. I was searching for double jointed bears to use as a starting point (I think I Googled just that; "double jointed bear neck pattern") and came upon Lisa's (?) work, which perfectly illustrated the point I was hoping to make. You can barely discern the piece itself because she works with dense and beautiful, but relatively short, pile. Her bears are spectacular!
I didn't ask her if it was okay to post her pictures here but I figured that, with credit given and a website reference included, it could only be a good thing for her business! Her work is spectacular!
Hey, for all you double jointed neck experienced ladies, I have a question too.
Obviously, in looking at the photo above, the head pieces (side heads and gusset) are somewhat "shortened" and the "bottom" of them is more at an angle, where it meets with the neck wedge piece.
Usually, when I close a head, I use a running stitch and doubled thread, gathering around my cotter pin and disk to close.
Do you close this kind of "shortened", angeled head in the same way???
Thanks!:)
 bears by beesley TM
Shelli, I do not pretend to be experienced with double jointed necks but the diagram is pretty much what we did for Nanug. What we did however was add a disk of mohair at the back of the head and left it half open for stuffing. once the head was stuffed we hand sewed the disk closed and attached it to the double jointed neck which also had circle disks on bothe ends. Do I make any sense?
Let me know and I will try to be clearer.
Hugs Louise
Posts: 8,574I M MOVING THIS TO THE TOP BECAUSE oops caps lock-I hate
that key- Because Shelli's question didn't get answered and I am hoping some one will know the answer
dilu
Past Time BearsHmmm . . . I'm not sure I can answer Shelli's question since I've only done the double jointed technique on one bear (an all fours). The gusset and side head pattern pieces on an "all fours" or "realistic" bear typically are a little shorter than on a regular teddy bear whether using two joints or just one. If I remember correctly, somewhere hidden on this board is a picture that Judi posted of one of her teddies using the double joint. If we can find it :o, maybe it will give us a hint. So . . . guess I really don't know the answer! 
 Canna Bear Paint
I seem to do an awful lot of double jointed necks, so here's my $0.02. Yes, the 'neck' portion of your head piece will need to be shorter if you are adding a double-jointed neck. If you think about it, your regular head pattern piece (for a non-double jointed bear) already has a neck. If you take it as is and add the wedge for a double-jointed neck... you will wind up with a bear who closely resembles a giraffe as he will have the length of two necks. Remove the neck from your head piece, your neck is the wedge.
BTW, SueAnn is correct above avoiding gathering, you would get more of a rounded snowman effect at your joints. Use the circles instead. That is not JUST for the neck wedge though. For the smoothest join, the top of your body and the bottom of your head also need circles that are the exact size of the circle in the side of the wedge you are attaching it to. So the bottom of the head needs to have an exact size match to the top of the wedge. The body needs to have an exact match to the bottom of the wedge. Measure, measure, measure. What fun! Only other thing I can think to add is that the circles do not need to be mohair (hey, mohair is expensive and you have to worry about cutting it back and so on and so forth). I use ultrasuede, it is tough enough to do the job and maintain its shape, while smooth enough to help the joints move freely. Do not do the mistake I once did of using wool felt for the circles, we're not even going to discuss how much it distorted and pulled apart when the neck piece got stuffed. Oh, the pain.
Hope this helps!
Kelly
Just Us BearsThanks for clarifying that Kelly! I have only done the one...and that is the bear I'm almost finished. I made the head shorter and cit it on an angle like the picture of Lisa's bear. Dilu, there's no shame in not understanding what I wrote at first. I'll let you in on a little secret. Whe I first wrote out that post...it was followed by a 'I don't get it!" from yours truly. But as I was typeing out my question...it suddenly clicked. I was going to post a pic for you but Shelli did so a showed it far better than I could have.
Something else to remember when doing a double neck joint, it that you have to plan where your final neck closure will be...'cos you can't just sew all the pieces of the neck together without knowing...or you'll be left with no opening to tighten your joints. Do you understand what I mean?
 Baird'sBears
Great diagram, Shelli  , Great instructions, Kelly
I hope Judi doesn't mind, but I'm posting one of the pictures she sent to the Edinburgh thread.
For my poor problem Bear, I used linen-lined leather circles for both sides of the disk, the top of the body and the bottom of the head. They moved really well, but I'd made so many small trial/error changes to the pattern as I went along that by the time I was ready to join the pieces, they no longer fit!. Duh. It's fixed now, thanks to Judi. )
So Kelly's right--MEASURE as if your life depended on--and make sure you're measuring at the sewing line, not at the cut edge!
Eileen
Baird'sBearsSorry, folks :(
I can't seem to figure out how to upload the photo from my computer!
HEEEeeeelp, Judi!
Eileen
Sorry, folks :(
I can't seem to figure out how to upload the photo from my computer!
HEEEeeeelp, Judi!
Eileen
Please read this:
Baird'sBears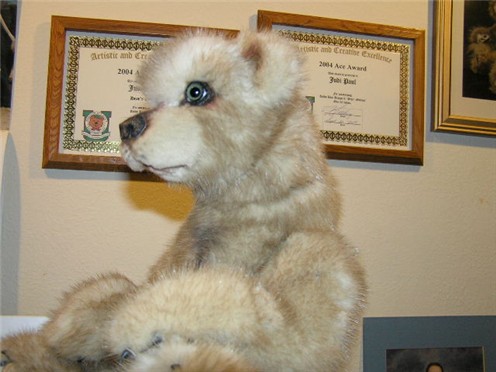 Trying again
Baird'sBearsAhhh. There's Judi's beautiful neck. Thanks, Intercal!
 Bumpkin Bears
Ok, I'm sat here with my new double neck pattern in front of me and trying to work out if it's right and how I'm going to join it all together :/
Do I use cotter pins for the jointing as I normally would for a single head/neck? Do I just mark the centre of the circles of fabric in order to know where to place the joints? I'm worried about them moving or not being tight enough.
As for eye placement do I do that once the entire head and neck is finished or when just the first head portion is finished?
Sorry if I'm asking obvious questions but this is my first double jointed neck bear!
Thanks everyone,
Catherine
Canna Bear PaintHi Catherine! You can do the joints with whatever you prefer, cotterpins or bolts. For smaller bears like this one at 8 1/2", he's jointed entirely with T-pin cotterpins:

The big bear in my avatar is 20" and is jointed entirely with bolts. Either way, I insert the cotterpins or bolts from inside the neck wedge with their ends sticking out (this is why it's important to use T-pins if the bear is small, so the ends of regular cotterpins don't rub against each other and interfere). With the pins inserted that way, sticking out both sides of the wedge, you'll be turning the end of one cotterpin inside the head and the other inside the body. Hope that makes sense!
Regarding the fabric circles on the sides of the wedge, you will definitely want to mark (or initially poke a hole through with your awl) where the centers are. Easiest way to do this is to use the size hardboard disc you'll be using, size your fabric circle to this and poke a hole through the center with the awl while you're at it.
As far as finishing the head goes, I joint everything together first with everything unstuffed. The head goes on the neck wedge, the neck wedge goes on the body, and all the limbs go on the body. Once it's all in one piece, I start stuffing things in any particular order. As soon as the head's stuffed, the eyes and everything go on, but sometimes that's pretty late in the game.
Hope this helps and best of luck with your new bear!
Kelly
Past Time BearsPLEASE don't feel bad about asking questions!! All of us are here to help if we can and learn from others at the same time!! We ALL need questions answered at one time or another, so just join in with the rest of us to give suggestions and to receive information. When I made my first and only (so far) double jointed neck, I set the eyes before finishing the neck as I would a regular jointed head. I always finish the head entirely before I start jointing. Also, I used the nut/bolt method of jointing . . . it's just always been easier for me . . . and yes, mark the center of the circles for the joint placement. Again, ask questions . . . it's a great way to get informed!!
Bumpkin BearsHi Kelly and Sue Ann - thanks for your help. It is beginning to make sense the more I think about it and read everything here. The only thing I'm not so sure about is now jointing the neck wedge to the head. I understand that you turn the joint down inside the head, but not sure how to do this, just opposite of what we do for single joint necks. ... I guess I just have the loose circle that will go into the head and attach the joint onto that, turn it down and then sew the circle onto the head to seal it up? Oh if only we all lived close and could just show each other what we mean over a cup of tea! Kelly your polar bear is soooo amazing.
Catherine
Past Time BearsYes, Kelly, that polar bear is a very wonderful work of art!! He's gorgeous! I agree, Catherine . . . it is MUCH easier to understand when we can see it done in person . . . maybe some day!
Canna Bear PaintSorry for taking a little while to respond, we're getting ready for our next show and it's hectic, of course The way I do the double joints (fastening the ends inside the head and body) does mean that I leave an opening in the head for stuffing and turning the ends of the cotterpin. I usually try to leave the opening under the jaw. However, it occurs to me that there's no reason you couldn't face the cotterpins / bolts any direction that you wanted to, so long as you have enough room in your neck wedge to do so. I learned to do double jointed necks on the little polar bear pictured above, and there's no way I could have turned cotterpins inside the neck itself, there's just no room. Now that I'm used to doing things that way, it's just a habit to keep doing it the same way. But Sue Ann is correct, you certainly could finish the head like you normally would on a regular bear with your cotterpin sticking out the base, then turn the cotterpin inside the neck wedge. As long as there's room to do it, go with whatever way you are comfortable with! I know my way of doing things isn't the only way, and it probably isn't the best way either, but it does work for me... so hopefully I've given you some ideas to find what works for you
Bear hugs,
Kelly