Banner Sponsors


For artists and collectors sponsored by Intercal...your mohair supplier and Johnna's Mohair Store
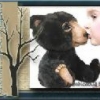
 The kids and teddy too
Ok either I am extremly stupid or this program is just to hard for me. !!!! Tami Lahey has helped me so much trying to answer some of my questions and I have figured out most of what I needed to for what I am trying to do but this one thing I just can't seem to figure out. It is probably something very easy. :doh:
What I am trying to do is erase around a bear and put it on another page and make a grouping. Sounds easy enough right????
Well I did erase all around the bear but when I go to put it onto another page or layer I can't seem to get it from one page to the other. Am I making sense?
If there is anyone out there that can help I would really appreciate it..
Big Hugs,
Bonnie
 Dances With Teddy Bears
Bonnie, I'm afraid I'm clueless. But I do know you're not stupid, the program is hard. Photo Shop's "help" is almost useless with their halfway answers.
I'd also love to know how to do what you want to do. I hope someone is in the know regarding Photo Shop.
There's so much we could accomplish using it, if only Photo Shop would explain things better. They do it on purpose to make us crazy! It's making me crazy!!!
I'm off my soap box now. 
Bonnie, once you have bear all trimmed the way you want you can simply click on "Cut" then go to your other page and click "paste". You can then adjust the size to what you want. That is how I put the ornaments on the teddy talk tree. I am using Photoshop elements. I hope that helps.
 Pa
PaI got photoshop elements 6 for christmas, and believe me I am not good on the computer at all but, I purchased the keyko training dvds and they are excellent!!!!!!I got them on ebay for around $30.00 in a buy it now auction right after Christmas and they had alot of themfor sale. They give you step by step direction and I really mean STEP by STEP, it actually shows the photoshop screen and where you put the mouse, it even makes a click noise when you're suposed to click the mouse. I strongly reccomend the keyko dvds, they are well worth the money! I'm sorry I can't answer your actual question but I hope this helps!
Kathleen
 Pennsylvania
What version of Photoshop do you use?
Photoshop Elements? Photoshop CS?
There are several.
What, exactly do you want to do? Just cut a Bear out of his background? That's not too difficult to do.
Send me the picture. I'll work it up for you then I'll send back the result in the form of a Photoshop file. This way you can see how its done rather than just having somebody blindly explaining it to you.
What's the old proverb? "Give a man a fish... ??" 
 Bramblewood Bears
Bonnie,
I don't know if I can be much help either....I use photoshop elements and when I am changing a background, the way I do it is to use the magic select lasso button and select my subject with the lasso ( you have to carefully outline the entire subject). Once you come around to where you started click on the starting box and it will then select the whole subject you just outlined. You can then copy and paste it to your new prepared layer. You can then go to layers and group them together.
There may be a better way to achieve what you are trying to do, but this is how I do it......
Once you have it on your new background, you can select the 'soft edges' from the layer options to make the edges less sharp.
Hope this helps in some way. :hug:
Hugs,
Tomi
The kids and teddy tooThanks so much to all of you for your support. I will be doing some experimenting to see what I can come up with.
Big Hugs,
Bonnie
 Doodlebears
Hi Bonnie, here is a very simple way of getting what you are looking for.
Get your original picture and with the paintbrush, use white to go around the object.
This is how it will look. I have only cut roughly to show you what I am talking about.
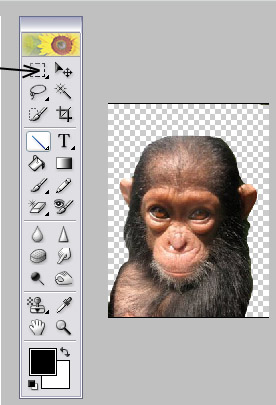
Click with the Magic eraser on the white background, this will leave a chequered pattern.
Now use the tool called the rectangular marquee tool. The arrow in the above picture indicates the right tool. With the tool click and hold down the mouse button at the top left hand corner and drag across the picture to the bottom right hand corner, release the mouse button. You should now have a dotted line all around the picture. Move your mouse up to the top bar and find Edit. drop down the menu and click on copy. Open up your chose background picture and once again click and hold down the mouse button at the top left hand corner and drag across the picture to the bottom right hand corner, release the mouse button. This will drop your cut out picture on to your new background picture.
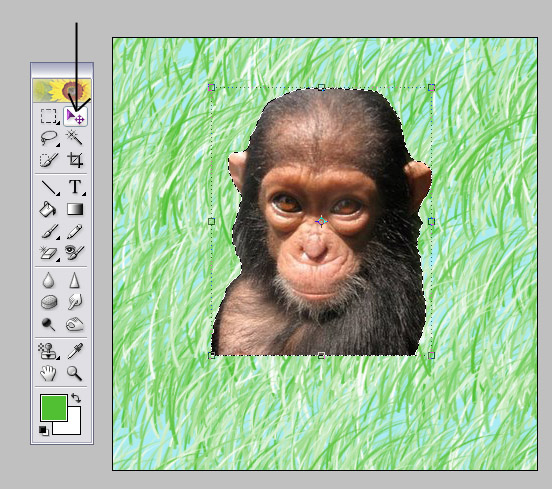
Use the Move tool as indicated with the arrow and move the cut out picture to your desired position, then go up to the top bar and click on Layer drop down the menu and click on Flatten Image. You have now finished placing your cut out picture onto your new background.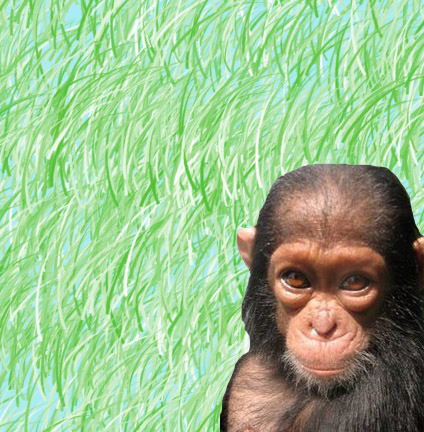
I hope this helps.
Hugs, Jane.
 Bumpkin Bears
Hi Bonnie, I'm not sure which photoshop version you are using. I've got CS3 and I find the Magic Eraser Tool works wonders for removing a bear from it's background.
If you go to the left panel with all the tools and click on the icon that looks like a square eraser, there should be other options - one of which is the Magic Eraser tool. If you click this on the background that you want to remove it should remove it all in one go leaving a transparent background! I was so excited the first time I used this! You can then copy the bear and paste it into your new image. I hope this helps. Hugs, Catherine xx
 Tami Eveslage Original Teddy Bears
Thank you for this!!!! I took a photoshop class (two intense full days) and I learned so much, but I didn't have time to practice any of it so it was lost. It can make one feel stupid. I find myself opening a picture and just staring at the menu bars, knowing what I want to do and recalling that it was covered in the class, but having no idea how to go about it! We got a book with the class, but it is not so helpful since it's in techie language. For example, I can't just look up "how to cut an image out of one page and place it in another" The book says things like "how to create a smart object" The only thing I want to make smart is ME!
Anyway, thanks to your tutorial Jane, I have successfully cut my bear out and placed him on a new background! :dance: But he is too big and since he is cut out, I cannot find corners to "squish him down" (definitely not techie language!) Any suggestions?
 Dolls N Dreams
Thanks for all the great tips Girls....I have been trying to help Bonnie and I just dont' know that much about it myself. I have taught myself the erase background part and paste bears!! LOL :clap: :clap: :hug: :hug:
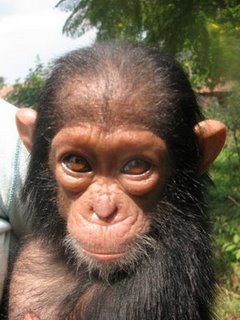
PennsylvaniaThe best way to cut an object out of its background is to use a "layer mask".
A layer mask is like a stencil that selectively blocks out part of the image. It leaves the original image untouched. It only hides the masked parts of the image.
When you use a layer mask there is a second, hidden, layer attached to your image. It can be black, white or gray. Where the mask is black, your picture will be transparent. Where the mask is white, the image will be opaque. Where the mask is grey, it will be partially transparent, in proportion to how dark it is.
Two things that make layer masks so great:
1) You can change them. If you erase parts of your image, you won't ever be able to get it back if you change your mind or make a mistake. The only thing you can do is reload the original picture and start over. With a layer mask, you can tweak and fiddle with the image until you get it just the way you want.
2) Layer masks can show more detail, pixel by pixel if necessary. And because they have the ability to make a pixel partially transparent, you can fade your object into its new background and avoid that "cut out with scissors" effect that you see in many Phtoshopped images.
Here is an example of a layer masked cutout:
(I placed the monkey onto a plain cyan blue background so that you can see the detail better.)
Notice how you can see the monkey's hair fade off into the background? If you put him into a "real" background you would have a harder time telling where the cutout lines are because of this fade.
I only did this picture quickly. It probably needs a little more work to make it look REALLY good. But the nice thing is that, with layer masks, I can fix it easily.
One drawback: Photoshop Elements does not have the layer mask controls that the professional version (Photoshop CS4) has. You don't have the ability to create layer masks in Photoshop Elements. However, if somebody else makes a Photoshop file with the professional version of the program, you CAN load it in and work on it. PS-Elements can use layer masks. You just can't CREATE them.
That leads us to a trick... :whistle:
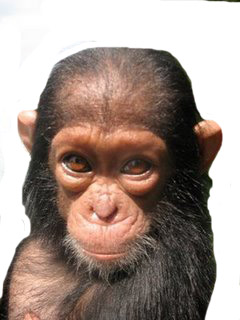
If you have a file made with a layer mask already built in, you can erase all the information in the file and put in your own picture then layer mask it the way you want.
If you click here >> CLICK HERE << you will be able to download the Photoshop CS4 version of the picture I made. If you load it into PS-Elements, you will be able to erase the monkey and insert your own picture. Then you can clear the layer mask and make it over again to suit your picture.
The best way to learn Photoshop is to just play with it.  Get some pictures and mess around with them until you start getting the hang of it.
Go ahead and take the monkey picture and fiddle with it. Don't worry if you produce a polished image. Just play. Be creative. See what you can come up with.
And have fun!
That's the best way to learn Photoshop! 
The kids and teddy tooWell I am just overwhelmed with all of the help from everyone. :clap: It is very hard for me to ask for help but when I was close to tears yesterday I thought ok lets see what I can find out on TT.
Jane thanks so much for the great tutorial. And Randy for the great common sense way to explain it all. I am wanting to take some time to just play and see what I can do. It has always been hard for me to grasp the technical stuff.  I am hoping to be able to do some of this so I don't have to pay someone else to do it.
  I will be printing out all of this for reference.
Better go for now and get some housework done. One thing I can do. :crackup:
Thank you , thank you, thank you one an all !!!!
Hugs
Bonnie
Tami Eveslage Original Teddy BearsBonnie, once you have bear all trimmed the way you want you can simply click on "Cut" then go to your other page and click "paste". You can then adjust the size to what you want. That is how I put the ornaments on the teddy talk tree. I am using Photoshop elements. I hope that helps.
But then HOW do you adjust the size?
 Sudey Babes
I don't know about everyone else but I feel as if I am in Photoshop 101...and LOVING the information!
I've used a different graphics program for years and recently the disc shattered, so I have used Photoshop as a back-up and felt the same..."wandering in a foreign country" aura when I open the program.
This has been a GREAT help...THANK-YOU!
~Sudey
Tami, I use Elements 4 but this may be helpful. Here is my way of resizing after pasting one photo onto another background. I find that if I forget to click that arrow in the left corner of the menu ( Step 1) and make sure I click on the bear layer I can't get the resizing box. I'm sure there are many other ways to do this
I hope this helps. Sorry it's so blurry
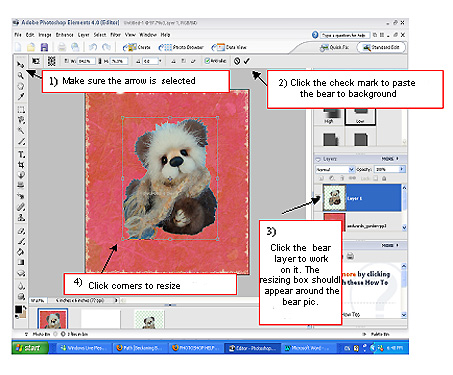
Resizing is very easy:
click on IMAGE (upper left corner) > IMAGE SIZE.... and choose which size you wanna have at the pixel dimensions (either by percent or pixels).
Make sure that the CONSTRAIN PROPORTIONS are activated!!
DoodlebearsThanks Thea, that is exactley right.
Tami once you have resized your picture this way just follow from the instructions above the fourth picture in my above tutorial. You will now have the right size picture on your desired background. Good luck!
Hugs, Jane. 
Tami Eveslage Original Teddy Bears Thanks Jane, Thea Milly and Tammy! I was actually looking for a way to tweak tha size one it was in the new image like Tammy showed. I needed to get the bear layer to see the sizing box like she said.
I'm relocating/rebuilding my website and I have made this cute Site Under Construction place holder with all of your help and with some of the graphics Penny made for me. (My other site is up until March, but I have had to get a new domain.)
Thanks so much! Now I just need to figure out how to make a banner link for my blog to go on Paula's blog list.
http://www.teddy-talk.com/viewtopic.php?id=28660
Anyone up for creating a banner ad tutorial? 
PennsylvaniaIt is probably better to resize an image using the Image>Image Size box rather than trying to transform it.
1) You can get pixel-accurate results. If you want an image that is exactly 100 X 100 pixels, type that into the Image Size dialog and that's what you'll get. No guesswork. If you transform the image you don't know exactly what you'll get.
2) The Image Size dialog actually RESAMPLES the image rather than just scaling it. This is important.
If you simply scale an image, the computer just multiplies or divides the image by some factor to get the new size. It doesn't care whether it makes the picture blocky or blurry. The scale tool just does your bidding and calls it a day. But, if you use the Image Size box, the computer actually recalculates the image, pixel by pixel to get the result. It will usually look a lot better.
3) Like Thea-MillyMe said. If you use the Image Size box you can constrain proportions to keep the height/width aspect ratio of the image the same.
If you use the resize transform tool you can very easily drag the image out of shape. You can hold down the shift key to constrain the image as you drag but, if you forget, you could spend a lot of time fussing around to get it back the way it is supposed to be.
For intenet use, all images should have 72 DPI resolution. (Dots per inch.)
I don't care what anybody tells you, it is useless to make images any larger than 72 DPI. If you make an image at a higher resolution, all you will accomplish is to make the picture take longer to download. You will not improve the apparent picture quality very much, if at all.
Anyone up for creating a banner ad tutorial? :D
If you need banner ads, send me a message.
Just a little while back I made some banners for Pipkins Bears.
See the topic here: http://teddy-talk.com/viewtopic.php?id=27688
At that time I was making web graphics in my spare time at work but now I have a good computer at home with all the software necessary to do the job. I am now free to work without worrying about who is looking over my shoulder and asking what I am doing.
If you need web graphics send me a message. I'm sure we can work something out.
Tami Eveslage Original Teddy BearsThank you for the offers Jane and Jenny! And thanks to everyone for all the information . I have figured out how to make my own banner! Teddy Talkers ROCK!!! Wish I had more time to hang out here these days!