Banner Sponsors


For artists and collectors sponsored by Intercal...your mohair supplier and Johnna's Mohair Store

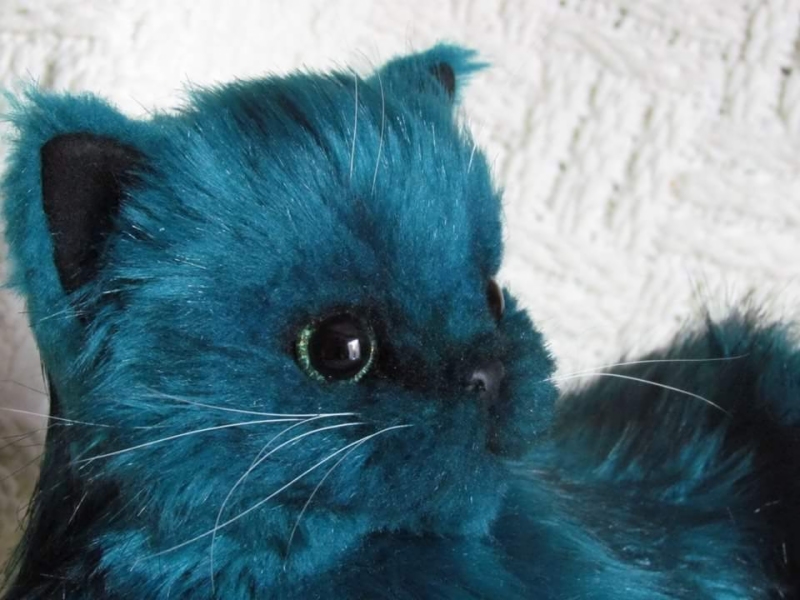
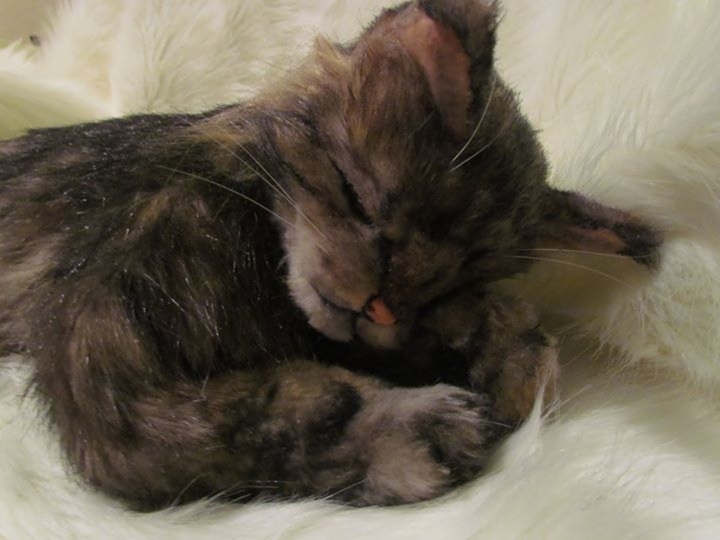
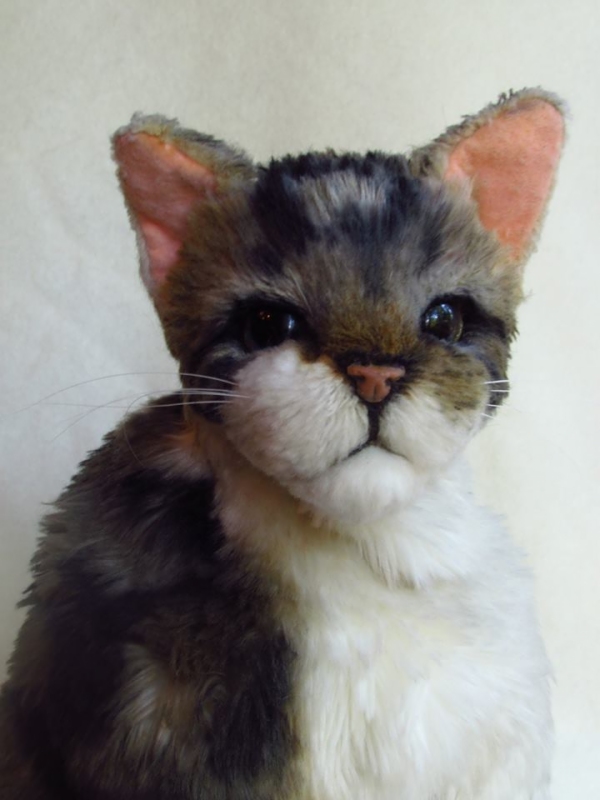
Hey PlushPuppy! I forgot to mention that, although the shading is very important, I think the biggest reason the eyes are natural is that I put an extra piece of fabric over the forehead and nose and around the top of the eye to make eyelids. Cats have very not round eye shapes, so without eyelids, the eyes look bizarre. I use a slightly larger size eye than other artists I think, at least for the same size head.
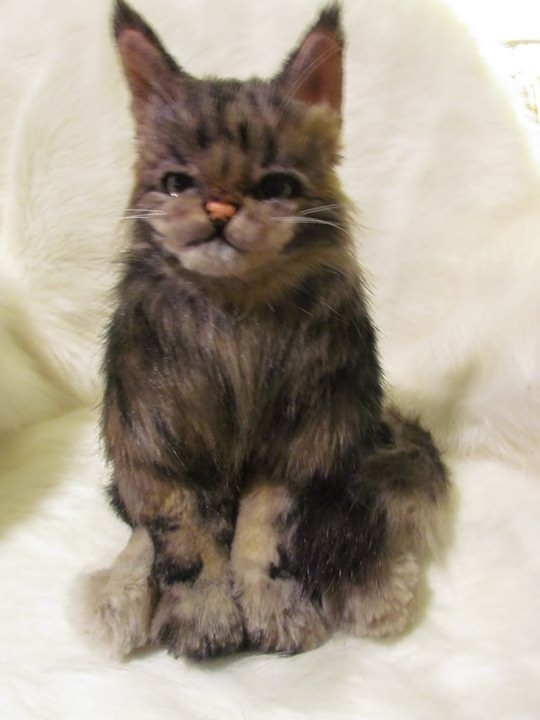
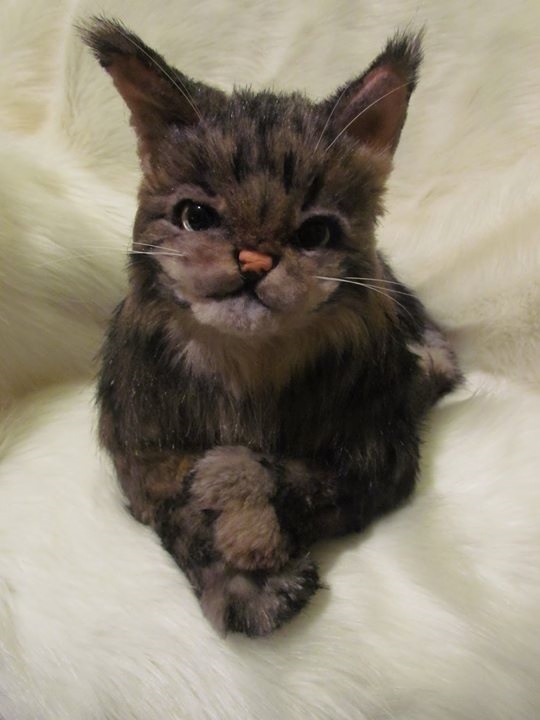
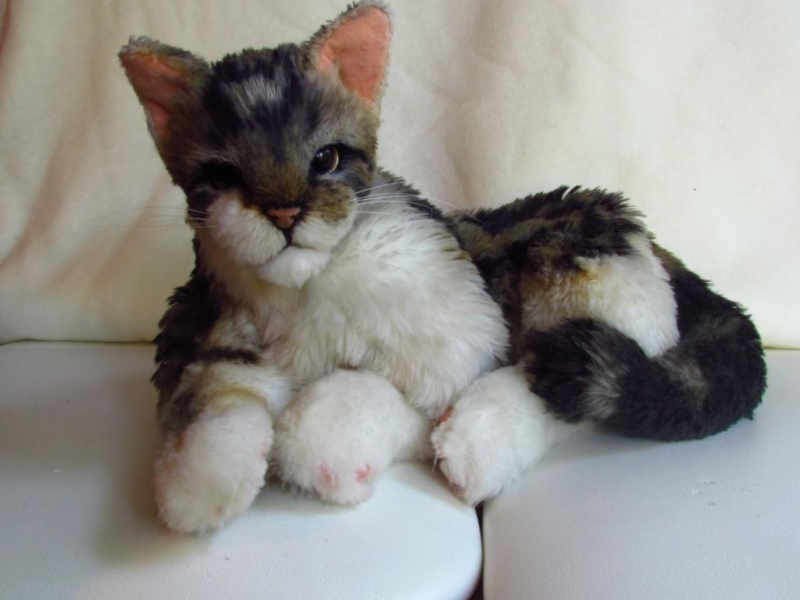
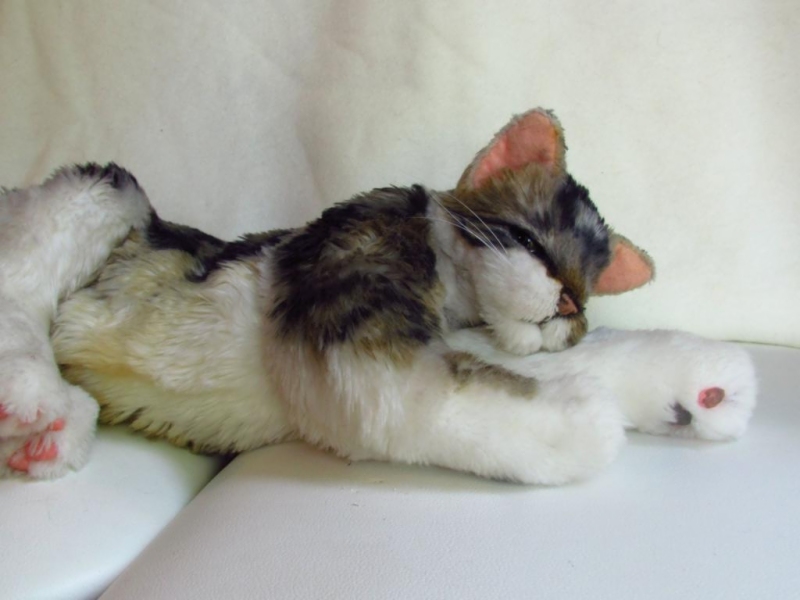
This is my second version of a very dear kitten. It's an all new original pattern and color technique (new to me). I think he turned out just so much more realistic and loveable!


Hi PlushPuppy! I love seeing you on TT, it's so fun that we started trying to figure all of this out at the same time! Thank you so much!
With the shading, I use permanent marker. I try to mix many colors to give it more dimension. On this one I used a couple of shades of blue, a green, and black. I literally just color on the fur like I would use a marker on paper, I find I get more control that way. Sometimes if I get it too dark or the wrong color in the wrong place, I use rubbing alcohol to even it out or blend it, but it does remove some of the color. Also, I like to use all kinds of colors, even if a color is lighter than the fur, it can make a big difference. I use Bic MarkIts because there are a bunch of colors and they're inexpensive, but their selection of browns is a little disappointing.
I also tried using acrylic paint airbrush, but that was a disaster because it stuck to the hairs like...mascara. The particles are just too big. You can use an airbrush marker system like copic, but I think it's easier just to just use the marker tip.
Oh! Don't forget to get the under fur when you color. It's hard to get it right, especially with stripes and spots, but otherwise it doesn't look as stark.
Thank you so much! I use real cat whiskers! The shed just like hair, so it isn't painful, and my mom and aunt and sister collect them for me too!
I use permanent marker or art markers across a copic paint trigger with a compressor.
I did manage to find a silicone that stays soft when it's dry, but, once I added acrylic paint to it, it changed texture completely and went all crumbly and never quite dry, so back to the drawing board!
Caroline,
This happened to me too! I kind of just kept mixing until the crumbled turned more creamy, also, it changes the intensity of the color you mix. You may want to try using Less paint? If it didn't dry, that seems like more of a problem. Usually the paint mix dries faster than silicone alone. But I did buy a bottle of silicone 1 once and it never dries. Had to get silicone 2.
Does the glue hold the silicon on for ever? I would be afraid that it will come off down the road.
I don't know if the glue will hold. I've only been making for about a year and a half, so I haven't had the chance to time test it. I wouldn't give or sell for children until I knew the longevity was at lest a few years. There are other problems than choking if the glue doesn't hold though, mostly, because the texture of the fabric changes with super glue, it'll be hard to reglue. I thought about other ways of affixing, but sewing will really just pull through the silicone.
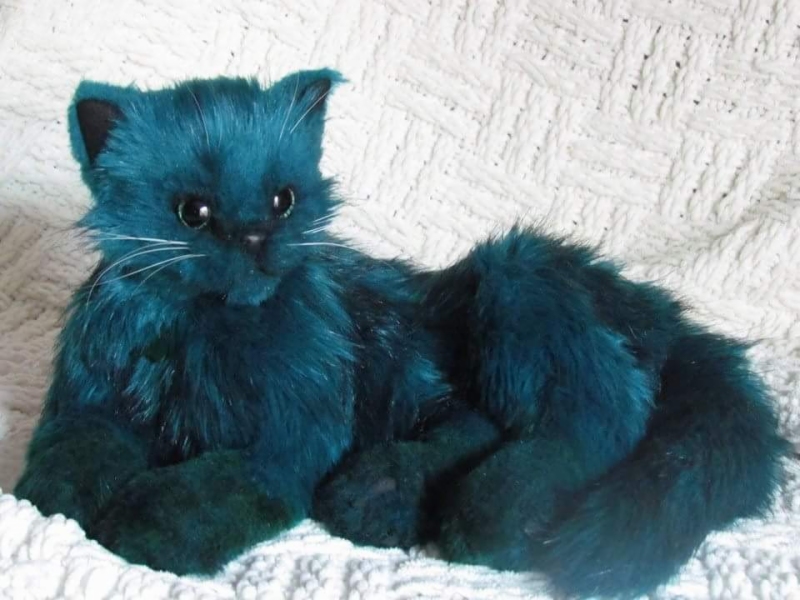
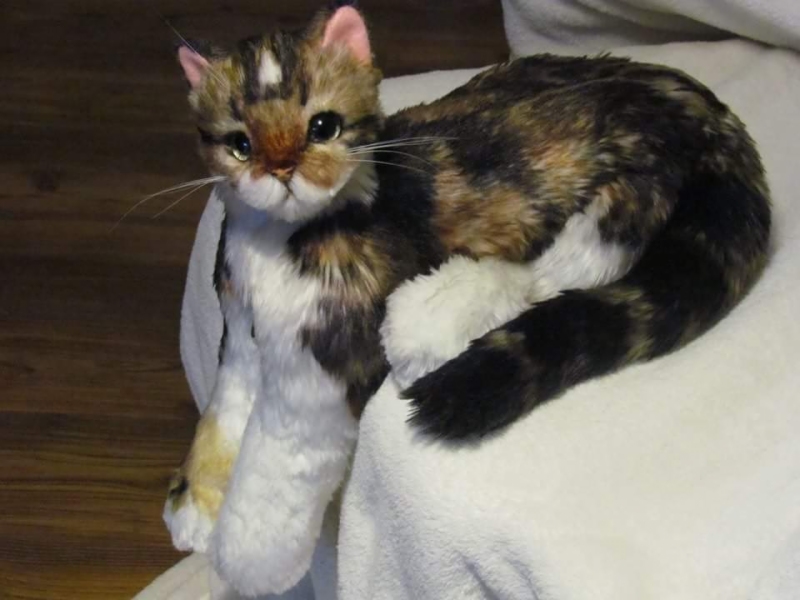
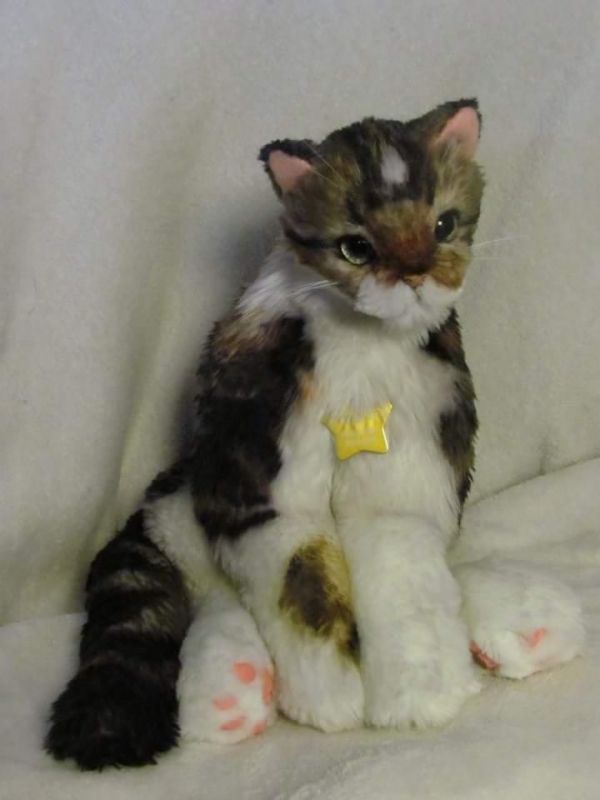
This is Thorin.
Thorin is made from a unique pattern, with hand dyed, synthetic fur, glass eyes, silicone nose and paws, and real cat whiskers.
My designs are about remembering my very best friends, so I take care to make them extra cuddly, floppy, and flexible. I try to find in the fabric those little quirks, the sidelong glances, the eye hugs, and the tail flicks.

I LOVE the new TT layout, thank you so much! It is so awesome to have a mobile friendly site. I know I'm in the minority, but even my real computing device has a touch screen. This design is beautiful and simple and has done away with a lot of clutter.
I do miss seeing the view counts and other post information for my own posts.
Thank you so much! Great work
Hi Judi, love your airbrush work! I have been airbrushing cats lately and I'm having trouble with blacks fading to gray. I love the forgiveness airbrushing allows and how you can just start going at it! I started using plain black acrylic paints but they faded after just a couple days. Then I used a brown base under the black, that helped but wasn't permanent. I tried adding India ink on top, and that has been more successful, but not totally permanent.
I know in other posts you talk about very thin layers, how do you keep the spray light when doing such detailed work?
I pretty much always use cotter pin joints in the neck. I like that they are posable and can tilt slightly...but occasionally I use locline too...though it is fun to pose up and down and tilts very nicely I sometimes prefer fact that with a cotter pin joint you can swivel the head ...so I spend lots of time thinking of ways to do both....but I haven't thought hard enough yet!
I thought I saw a tutorial on combining disk joints and LocLine! Have you checked in the library? I may have seen it on a different site, I'll keep my eyes out!
I have bags of glass beads in a bunch of sizes, and a couple of sizes of poly pellets too! Over the weekend I was trying to get a couple loads of laundry done between setting eyes and sewing, and I realized laundry detergent bottles are perfect for storage! They don't leak or tear and it has a spout!
Probably not as convenient for the mini-makers.
Hi everyone!
So a few updates:
1: I tried using some bakeable sculpy clay for a mold on a smaller kitty paw. It didn't work, the silicone just stuck in the mold. If you really wanted a good hard mold in clay, you can buy release agents for silicone casting.
2: The silicone is really quite hard if it isn't mixed with acrylic. When I mix the acrylics in, the paint sort of turns powdery, keep mixing!
3: I finally figured out how to add different colors to the paws. I just took them out of the mold and added layers! Duh!
Wax really gives the paw a special texure, it is softer when it comes out of the mold and less shiny. Adding layers makes the surface shiny and less squishy.
Since I make small animals, and haven't made very many, I have only been able to justify small amounts of LocLine, which means I can't get it very small. I use wire and love it! I usually get it in the floral section
Francesca, I'm sure clay would be great too! You may want to use bakeable clay that's been baked since the silicone might take up some of the clay in curing otherwise. As long as the clay isn't able to lose water it should be fine!
Kirstie, I had one of those hot plate melters and melted little tea lights in it until I had enough wax. I let the wax harden and then reheated the wax for pressing each piece.
I have thought about putting all five pieces onto some sort of handle to keep them all in the right place, and that would also make it easier to press, I think you could press something like that into the wax while it was still melted.
That's so weird. You don't really think of those things... We have to go an hour to get it because we live in a tiny town, but any home improvement store would be likely to have it over here. The sealant your dad recommended is probably very similar. I used candle wax because it was all I had, silicone doesn't stick to much (that's why they make oven pads from it) but it does bond to itself. It seems to bond with the cling wrap also.
Very cool! Glad to hear you're going to sell, I hope you get some good bites! I'd love to see pictures of your toes and the poms they belong to when you get done!
Thank you!
PlushPuppy, I typically extrude more from the tube than I use, but I usually start with a couple of tablespoons. The tube is enormous compared to how much you'll need. I make my noses this way too now. I have used maybe a quarter of the tube. And I practiced A LOT. I don't know that it needs to be acrylic, I have never used anything else. You could probably use various types of ink... but acrylic is easy to find, easy to use, and it is water based, so it helps the curing process. What are you making now?
Hi everyone! I wanted to share a technique I stumbled on. I wanted paws that looked real and felt real, these are really great...if I do say so myself.
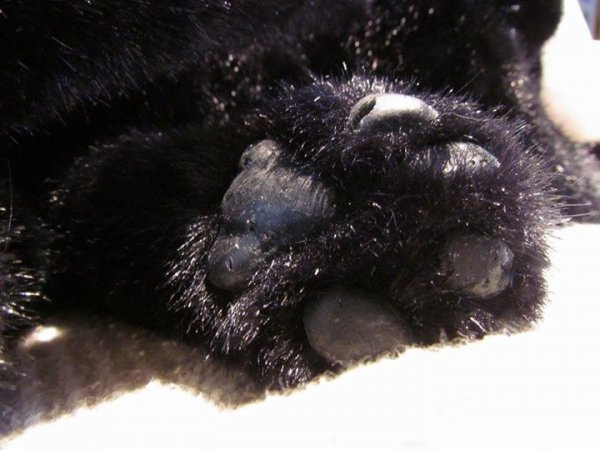
I used silicone caulk in the big tube you find in a hardware store. You'll also need something to extrude it through, I would use a frosting sleeve but I don't have one so I use saran wrap. And you'll want scissors and acrylic paint the color you want and curved forceps or tweezers and fast drying super glue.
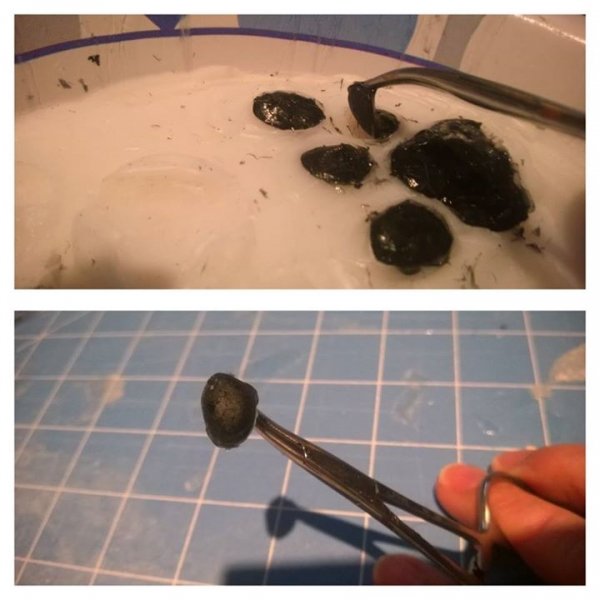
Before I started, I had made my little paw shapes from sculpey clay and baked them, then I pressed them into candle wax for a mold.
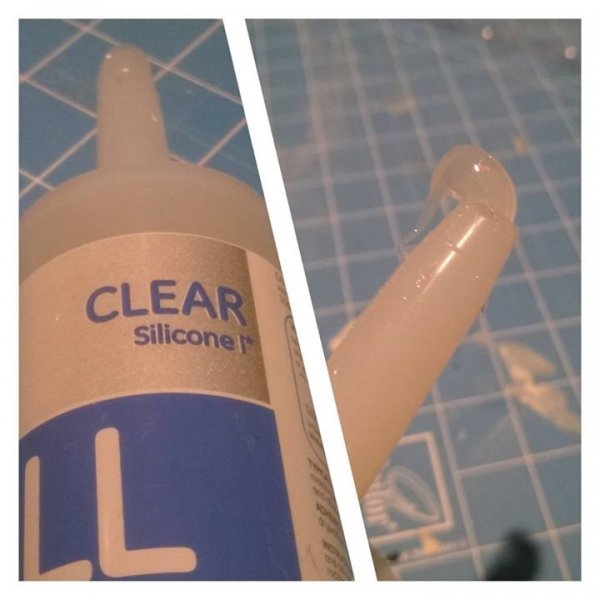
You MUST use silicone I, there is also silicone II, but it won't ever dry in a mold. It actually has an extra reactant that keeps it active so mold doesn't develop: good for bathrooms, bad for paws.
Cut the tip off of the silicone tube and it is easy to push the bottom through to get it going, you won't need a gun. Mix in a little bit of paint, you really don't need much, but make sure you mix it really well. Then you'll just extrude your mixed silicone into the parts of the mold. You'll need to be careful here, and fill from the bottom up and side to side, bubbles get trapped easily. This is pretty messy so I usually wet a knife or my finger and smooth out the tops, but don't worry about cleaning the mold too much, its easy to snip the excess off.
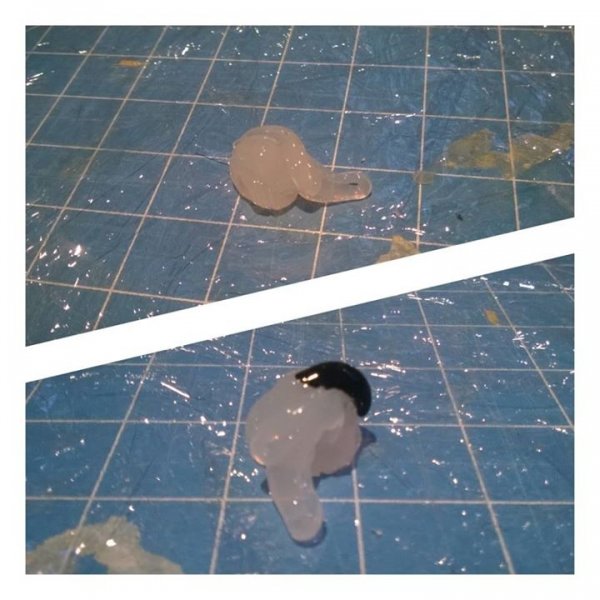
The acrylic paint is water-based, and the silicone cures with water, so mixing paint in is actually a huge benefit. It dries in a fraction of the time. It should be dry in about an hour. At that point you can use your forceps to pull out the castings. They stick a little to the wax, but it is very stretchy.
I use super glue to affix the pads to the foot. It is a little tricky because the hairs sometimes lift up the pad, use a quick drying glue and try to cut down or tweeze out as many hairs as you can.
Are you looking for a more realistic paw? I had trouble with finding the right material when I started too. I ended up using silicone.
Thank you everyone! It is such an honor to get such high praise from such talented people!
When I started working I had just lost my best friend, Merlin and I wanted to be careful about staying on the realistic side of the line between teddy and real. The paws were very important to me. So I started testing materials. I tried to take a mold of a living cat's foot...you can imagine how that worked! So I made toes and "palm" out of bakeable clay and pressed them into melted wax for a mold. The only material that worked well was silicone caulk, but it MUST be silicone 1, silicone II will NEVER dry. I bought clear caulk and used acrylic paint to dye them. The silicone sets using a chemical reaction with water, so the acrylic cuts down the set time enormously. I will try to put a post with pictures and steps in one of the library topics!
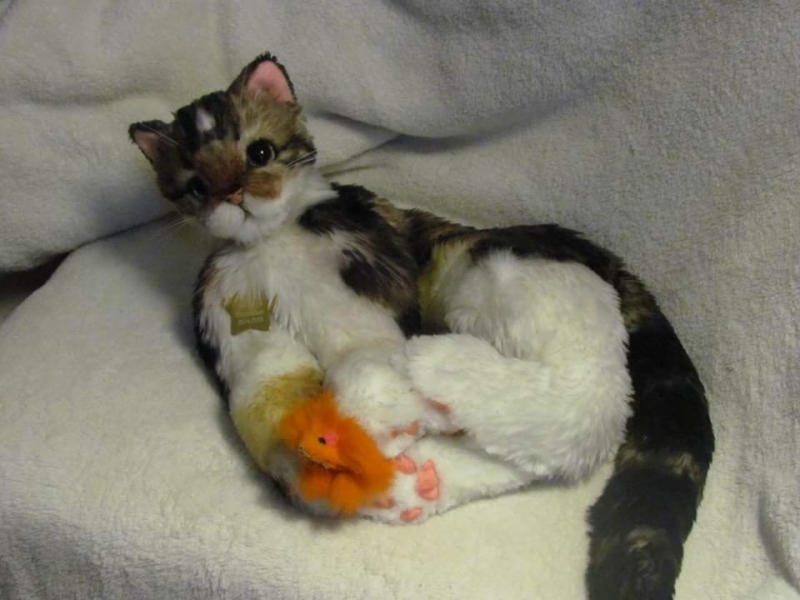
Hi everyone!
I have finally gotten my pattern and materials and photography to a quality I felt I could post!
Merlin is stuffed fully with poly pellets, except in the head. His fur is synthetic. He has glass eyes, painted by hand, and silicone nose and paws. His eyes open and (mostly) close. Sorry these pictures are so huge! I don't know how all of the things work yet!


The shading here is done with permanent marker. Its all I had!
I plan on getting some airbrush if I get a chance to do a patterned cat!
haha I am so glad you like him! That's exactly how I stumble my way through these projects, I take bits I already have, or find an idea here, and try it with the basics that I've already got. The folded fabric in that second picture was from scraps I had left over from patterning. But they were sitting there... Now they are my pattern pieces! And I use nail polish for my eye paint.
So... the way I start is I have my solid head pattern pieces. I sew them all together so that all I have left open is the bottom where the neck goes. Then I cut just a tiny slit for each eye, I use glass eyes with the loop wire, so I only cut enough so that the wire can be pushed through... maybe 1/4 inch? sometimes I take a pair of needlenose pliers and squeeze the loop together. I think the eyes look more realistic when they sink down into the head, after all, they have sockets in real life... but the slit is small so the eye doesn't sink far enough for it to look socketed. That's why I started putting eyelids on. When I sew the eyelid on... I just sew it directly to the head (you'd probably want to trim some of that long pom fur!) but it makes the eye pull into the head more. Still it is backed by fabric so the eye doesn't fall into the stuffing.
It is super easy when there isn't any fur to get in the way, but now, working with a pretty low, dense pile, I just trim before I cut the slits.
Placement also makes a difference! I put my last eyes too close to the nose and I had to stitch up the slit and cut a new one! luckily, I put these lids on so it won't be a problem!