Banner Sponsors


For artists and collectors sponsored by Intercal...your mohair supplier and Johnna's Mohair Store
That's strange, I've tried markers (copic and letraset) on different faux furs and most of them became a little stiff and sticky and rubbed off for a long time (became better after a few weeks), so I only use them for small accents.
But I didn't have any problems at all with acrylics, the paint just has to really thinn, so you need several layers to get the shade you want.
If you have acrylic colours at home you could try painting a corner of the samples to see if the fur takes the colour well.
Even if you get a nice cream coloured fur you'll have to shade it a little to make it look realistic, the dog in the picture also has light and dark areas.
Hard decision... I would ask for samples of the other two, nothing to loose.
But I guess the polar bear would be the best. If you don't want the dog to be completely white you can paint it with water-thinned acrylic colour to a more brownish shade, that's no problem.
I've drawn this very fast, so it's not very accurate: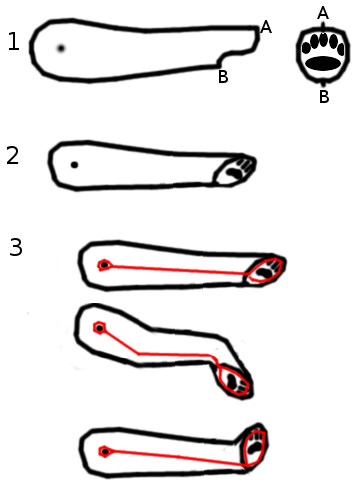
The pattern could look like figure 1, then the stuffed arm would look somewhat like figure 2.
But if you insert a wire armature and stuff the arm not too hard you can bend it in many positions like in figure 3 (the red line is supposed to be the armature).
Does this help?
You have to design a pattern for a streched paw/leg (like on the sitting bear) and insert a wire armature, then you can bend the paw up or down in any position you want. 
SilverClaw, thank you for the pics, very interesting! 
When I make Plushies with an armature like your chuhuahua (paws, head and batting are already attached to the skeleton) I sew the body inside out, but leave the whole back seam and the thin parts of the legs open, so I can get the armature in.
For me that's a lot easier than sewing the whole body with ladder stich. 
This is the only picture I have, but you can't see much, too much fur.  Well, it's an unstuffed body with open leg seams (and a test head pinned on).
Fauxthrow also sends samples, that's the best way to avoid mispurchases.
Mill Creek puppies are sooo cute! 
I guess they have disc joints in the neck (and legs?) to make them poseable, most artist teddy bears also have them. They are easy to use, but I don't like them because they don't look realistic (especially at the legs) and can only turn in one direction (the head can turn left and right, but not up and down).
A normal store bought plush dog's head can also be turned in many positions, right? It just can't hold that position if you release it, but it can if you insert wire or lockline. 
This pattern looks quite good, but I would make the head separately from the body. The head has to be stuffed very firmly, so the end of the backbone is fixed and can't shift inside the head and the head won't loose shape when turned. But the neck should be loosely stuffed, so it can turn easily.
Does that make sense? 
Joanne Livingstone wrote a few blogposts about lockline and how she attaches a separate neck piece, maybe it can help you:
http://desertmountainbear.blogspot.co.at/
If you decided to make your own pattern, you could try using this method http://www.deviantart.com/art/Plushie-P … -179305255
I do that too, but I use tin foil to get the pattern from the model.
you could also decide to use a plastic ball socket armature, but that is much more expensive.
I love lockline as a backbone, it moves perfectly realistic, but I absolutely can't recommend to use it for the legs. I tried that one time and really regretted it, it was impossible to get the plushie in a natural position.
It's not only darker, but feckled at the base. You can see that it has light and dark brown hair tufts (don't know if that's the right word to describe it?). They blend together and make the fur look natural, but if you cut it short you can see the same pattern as on the fabric backing (last picture).
I don't know what kind of color "blush" is, but you could ask the seller if it's really pinkish. Maybe they can even send you a little sample piece?
I've looked at the fabric once again and I am afraid it won't look good if you trim it.  The backing is freckled, so I think the fur will also look like that at the base.
You should better look for a really unicolored fur like this: https://www.mohairbearmakingsupplies.co … -60mm-pile (in a color fitting for a pom).
If you put a strong armature in it (strong enough to hold any pose) the dog will be of course stiff, so you can't cuddle it like a ragdoll (or a real puppy). But I wrap my armatures in batting and/or thick felt before putting them inside the animals, so you don't feel any hard metal under the fur. Then I stuff just a little fiber fill around the armature, because if you stuff it too hard it's not poseable anymore.
How big should the pom be (heigh at withers)? I've seen very small and rather big ones.
Well done! Those little paws are adorable... The head is interesting, but I don't really like art dolls with naked heads in general, I like it better when the clay is covered with hair. But still, I'm looking forward to see more of your creations!
My idea was to make the whole dog out of this, then clip the legs/muzzle/ears shorter, using my grooming clippers, just like I would a real dog, will this actually work though?
Yes, that's the easiest way and will look very realistic if the fur is dense enough and the colour at the base is not too different.
I'm thinking of those quality glass eyes they put in reborn babies
I think baby eyes would look strange on a dog, I recommend taxidermy glass eyes.
If I can't get hold of a sewing machine, is this do-able by hand, or would I really need a machine?
I sew everything by hand, even very large animals. It takes longer but I think the result is even better. :)
But if you want to order one, this artist has made a very cute pom recently and takes commissions: http://www.pawtraitbears.com/
SueAnn, this website wasn't updated since long ago. I'm sure I saw this pom on ebay recently, it was sold by it's new owner.
That's a difficult project, but it's not impossible if you are talented enough.
I was once asked for advice by a newbie, she wanted to make a lifesized lion as her first plushie  and she did a wonderful job, I was really impressed.
If you want a very realistic pattern I guess you have to make it yourself. I like to make a model of clay and use tin foil to get a pattern of the surface, works like a charm for me.
But for a long haired dog like a Pom I think it would also be okay to just buy a simple dog pattern, but make a test dog out of simple cotton fabric and if nessesary change the pattern to your liking.
In this case I would search for a pattern without joints, because the armature is enough to make it poseable.
The most difficult thing will be the face, you will have to learn a lot of new techniques to make a realistic looking nose, eyelids,...
Sorry for my bad English, I wish you good luck and just ask if you have any questions!
Yes, round cords, the same that are used for pendants, they should be available in any arts and crafts shop.
The diameter depends on the size of the bear/eye and how thick you want the lid to be.
I have used 2mm for big eyes and 1mm for medium ones. I think there are even finer leather cords, but I couldn't find one in the shop, so I use a waxed cord for smaller eyes and a thick waxed thread (the same I use to attach eyes) for the smallest ones.
I hope this was understandable.
Hi dellyb!
I like to use normal leather cords for big eyes or thick thread for small ones and white glue to fix them.
For shading I use copic markers since that is the only brand available here, but I'm very pleased with them. You can find a lot of infos about that in the library: http://www.teddy-talk.com/misc.php?page=44880
Some people won't even come into my home.
Really? Strange, nowadays it's not unusual anymore to keep reptiles and spiders... I don't mind at all as long as the tarantula terrariums remain shut.
For projects like this finding the perfect fabric might be the biggest challenge.
By the way, that's a beautiful pet, even though I like the black one in the background better. 
Both would look good, but I would prefer fabric. Felt is a little fuzzy so I think smooth fabric or maybe faux leather with a scaly structure might look and feel more realistic.
I am a perfectionist, so would needle felt the head firmly (that's the easiest way to get the correct shape), build the body of wire and batting or softer needle felting and then cover the whole snake with a strechy fabric.
Hi Sheree, I have only done that one time and used a thin faux leather, I first tried felt but it was too fuzzy for the small eyes.
Paula, some use ready made plastic eyelids (but they are only available in big sizes) but most artists make them theirself. There are many ways to make eyelids, they can be modelled of polymer clay or epoxy, sewn of fabric or suede, made with a simple leather cord,...
Hi and welcone to TT!
Joanne Livingston has a wonderful blog where she shares lots of informations, she also wrote about epoxy noses and eyelids:
http://www.desertmountainbear.com/
If you have or can design a pattern with an open mouth (there are many different ways to do that) you can make it poseable by inserting wire into the lower jaw.
Good luck! 
A heart-warming happy end!

