Banner Sponsors


For artists and collectors sponsored by Intercal...your mohair supplier and Johnna's Mohair Store
 Tami Eveslage Original Teddy Bears
Shelli asked in a pm if I might do a brief tutorial on trapunto, so here goes.
I had wanted to add detail to my bears' paws from my earliest designs on. For some of my first bears, I used acrylic paint to add their foot and paw pads. While I was happy with this, What I really wanted to was add some dimension. Then, I was thumbing through a quilting magazine and saw a description of trapunto. Ah ha!
Trapunto is quilting technique which produces a raised surface on the quilt (or bear  ). The raised surface is created by layering a piece of woven fabric (muslin etc.) with your paw pad material. Before you sew your pad to the bear's leg, you would draw paw pad shapes and sew completely around each one using tiny stitches. Then sew your paw pad in to the bottom of the leg, but don't turn it yet. The next step is somewhat tedious but the results are pleasing. You cut a tiny slit in the back (muslin side) of each shape and add polyfil stuffing to each shape. After you sew each opening closed (it doesn't have to be neat but it should be tight), you may turn the leg right side out, and stuff it as you normally would. You will see the raised areas,but you can also use paint or air brushing to accent more.
Happy Bearmaking
 Chaska, Minnesota
Oh Tami, thank you for this delicious technique!!
Michelle
 Melbourne, Australia
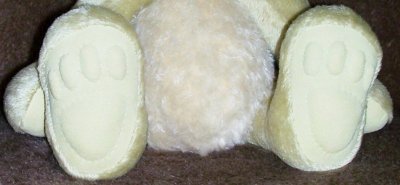
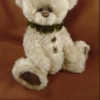
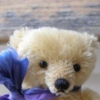
This is what they look like when finished.
Hugs,
Tami Eveslage Original Teddy BearsThat's a great picture example! Thanks Sandi.
 Acid Attic Bears
Thanks so much ! Your explanations are very clear ! :hug:
Oh, how wonderful to see this information here! What an easy-to-follow tutorial. And thanks, Sandi, for the picture as well!
I've used this technique previously myself, but unlike mine, your trapunto pads are superb, Tami... ... so it's nice to hear the "how-to" stuff from a master. Really nice pads on your bitty bear feet too, Sandi!
Thanks so much for taking the time to add this to our wonderful library of tips & techniques. I'm certain there will be MANY people to benefit!
 Back Road Bears
Wow, now THAT sounded easy. I've read instructions before but got so confussed and figured it must simply be over my head! Never mind that I can read instructions and apply them, I have to SEE it done. But Tami, those were perfect and I can't wait to try.
I'm concerned that I won't get the pad sewn into the foot exactly perfectly so the pads could be 'off'. Is there a secret, other than just being REALLY careful, as to how to get it right? I do mark the heel and toe on the paw pads to line them up with the seams.
 BEAR ME SHOOTKA
Tami, thank you!
I might try it on my next bear!
Such clear and easy-to-follow instructions!
Hugs, Julia :hug: 
Tami Eveslage Original Teddy BearsYes, Daphne, you would mark the heel and toe and line them up with the seams. Then I woiuld pin and then hand baste them into place (I always do this with any parts that are small or don't lay flat under my machine. Another option, of course, would be to hand sew them in if you are really worried.
Tami Eveslage Original Teddy BearsI really should use the spell check feature!! :redface:
Back Road BearsI gave up on spell checking a long time ago.... takes too long! 
I'll have to give this a whirl one of these days!!!!! I think I can do it now!!!
Thank you, Tami!
Tami Eveslage Original Teddy BearsYou are welcome! 
Tami and Sandi thank you!
I too read other's directions and got totally confused...  Your directions were superb!!
 Flying Fur Studios
I also thought it was confusing before, but that sounds like I can do it! Thanks a bunch for the advice, you are the master Tami.
Sandi, thanks for the pic as well. Very helpful
 Just Us Bears
Tami...thanks for those great instructions...I wish I'd had those the first time I tried trapunto paw pads...I learned the hard way!
The paw pads in your avatar bear(which look great by the way!!)...are they trapunto? How are they a different colour? Or are they appliqued on?
 JeannieB Bears
Hi Tami,
Thanks for sharing the instructions. I put them on "Moose" who is my first pattern and 5 th sewn bear. It took me a long time....but, it looks great! He only has three toes  I will post his picture on the showcase section...probably on Sunday. Thanks again for sharing
JeannieB
Tami Eveslage Original Teddy BearsJeanie it does take a long time, but the results are nice. I can't wait to see your picture!
 PottersHouse Bears
Thank you, thank you, thank you. I've wondered how you get those cute little feet. Guess what I'm going to do with this little guy I'm working on now.
 Paws In My Garden
Tami of all I have read and I have read alot, I like your description of this the best. Thank you for sharing this it helps,
Hugs,
Angela
 Bearly Kidz Bears
Thank you Tami now I understand :clap: :clap:
 Burlison Bears
Gosh! I never knew it was that easy! I can't wait to give this a go on one of my traditional style minis! Thanks for explaining that! I've always wondered how that was accomplished!
-Eliza
 Bears by Jodi
:dance:
 Seamore Collectibles
Wow, now this is somehting I would love to try.
Thanks for the wonderful detailed instructions.
Tami Eveslage Original Teddy BearsGosh! I never knew it was that easy! I can't wait to give this a go on one of my traditional style minis! Thanks for explaining that! I've always wondered how that was accomplished!
-Eliza
You are very welcome all. Is is not complicated but it is challenging and time consuming. It takes me a long time to get my bears paws to look the way they do. I think you might find yourself rethinking the word easy particularly if you try it on a mini!!!
Jodi, I have done it on a smaller bear---ONCE! It most definitely can be done. I would think that doing on a true mini (a bear under four inches) would be next to impossible! But then there is that guy who sculpts and paints tiny figures on the heads of pins out of dust particles--so nothing is impossible!