Banner Sponsors


For artists and collectors sponsored by Intercal...your mohair supplier and Johnna's Mohair Store
 Bumpkin Bears
hi, I'd like to try giving my bears a waxed old fashioned looking nose. I've got some wax pellets I use to melt up and use for silk painting, just white wax that goes clear when melted. Does anyone know if I can use this kind of wax and how I go about applying it without it going all over my bear?  I have often heard of people using beeswax, is this the only kind you can use or can you apply any kind of wax from candles? I don't want to get an extra shiney effect, just an old buffed finish. I tried searching the other site for this but couldn't quite get the answer I was looking for. Thanks a lot,
Bear Hugs,
Catherine
 Donna's Duin Bruins
Hi Catherine,
Do a search for "Using wax on noses". There are several ways to do it.
Donna
 Hi Catherine,
I've just done a couple of waxed noses. I've pondered about doing them for a while and recently decided to take the plunge. I don't know if this is the best way, but it worked okay for me!
I used natural beeswax (which smells lovely when warmed!)
I have a huge lump of it that I purchased and so I cut a small piece off to work with.
I used my hairdryer to warm the piece of beeswax just enough so that it was soft enough to gently rub onto the nose ... I tried to keep my direction running with the nose thread. Watch the heat from the hairdryer on your fingers though - it gets pretty hot!
When I'd coated the nose, I let the hairdryer soften it a little more, so that it could be smoothed with my finger to make sure I had no lumps and bumps.
Then I used plain white paper to buff.
Then I repeated the process a couple more times until I achieved the effect I wanted.
I wasn't comfortable with leaving the nose wax unprotected, so I sealed the final buffed nose with a coat of satin finish varnish from my local DIY store.
I think to achieve the look you want, it would work well if you left the nose unsealed. Or maybe someone knows of a better sealing agent?
Bumpkin BearsPaula, 'your' noses look fantastic, just what I was looking for  Where did you find your bees wax? I've got to work out where to find it over here and what it is called in Flemish
  It sounds a lot easier being able to melt it with a hairdryer than having to melt in saucepans etc.... I was imagining liquid wax going everywhere! Does the wax make the colour go darker, I do not always use black thread so was wandering if it will change?
I really appreciate your help - your bears are just so amazing.
Catherine
 Country Bears
Hi Catherine,
Have you tried Ezy-Wax from Bearycheap?? I just warm it up a bit under my daylight bulb and rub on my nose then buff it up. They do clear, black and browns. I also use clear varnish (usually nail polish) on my noses too. Having said that I've NEVER been able to get those really wet looking glossy noses like say Andrea Brewer does, they're scrummy - can't wait to hear what everyone else does. I'm sure SueAnn's bears have waxed noses, come on SueAnn, how do you do it??;)
I've tried several different methods. I originally used beeswax, and like someone else already posted, used to heat a litte bit on my light bulb and then rub it on. Beeswax is great because you can use it on any coloured nose. You rub on a layer, buff it up with some paper (brown parcel paper is great), rub on another layer of wax, and build it up till you get it right. You can use making tape or magic tape to mask around the area of the nose if you are worried about dripping wax on it. However, because I'm working on fairly small bears and I'm also one of those messy people, I wasn't always successful with either bees wax or ezy wax.
Thankfully, there is another great and easy product that you can use which requires no heating of the wax. I think Hayley sells it, I've only ever sourced it from Australia so am not sure where else you can get it. It is fairly soft coloured wax that comes in a triangular block - you just rub it on to the nose, then buff it up with paper. It is great because you don't ned to worry about drips and spills and you can work on really small scale (I have a friend who makes 2 inch bears and uses this product). So far I've only seen dark brown and black but I think it comes in other colors.
 Mutz's Tootsz Bears & Buds
Hi All,
I have also heated beeswax in a kistka (sp). It is the tool that is used for making Ukranian Easter eggs. It is very good for getting small amounts of wax on the noses.
TTFN
Amy
 Winneybears and Friends
Sequoia Bears in California, USA carrys the black colored bees wax...she also carrys the glass claws . She advertises the glass claw sets of 10 on Ebay. She is on line so do a google search....Winney
Bumpkin BearsThanks everyone, I'll look up all the different waxes you mentioned.
Catherine
 Adorable Bears
I use wax from Beary Cheap or Gerrys in Australia. I hold it over a candle flame then using a small butter knife scrape a small amount of wax onto the knife and apply it to the nose . I then mold it with the knife. I buff it to a shine with folded white paper changing the paper often. i have done it this way for years and always get compliments on the effect....but it is not for the faint hearted. remember to protect the bear by using masking tape around the muzzle.
Susan
www.adorablebears.com.au
 Just Us Bears
Hark! Do I hear my name mentioned??
Hi Melissa! Welcome to Teddy Talk! I haven't been around much of late...have had a nasty head cold that just wouldn't go away.
Welcome also to all the other newbies....I can't believe how many new 'faces' there are of late!
Melissa, the triangular wax you mentioned is in fact Ezy wax. You can just warm it in the microwave for 60 seconds on high (or pop it down your cleavage if you are lucky enough to have one!!) I find it so easy....just stroke it on in thin layers, buffing between each layer, until you have the desired effect.
Catherine, to get that old antique look you mentioned, just lightly coat a black nose with black wax..maybe just one or two light coats, then a single layer of natural coloured wax or beeswax and don't buff too much...you want it to stay dull. You can also colour over the wax with Copic markers or similar.
Another alternative to wax is Nose Gloss. You just paint it on in thin layers with a small paint brush..it is white, but dries clear. If you just want a little sheen, just use one coat...and if you want the high gloss wet look Clare, you just keep adding layers until you have the level of shine you want...easy! The most important part with getting the high gloss nose, is to make sure the previous coat is 100% dry before adding the next one (I leave for at least 12 hours between coats to be safe), otherwise the nose can go a bit milky. Also, go lightly with the amount you apply each coat. It does take time and patience, but the end results are worth it.
I have both the ezy wax and the nose gloss on my site www.bearcupboard.com/Catalogue/Catalogp … sities.htmif you are interested (if you are outside Australia, you'll need to copy and paste your order into an email), and I also have coloured nose wax in quite a few different colours, that I apply in the same way as the ezy wax. Compliments coloured noses brilliantly without milkiness.
 bears by beesley TM
Catherine. I love to wax noses. I use the same method that Sue Ann uses. A pie plate with melted bees wax and a paint brush. I embroider the nose as usual and wax over it with wax heated on low on the stove and painting it on. While stil a bit soft I like to use a butter knife to shape it. Then I use copic markers to color the nose over. Hope this helps.

Many Hugs Louise
 Baird'sBears
 I'm so glad you started this thread, Catherine!
I've only waxed a few noses, so far, but I seemed to have better results when the was was melted to a liquid state, and was absorbed by the perl cotton. I used a paint brush with a tiny tip to apply the wax, and didn't make too much of a mess! Has anyone else noticed a difference? If not, I prefer the idea of rubbing warm wax onto the nose.
By the way, I recommend Hayley's nose template! It took me from shapeless blobs to recognizable noses in one easy step . . . thanks again, Hayley!
Eileen
 Past Time Bears
Like Louise has already mentioned, I melt my beeswax over the LOWEST heat possible, then paint it on the nose by layers with a small brush until I get the look I want. I haven't used the E-Z wax so can't compare the methods. I do like the fact (as Eileen says) that all of the perle cotton is coated with the melted wax, because it really soaks it up! I say go for whatever works best for you.
Hi Hayley. I thought ezy wzx was the stuff in the pottles . I don't heat my triangular stuff - whoever I bought it off told me that you didn't need to. It seems to work fine for me (and probably better cos I don't get mess everywhere) but maybe I'll have to try heating it a bit. Thanks!!
 Matilda Huggington-beare
many years ago when it was'nt fashionable. I sculpted a nose in wax, right on the bears face. It did start out as a covering as you all have described , but somehow it went further. Layer upon layer and then came nostrils. It turned out great.
Your only limited by imagination........and it does'nt even have to be yours.....:lol:(I luv to laugh)
Hi Catherine,
Sorry, only just got back to this thread as I've been busy with my preparations for a show in two weeks' time!
I found my beeswax (a lovely big lump of it!) on a UK website for candle makers. It's sold in a large block and I just cut bits off to work with and keep the rest in polythene - I think it will last me forever!
So far, I've only used it on black noses so it's hard to say whether it affects the thread colour or not - I will be using it on brown soon I hope!
 Hi Catherine,
Another way of adding a more subdued waxed look is by pulling the thread though a piece of wax before you stitch the nose, it makes it very easy to stitch as it seems to pull through the mohair better and also gives quite a nice vintage look to old teddies.
Goodluck with it,
bearhugs,
Denise
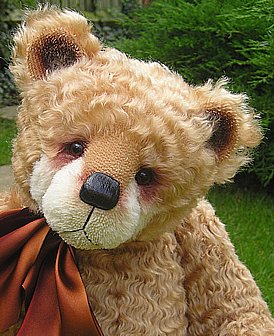
ps I did Rupert's nose with it, you can see the slight sheen but the stitching still shows
 Jazzy Rags
thanks for all the tips girls i have ezy waxs but did not know what to do with it silly me fran
Bumpkin BearsSoo many great tips - I loved the noses on your Rupert bear Denise - thanks everyone,
Hugs
Catherine
Baird'sBears Great idea, Denise!
I love Rupert and his nose.
Eileen
Hi Catherine
Finally, here I am - sorry for the delay - I had to collect the girls from school.
Anyway here is my method for waxing noses (pretty similar to most of those above). I'll do it Blue Peter style:
You will need:
A pure beeswax candle or piece of beeswax (I purchased mine from a honey maker at craft fair)
An old mug that you don't mind spoiling
A stiff paint brush
A desk lamp (switched on to warm up) or hair dryer
Grease Proof paper
1. Cut a piece off the candle/wax and place it in the mug, then microwave until the wax is completely liquid. Mind the handle though as it gets really hot.
2. Paint a small amount of wax onto the nose (don't take it right to the top and bottom edges though as you'll run the risk of getting it on the mohair and it seems to get to the edges by it own accord when you remelt it), if it is hot enough it will just sink in. It should harden quite quickly. If all of the wax has been absorbed by the thread just apply some more so the finished effect is a bear with a heavy cold! Very nice.
3. Hold the nose under the lamp or hairdryer to remelt the wax.
4. Once it has disappeared again, using a piece of grease proof paper polish the nose in the direction of the thread. As you polish it it will dry and harden to a smooth finish. The more layers you put on and the more you polish, the shinier it will be.
That's it! You may want to repeat the process a few times until you have the desired amount of wax. From my experience you can melt the wax in the mug time and time again without any problems - I've been using the same pot for ages.
I hope this helps.
Vicky
 Flying Fur Studios
So... can I add a question to this tread???
What about colored wax?? I've seen it in different colors and not sure why you would use a colored wax. Doens't the clear beeswax work on any color nose? or am I missing something?
What would you use if you had a pink nose etc.
Thanks
Heather
Hi Heather
Oooh ....... I'm not sure on that one - Ive never tried a coloured wax or a coloured nose (other than the occaisional brown or gold one). I know that beeswax darkens the shade slightly when used on dark or mid brown perle. I'd be interested to know how to use coloured wax too.
Vicky
 ontario, canada
hi Vicky!
do you seal the wax with anything after you've completed the waxing? that seems like silly question now that i've typed it.
:redface: