Banner Sponsors


For artists and collectors sponsored by Intercal...your mohair supplier and Johnna's Mohair Store


 Hi all photo editing wizards (or those who want to be!) I have a challenge ready for you!
Using ALL FIVE of the attached image files, in any way you choose (select, warp, add pattern, expand, overlay pattern or gradient, etc.) create an avatar-sized image featuring one of your own teddy bears! For this first challenge, there is no specific theme. Just elements, included above, that you must use.
The only rules are as follows:
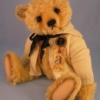
1. You MUST feature at least ONE of YOUR OWN teddy bears in your image!
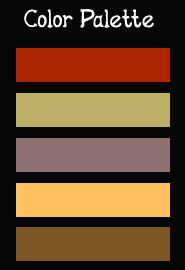
2. You MUST use all five colors in the color palette, in some way.
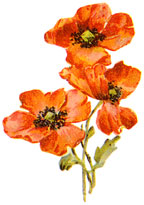
3. You MUST use the elements (in this case, a gem, some flowers, and a bow) somewhere, somehow, in your image.
4. You MUST use the text (italics, below) somewhere in your image.
5. Please, refrain from using copyrighted images, especially bears not of your own making!
6. Feel free to otherwise add elements to your final image, as you desire.
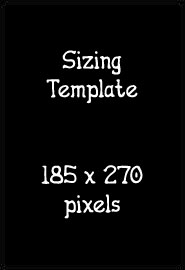
5. The final image must be sized and saved as follows for posting here at TT:
185 pixels wide
270 pixels high
Resolution: 72dpi
File type: .jpg
Please return to this thread with questions and comments as we proceed.
DUE DATE FOR POSTING OF YOUR IMAGE: One week from today, Sunday, March 5th, 2006.
Have fun!!!
------------------------------------------------------------------------------------------------------------------------
Files to use are shown above and, in order of appearance, include:
1.) Black "size template" true-size file. You can use this file as a size template by overlaying your own content onto this black image, using it as your bottom layer, and then deleting it when done. No need to use this file at all, if you can figure out how to size your image to 185 x 270 without help. It's intended to be a sizing template only, and not a design element or suggestion.
2.) Color template. Use all five colors by "sampling" them, using whatever tool your particular program uses. Generally, such a tool is called something like "color picker" or "eyedropper" or "color sampler" or the like.
3.) Flower image. Feel free to delete the background and use only the flower part.
4.) Rhinestone gem image. Feel free to delete the background and use only the flower part.
5.) Bow image. Feel free to delete the background and use only the flower part.
6.) Text quotation, below (which I hope is motivational, and reminds those of you new to this digital design stuff that there is merit in effort and trying!):
Better to do something imperfectly
than to do nothing flawlessly.
-Robert H. Schuller
 Matilda Huggington-beare
What a shame I dont have the program to do this. Cant wait till next sunday to see what everyones has done.
Matilda 
By the way... you can post your final product BEFORE next Sunday. That's just the date to aim for as a drop-dead timeframe. I'll be out of town next weekend so mine will be posted no later than Friday, but probably before that!
 BEAR ME SHOOTKA
Oh, Shelli, thanks, can't wait to start!! 
For anyone interested in tyring this there are a couple of free editing programs to download.
1) PHOTOSHOP ELEMENTS 4- 30day free trial download - You just need to sign up for a user name to login
(scroll down the page for elements 4)
http://www.adobe.com/products/tryadobe/ … roduct=101
2) PHOTOFILTER- Free full version. Easy to use with a little playing around. http://www.snapfiles.com/download/dlphotofiltre.html
If you go to North Country teddy Bears site there is a tutorial on using this program.
http://www.northcountryteddybears.com/4 … ertut1.htm
I'm sure there a million other editors to download also.
 Posts: 8,574
Totaly beyond my capabilities, but I am looking forward to what you guys come up with! What a fun idea Shelli!
dilu
 Terries Bears
Thanks Shelli for your your time and the work that you have gone to, to put this together for us! Now I have to sit down and try to figure this program out! 
 Apple Dumpling Designs
Totaly beyond my capabilities, but I am looking forward to what you guys come up with!
I'm with you Dilu...let's just sit back with our tea or coffee and enjoy what everyone else is doing. I haven't a clue where to even begin.
Shantell
Apple Dumpling DesignsCan I just use my scissors and glue? 
Well, but that's the point here, ladies! You MUST begin, to GET that clue! It starts somewhere, with the littlest thing, and then the next thing you know, you've figured out how to do a million things. And you never get any bears made, because it's too dang fun!
Don't think I chose this exercise by accident. I'm a teacher at heart (actually I have both a Master's degree and a teaching credential), and I had a plan in mind to help steer people thru getting their feet wet. Here was my thought process:
1. OBJECTIVE -- Get people to stop talking about, and start tinkering with, their "scary" photo editing programs.
2. EDUCATIONAL GOALS FOR PARTICIPANTS:
(a.) Sizing/resizing images, both in terms of dimensions (wxh), and in terms of image resolution (dpi)
(b.) Creating "new" documents
(c.) Puzzling out at least one way to make "selections," which is maybe the most important thing to learn in a photo editing program
(d.) Getting familiar with the concept of, and using/manipulating, "layers"
(e.) Finding and using your program's "text" tool, which also includes finding and using your computer's installed fonts
(f.) Learning how to specify and pick colors for backgrounds and text
This is a tall order, and for the very beginner, one week might not be enough time! But I figured it we drew it out tooooooooooo loooooooooooooong, then it would lose interest and attraction.
I'm hoping that myself, and Penny, and Hayley, and whomever else I might be forgetting -- Jane! -- who have some familiarity with the concepts behind these programs, can assist somewhat. But each program is different, so ultimately it will be up to the individual participant to figure out his or her own specific program's functions and tools.
There are ten GAJILLION BAJILLION -- that's the official number, I counted!!! -- tutorials available online and most are easy to follow and very, very good! Just Google what you're looking for, like, "PhotoShop Using Layers" or "Paint Shop Pro Choose Color" and you'll be bombarded with how-to's from here to Timbuktu.
When I was in grad school for education, we talked lot about bilingual education. There's a theory of why kids can learn two or three or four languages so easily, and it was, at that time, called the CUP theory. That stands for "Common Underlying Proficiency." Sounds complicated, but bear with me.
The idea is that, as an infant, when you learn what a FORK is, you learn both the "label" for FORK and the "idea" of "fork-ness"; the idea of what a fork IS and LOOKS LIKE and DOES.
When learning a second (or third or fourth) language, the "idea" of "fork-ness" does not require relearning. Rather, the "idea" of "fork-ness" is learned ONCE in our development... and only the LABEL for fork -- "gabel" in German, "tenedor" in Spanish, etc. -- requires relearning.
Thus, there is this common underlying proficiency between languages -- once learned during your development, you have an understanding of what a particular something IS and LOOKS LIKE an DOES, even when you don't know the label for it, yet, in another language.
So why am I telling you this boring story of educational academia?
Because I believe that those of us who have some experience and know-how with these photo editing programs -- even if they are not the same as your own! -- can help walk you thru learning your own program, even if we don't have or know the same "labels" or speak the same "language" which your own program uses. That's because there is, more or less, a common underlying process for doing many of the things that these photo editing programs do. Fro example... I can't tell you what it's called in Paint Shop Pro, but I can tell you, even without having any direct experience with Paint Shop Pro, that there will be a way in that program for you to somehow wrap an outline around, or "select," a portion of an image. And so on.
Sooooooooo... don't be afraid of this stuff, even if it's a real headache-provoker! (And PS -- it totally and completely is, especially early on. I won't lie to you.)
In this web-friendly world of ours, it can only help you to take some time -- to MAKE some time -- to learn these skills, to benefit your web building and online presence and hopefully improve your presentation and increase your professionalism as well.
Have fun with it!
 Posts: 1,153
Shel...are we supposed to copy/paste the black background, flower etc, to pull it up in our program?
Sorry, I know this must sound dumb, but I soooooooooooooooooo want to learn how to do this.
AND, I cannot tell you how thrilled I am that you have the 'teacher, want to teach' thing going on in your head!!! :hug: :hug:
I am an egar student...dumb, but eager!
Remember I am working in Elements3.
nanc........
First... NOBODY SOUNDS DUMB! This is highly abstract, not-easy-or-quick-to-pick-up, stuff. NO "I'M DUMB" COMMENTS ALLOWED.
Shel...are we supposed to copy/paste the black background, flower etc, to pull it up in our program?
YES! Although the black background isn't intended to be a design element in and of itself; rather, I provided it for people who don't yet know how to size new documents. If you SAVE and OPEN the black size template and then place everything else on top of, and within the borders of, it, then you'll end up with the "right" sized document for our purposes here.
And if you don't know how to SAVE and OPEN these files, you'll have to do some research on your own, but as I said before, I/we can help talk you through the IDEA behind each thing you might want to do, making it so much more accessible to you... and requiring you only to figure out the TOOL or LABEL for the process, in your own program... rather than figuring out every last concept and detail for yourself.
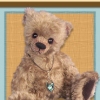
Let me share some examples I whipped up this morning, so you can all see what I had in mind. I actually saw this kind of exercise both in scrapbooking magazines and in a British PhotoShop magazine. The editors start people off with the very same contents -- colors, images, sizes, etc. -- and then challenge their readership to come up with personalized output combining those elements together into one cohesive whole.
You'll notice that I've used all five colors in each of these images, and a photo of my bear. I've used the bow and the gem and the flowers. I've added elements, too; I added "tags" to hold the quoted text, and I used "brushes" to create the wallpaper pattern in one case.
See what I mean?
I don't want to remotely brag or sound self-important, but PLEASE don't compare your work to these images if you're just starting out. It's very hard to learn all the steps necessary to get to this point and I've spent literally hundreds, if not thousands, of hours learning PhotoShop by reading books and tutorials and just by tinkering around with it.
I really intend this NOT as a competition in any way, or a ranking or one-upmanship, but as a noodge to get you guys to learn to use your own photo editing software. It's also a great way to improve your photography, post-photo-shoot, of course! If you're planning in any way, ever, to showcase your work online, in digital form, your photo product will just look all that much better and more professional -- which translates into making just a great impression on your collectors! -- if you can learn how to adjust brightness/contrast, color correct, add borders, add text, etc.
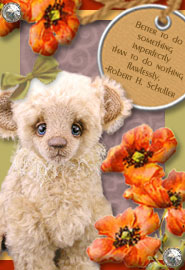 Here's the first.
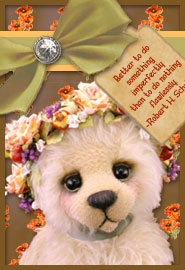 And here's the second.
Apple Dumpling DesignsCute....
Shelli...you make it look so easy. I too sooooooooooooo want to learn how to do this...in fact I'm seriously considering just buying Photoshop Elements (I can't afford the other...nor would I be justified because I would never begin to use it to it's fullest capabilities).
Beautiful...
It IS easy... once you know how to do it!
When I used to make my little sister, Chanda, feel like crap, by saying, "What are you complaining about with that dumb math homework? That's EASY!"... my dad always used to reply, "EVERYTHING is easy, once you know the answer."
Shut me right up, I can tell you.
Laughing here...
Shelli, 
That was the most respectful way anyone has ever told me to "get a clue".
Warmest hugs, :hug:
Clueless in Portland, Aleta
HAHAHAHAHA!!! That actually had me laughing out loud, just like that! HAHAHAHAHA! I swear.
Hey, it actually cuts into my bottom line if everyone learns how to do this.
Having said that, it's just so fun, and such a great feeling, to be able to create these things. Maybe I'm just a unique case of passion for digital design run amok. But I doubt it!
I just wish this kind of feeling of creative freedom and success for EVERYONE! I know how paralyzed I felt when I started out and I had all these ideas just bursting out of my ears and I could not get a single one of them to go from my head onto the computer screen, and had to rely on my friend Andrea, a very talented and capable designer, to "translate" them for me. She did a superb job, but the truth is, the only person who can really get inside your head, is you. So this kind of creative control is, for me, just incredibly liberating, and now that I've had some clients, I see how hard it is to mind-read. So I just want everyone to feel this same great freedom and creative control!
Oh Shelli what a WAY cool idea!!!! :clap:
I have to say that once you showed me your examples, I got a better idea of what to do!
Thanks so much for taking the time to get our minds moving
Hay Tammy, I down loaded elements this pass weekend for 30 day trial. It took me a while but I did figure out some of the stuff. Didn't want to come to work today. Would rather stay home and play with the program. I have a long way to go yet.
Thanks Shelli
Lynn
 UK
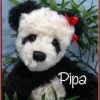
UK![]() Okie Dokie. here is mine !! Thanks shelli. was lots of fun !! :hug:
Okie Dokie. here is mine !! Thanks shelli. was lots of fun !! :hug:
 Past Time Bears
Gosh, Pipa . . . that is excellent and fast!!
UKAwe thanks Sue Ann. i wasn't all that pleased with it myself, i could do better. but i didn't have any pics of bears i could use apart from that one (the rest are all stuck on backgrounds of the wrong colour at the mo and didn't have time to shift them off tonight, but not bad considering! he he
Shelli, or anyone , I have a question about the color palette:
I downloaded Elements yesterday and have limited knowledge & I've used a couple of free editors a bit. I really want to learn more.
How do you use the palette in Elements. I understand the eyedropper sort of, but I can't figure out how to get these exact colors into Elements to choose them with the dropper. i tried saving the image them opening it in Elements, but can't seem to get the dropper to work.
Thanks, Tammy
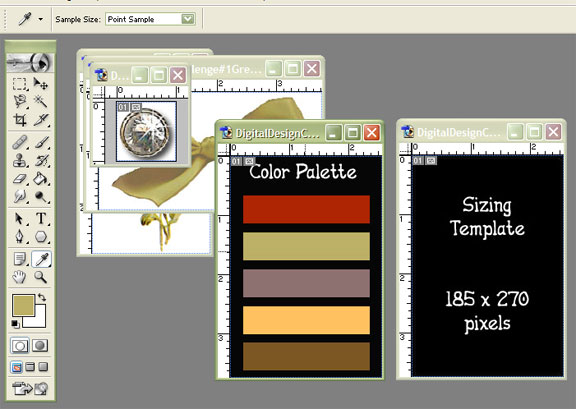
 I'm not familiar with Elements per se. In Photoshop 7.0, what I did was:
1.) Open BOTH the Color Palette file AND my "new" document file;
2.) Click on the Color Palette file, which "activates" it (see how the Color Palette file, above, is darker green... and the rest of the open files are lighter? That's because the Color Palette is the "active" one!);
3.) Click on the EYEDROPPER tool (see how the eyedropper is whiter than the rest of the tools? That's because it's the "active" tool!);
4.) Hover over one of the bars of color on the Color Palette;
5.) Click on the color bar of your choice, using the eyedropper tool;
6.) You will see that the FOREGROUND COLOR square (the green one, above) changes to the color you have "selected" with the eyedropper tool. The eyedropper itself doesn't appear in the screen capture because it disappears as part of doing the screen capture -- aargh! But the result of doing what I just explained, above, is shown here.
You can find this stuff for yourself.
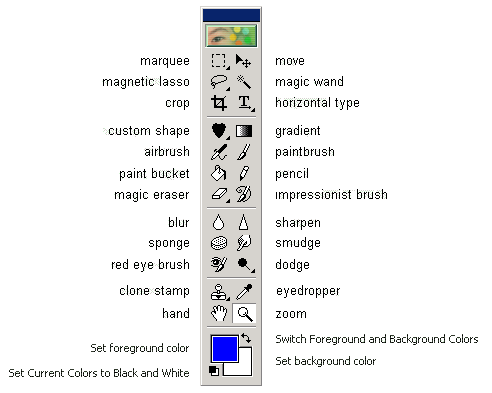
I Googled precisely the following: "photoshop elements eyedropper tool use" and came up with this tutorial in about a nanosecond: http://www.oaacs.uci.edu/howto/photosho … electcolor
Included in that tutorial is a screen capture of the Elements "toolbox." YOU NEED TO FAMILIARIZE YOURSELF WITH THE TOOLBOX and this is as good an explanation of it as any I've seen.
For other programs, the process will be similar. Your toolbox will look different but will likely have many of the same tools.
I can't stress enough that these tutorials do a fabulous job of explaining things, including screen captures which will help you out visually.
If, AFTER you familiarize yourself with your program's toolbox and have read, or at least skimmed, a tutorial or two, you still need help, then with that little base of understanding and knowledge is the best time to come back here and ask more questions. Otherwise, we'll just be re-writing here what you can already find elsewhere on the web.
Have fun!