Banner Sponsors


For artists and collectors sponsored by Intercal...your mohair supplier and Johnna's Mohair Store
 Irenours-bears
Hi. i decied to set apart my bearmaking to learn how to use my photo editing program and publisher (thank you Shelly)  . i try to build some hand tags for my bears and a new avatar. I built the background with Publisher and extracted a bear head withmy photo editing software wich i want to upload on the background . How can i do that without having a white background on the extracted head? Oh i hope that's make sens? irene
 Posts: 3,177
You have to erase the background first Irene. Use either the 'background eraser' or just 'eraser' or a mixture of both to remove all the background before extracting the image.
I hope this helps Irene - good luck and don't drive yourself mad with it 
Penny :hug:
 Sunnie Bears
Another way to do it is to have both photos open at the same time. select the head you extracted (without the background) then copy it, go to the new photo and paste it.
Sonya
Irenours-bearsThank you Sonya and penny. Sonya, that's what i did. I copied and past the extracted bear head , but instead of having just the head, the head have his own white background  This is what i done:
1) built a background with publisher software
2) Selected a bear photo with my photoshop editing program
3) selected the edge of the bear head and the pixels that i wanted to keep, then clicked OK
4) What i have now on the screen is the selected bear head with a squared backgroud
5) I copied and paste it in my files folder
6) Opened the avatar background in publisher
7) Clicked on Insertion, then open the extracted head, then OK
But the extracted head is surroud by a white background
What i'm i doing wrong?
 Luxembears
Where do you get the background Publisher? Does that come with the photo program. I am DETERMINED to learn this stuff!
Sunnie BearsWhat photo program are you using? I use photoshop and have the option of erasing the background so when it pastes the head into another picture, it pastes only the head. The pixels that were around the head to start with are cleared instead of turned white.
Sonya
 Baird'sBears
I am DETERMINED to learn this stuff!
 Me too, Judi--though I can't seem to erase a background without losing too much hair (bear's, not mine).
I'm wondering about the erasing pixels thing. Do you enlarge the image you want to save to make detailed erasing possible?
Eileen
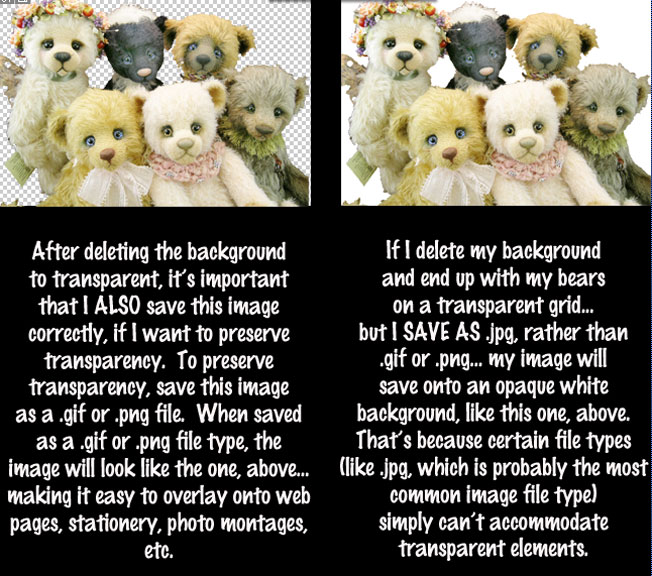
Irene, you are probably saving the file as a file type that does not allow a transparent (gray grid) background.
The only two files types that I'm aware of, that allow you to save images with a transparent background, are .gif files, and .png files. You should be able to choose these file types in your photo editing program when you click on SAVE AS.
If you SAVE AS a .jpg, you will end up with your extracted head on a white background.
Does this help???
I'm wondering about the erasing pixels thing. Do you enlarge the image you want to save to make detailed erasing possible?
YES... just as huge as you can stand it and still see what you're doing.
Some programs have several ways to SELECT the part of the image you want to "keep," and some of those ways are better than others. I've been experimenting with what Photoshop offers, and I checked out my dad's Photoshop Elements (he has version 3.0, not the most recent), and Elements 3.0 does not have an EXTRACT function. Which I find is the best way (esp. using SMART EXTRACT) to separate "hairy" stuff like grass and bear fur from a background.
If you don't have a transparent layer in your document to begin with, no matter what you do, you won't end up with your image on a transparent (grid) background.
For example... if I open an image and then "erase" everything that surrounds my teddy bear's face, it will "erase to background." Meaning that it will erase the part that was in my photo... and replace it with the chosen background color in my photo editing program. By default, in Photoshop (and probably other programs, too), that color is WHITE.
If I want to erase to TRANSPARENT, then I need to ADD LAYER, which in Photoshop is transparent by default. I need to make sure that transparent layer is UNDER the photo layer. Then, if I choose to ERASE the background on my photo, what I end up with should be a transparent surround.
Not sure how this works in other programs, though. I think the LAYERS part might be a key element. Irene and Eileen... make sure you've got a transparent layer SOMEWHERE in your document before trying to get to transparency.
Again, not sure I'm making sense here. Sorry! 
Baird'sBears I get it. I think. Thanks, Shelli! :hug:
Eileen
Irenours-bearsHi and THANK you soo much to try to help Shelly, the saving image is GIF. Does i erase the background AFTER i extracted the head? This is the software i use. Shelly, can you tell me how to show what i have on the screen, it will be more easy to me than try to describe how i use Microsoft Publisher to build the backgrounds. Thank Shelly. i also have another s photo editing calls: ARCTSOFT PHOTOSHOP PRO and KODAK EASY SHARE.
Irene, showing what you have on screen is called taking a SCREEN CAPTURE. It's really very easy!
Find what you want to capture and center it on your monitor. Then click CTRL>PRINT SCR (which translates as "control" button and "print screen" button.) The PRINT SCR button should be somewhere at the right of your alphabetical keypad, on your keyboard... usually near the top edge.
What this does is to take a "photographic snapshot" of what's on your monitor.
It then places that "snapshot" onto something called your CLIPBOARD. You can't "see" your computer's clipboard... but it's there. I'm sure there's a way to access it directly, but frankly, I've never had a need to do so, so I can't tell you how! But every time you right click COPY -- when you want to copy, say, a line of text -- what you are actually doing is taking that line of text and placing it on your computer's clipboard. It's like a temporary storage facility for stuff you're just about to use, in a second... !
Once you've got the monitor image on your clipboard, open an image editing program... such as the one you're showing me, above. Then open a NEW DOCUMENT, go to EDIT, and click PASTE.
What you should end up with is your screen capture, inside a file in your photo editing program.
In short:
1.) Get what you want on your monitor screen
2.) Click CTRL>PRINT SCR
3.) Open your photo editing program
4.) Create a NEW DOCUMENT
5.) Click EDIT>PASTE
Have fun!
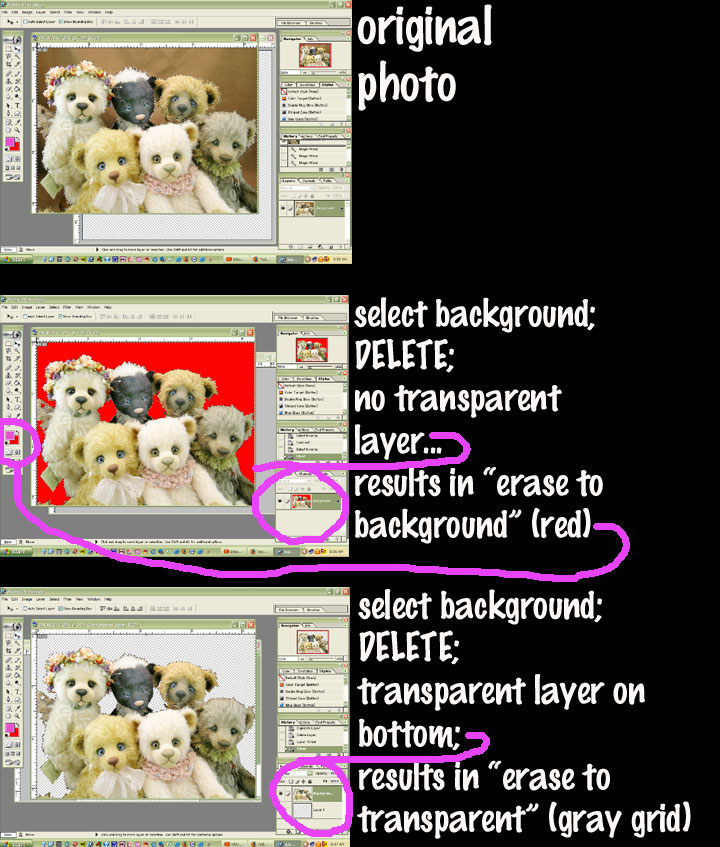
Here's a visual example of what I explained, above.
The first photo is my original, on a warm brown background.
The second shows that I have selected the background, deleted, and ended up with "erase to background."
The third shows that I have selected the background, deleted, and ended up with "erase to transparent"... because I INSERTED a transparent layer into my document BEFORE deleting, and placed it under the original photo layer.
The foreground and background colors for this document are FUSCHIA and RED. I chose them because they're easy to see! They appear in the Photoshop toolbox at the left of the image.
The layers palette appears to the right of the image, at the bottom of each screen capture. Each layer is represented by a separate little "snapshot." You can see that on the original there's one layer, as well as on the second photo. But on the third, I've added a second, transparent layer, so that I can extract the bears and land them onto a transparency, which opens them up to more possibilities for effects and editing later on.
Hope this helps!
Little bit more...
Irenours-bears Now i'm going to search of a good program. I don't know if Photoshop elements is translated in french and where to find one, but i'm going to look by google search. I did what you advise about screen capture, but i'm not sure i did it well. When i open a new document with the photo editing, it ask to choose the amount of pixel i want. I choose 1250x850. When i check by opening the saved image, it look small and i have hard time to read. I would want to schow to Judi how i can build backgrounds with The Publisher program. I hope that photos will upload here
Irenours-bearsOOOPPPSSS it doesn't work; i'm desperate now
LuxembearsAwesome explanations Shelli! Thank you. I am digesting all of this in small bites. I have Adboe Shoto shop Elements. It is capable fo doing layers with thr gray/transparent grid....I am still learing how to select and save my selections. You're so right that there are several ways to select parts of an image. Experimenting , and reading others experiences it such a huge help!
THANKS! :hug:
Are you using Adobe Photo Shop alone?
What about everyone else? I would liketo know what you're all working with.
Irenours-bearsJudi, this ishow i work with Publisher. First, you can choose different documents formats like cards, banners, index cards.....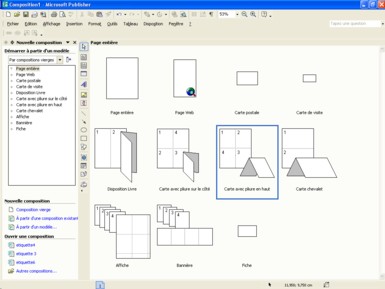
Then you can choose an existing design if you don't want to build your own
Then, you can change the colors of this design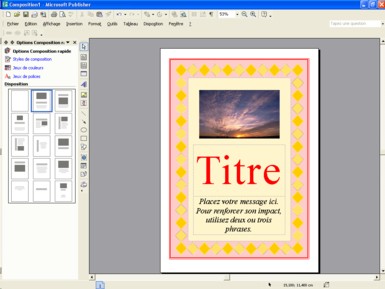
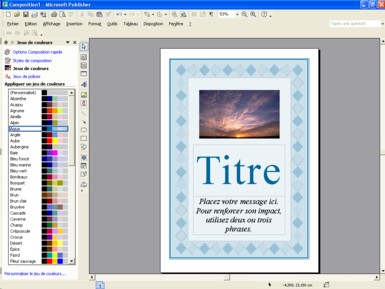
You can also build yourbackgroung by clicking on FORMAT-BACKGROUNDS[img]http://www.teddy-
talk.com/uploaded/publisher5.jpg[/img]
You can add what you want to this background like i did here with flowers frame and text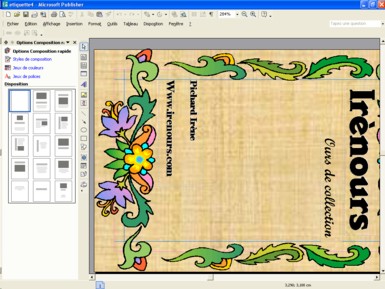
I hope that my explanations are not too confusing  Sorry in advance, Irene
Irenours-bearsI'm soo happy, i did it HOURRAAAA. Thank you Shelly. It didn't work the first time because i had to change the format and reduce the photos
Yay!!!!!!!!!!! :clap: :clap: :clap: :clap: :clap:
LuxembearsIrene, that is great! Thanks for showing it.!