Banner Sponsors


For artists and collectors sponsored by Intercal...your mohair supplier and Johnna's Mohair Store
 Flying Fur Studios
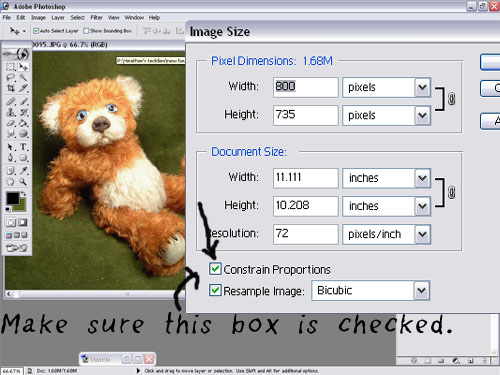
Hello, I was helping a friend out. She was having trouble re-sizing a picture in photoshop and have it turn out clear, and not fuzzy.
I created this sreenshot for her and thought I might as well share it. Just in case it's new info for some of you.
Let me know if you have any questions
 Brisbane
Thanks Heather, that is really helpful. Can I ask what the checked box means and why we have to check it??
Sorry if this is a dumb question... :doh:
 Chaska, Minnesota
Thank you Heather....I must give credit where credit is due. Heather graciously helped me get my photo less fuzzy so I could post it. I think this tutorial is greatl for people like me who simply has no computer savvy...
Many, many thanks Heather.
 Bine-Teddies
Sarah, the checked box makes sure that the proportions between height and width stay the same. Say, if the width is 1.5 as much as the height in the original, it should still be 1.5 as much in the resized image. Or in other words, if height to width (h:w) is 3 to 4 (3:4) it should stay that way, not turn into 5:2 or something. Hope that helps.
Brisbane Thanks Sabine...that does help. I always find I can work with things better if I know why something has to be done
 Creative Design Studio (RKR4CDS)
I'd like to add that in Photoshop, it helps your resolution to stay sharp if you scroll down to set the resolution first, before entering a pixel or inch number. When I'm editing my finger automatically clicks 'Tab' 4 times to bring it down to the Resolution setting first.
If you think that you'll ever need a print res plus an online one, do the 300 (or higher) copy first and hit Save or Save As, then change the res down to 72 (and change any pixel or inch numbers) and save a 72 res rendition that way. And your original can stay the same in its Raw format, should you ever need to work within the image again.
To see the difference, make a duplicate copy of something - Image>Duplicate - save it as a 72 res image and then raise the res to 300....
Flying Fur StudiosGreat add-on's ladies.
Thanks for explaining that one sabine, I'm ot good at that.
Also, good points Bobbie, something I learned the hard way with my wedding invitations!
 Matilda Huggington-beare
Thankyou Heather. Image sizing is something that floors me every time.
Thanks for the explanation Sabine. I had the same question on my lips.
And thankyou for the advice Bobbie. I have lost count of how many times I have lowered the res before saving and messing everything up for future pics. DUH!!
 Cleathero Creations
Great tutorial. Took me ages to figure out how to keep the pics right when changing them!
Another stupid thing, but something I have just learnt is in Photoshop box the size of your picture is given
PIXEL DIMENSIONS: 1.68 M ( as per the picture shown) or whatever the size is of your picture.
Sometimes you see the picture and it looks fine, till you want to use it, or print it , then you get something different.
I was also told to change the pixels to % and then reduce, this also helped me, but watching the PIXEL DIMENSIONs change also made me understand a bit more about the size of a picture.
Lynette


