Banner Sponsors


For artists and collectors sponsored by Intercal...your mohair supplier and Johnna's Mohair Store
 Hi Shelli
just to confuse you even more and add my two cents worth
I agree with whover said to start with a mini upholstery fabric with the woven grid back - sassys fabric gives beautiful results and you can use her long pile on anything from a titchy one inch bear up to 4 inches or so. the holes give you a really good guide for the length of your stitches - I do backstitc and do about 2 holes forward and one hole back. Oh, and you don't need to fraystop this one unlike everything else and it's way way easier to turn than mohair, rayon or faux fur.
Now, I use a susper fine invisible nylon thread to stitch my minis - I think it is overlocking stuff. you can use single thread but I used it doubled as I sew better that way  Use a small needle - either a thin 'sharp' or a qulting needle. Don't pull your stitches too tight - this is a hard one - they need to be nice and firm but if you pull too tight you'll actually see the holes and stitches when you turn it through.
I have a nice mini cotter pin turner which I also use for turning as I've never got the hang of haemostats.
Eyes - I use onyx eyes and glass eyes. I tend to use onyx beads on anything under three inches - you can sink them in nicely if you use black monlycke grizzly thread or metrosene topstitching thread to put them in.
Cotter pins and discs - I get my discs and pins from Intercal - and I ALWAYS use the mini T pins as there is never any risk of pulling the pin through the disk. If you make big bears you'll be used to nice firm joints - if you use the cotter pins with the bulbs you'll run the risk of pulling the bulb through the disk when you try to get it tight. I just did this when I was forced to use very light little cotter pins on my 1.5 inch bunny.
You can also make your own discs - by using a regular hole punch and the lid of an icecream container - don't know what the equivalent is in the States. Debbie Kesling uses this method in her mini bears book and she reccommends tupperware containers(I can't afford that!!!!) but it'll give you an indication of what kind of plastic she means. Our icecream container lids are a bit thinner than that but a softish slightly flexible plastic. All you need to use for joints on these are jewellry head pins - which are a long bendable pin with a flattish head. When you've got it jointed into the bear, cut off the excess pin length and then turn the pin down (much like a cotter pin) until it snugly fits the disc.
oh.if you are using mohair I am in love with Aleene's stop fray - I put it on before I cut out - blot it into the fabric with some paper towel. It smells way less toxic than some of the other brands which has to be good for the longevity of the bear. It also stays much more flexible and so it is easier to sew through - very important for me as I stitch every thing by hand - even the clothing for my bears.
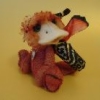
phew - hope I haven't confused you even more. This is a photo of the first mini I had done in a couple of years (until recently I was only making bears between 3.5 and 6 inches) Heffie was made for the mini bears circus parade and is about 2.5 inches tall. her head has two gussets in it (how crazy was I!!) one normal one and another titchy fiddly one under her her trunk. Her head took me about 4 hours to sew and that didn't include stuffing it! i've got some lovely mini bear fabric so am hoping to make another mini bunny this weekend.
 Pandy Potter Bears
Wow Melissa what a lovely job you have done. Could anyone tell me what the customs limit is from Canada to the UK? (so I won't have to pay tax) Also would it be best to pay by credit card or paypal because of conversion from sterling to dollars? (I assume I have to pay something). There are some lovely fabrics on that site and I would love to order some.
 Wild Thyme Originals
WOW Shelli... a mini making question and I didn't even see it 'till right now!!!!! Everyone has done such a great job answering your question, I'm not even sure that there is much I can add!
I really prefer to string joint my really tiny guys because I find that with the mini cotter pins the metal is just too soft to really be able to turn it down tight enough to get a nice firm joint in the limbs. I use waxed dental floss or sometimes a heavy duty beading thread to string joint. For my head joints I use a disk that is about the circumference of what you'd get if you used a standard sized hole puncher, and a mini cotter pin. I use the T shaped cotter pins and a tiny little washer. I've found that if you don't use that itty bitty washer you can still pull even the T shaped cotter pins through the hole if you exert a bit too much pressure on the joint. I use 2 mm or 3mm onyx beads for eyes most of the time. You can get very tiny black blown glass eyes on a U shaped wire from Intercal as well. They are round (like a bead) rather than flat back, so you still really have to pull them in deep into the fabric. You can thread sculpt just like you would on a larger bear to get a nice indented eye socket. I use size 12 quilting needles, the are absolutely tiny with a tiny little eye.... For me the hardest part of mini bear making is just threading that minute needle... but I really do find that when i use a needle that fine and short I can get more stitches to the inch. ( I stitch about 22 stitches to the inch). I back stitch (usually twice) all the seams using about a 1/16th inch seam allowance. The tinier the seam allowance the easier it is to turn. I use hemostats and prayer :pray: to turn, seriously.... that's the next hardest part of mini bear making! If there are any more specific questions you have, or you get stuck along the way... fell free to ask me any questions you may have. You might try getting me by e Mail for the next couple of days ... we have a busy weekend here and I may not be able to get to TT as much as I'd like to!
Beary truly yours,
Kim Basta
Wild Thyme Originals
 BEAR ME SHOOTKA
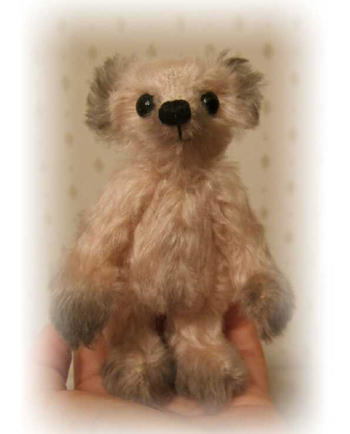 WOW! Shelli, good discusission1 I don't think is there anything to add I 've never actually thought on how to make mini...
I made few mini bears and found it great! Really! Sometimes, it take me a whole month to make teddy 12"!! But mini.. I made my last teddy Gosha just two evenings!! So great to see the results that soon.
Girls, thank you so much for posting "articles" on mini making. So interesting to read and educate myself. :clap:
 Kim-Bee Bears
I cant grow nails but I would assume that longer nails would be hard to make a mini with! But when I do have artificial nails, I cant even unbutton my pants LOL 
 Starlite Bears
I got acrylic nails in April of this year - desparate desire to be glamourous for a day or so - :rolleyes:
of course did not think of how I would manage to hand sew(do all my bears that way! or mould noses or anything
Nails - fabulous
sewing - welll after a couple of nights of withdrawal symptoms (or did I last even that long :redface: )
I managed to sew and finish with little problem I was actually quite proud of myself
So it is possible ladies if you have not tried it - nothing can keep a bear maker off creation!!
Anne
You guys have given me all sorts of ideas and the board, much to reference going forward. Thanks for your contributions.
I still have questions about cutting/fraychecking/etc. I have read that some people sew pieces together before even cutting them out. Anybody here do that? Also, do you fray check before or after cutting? This seems like a good thing to know before committing to anything. If you could post your technique, those of you who haven't done so yet, I'd appreciate it.
Thanks.
Kim-Bee BearsI sew after I cut and fray check.. I trace my pattern, fray check, let dry, cut out and sew
 Bears-a-Bruin!
OK, here I go, confusing you even more . My method for minis:
For a 3" mini bear, I use long pile fabric. Like others, I prefer the sassybears fabric with the grid backing or vintage upholstery fabric :love:
Mark out my pattern - my patterns are cut out in card and I hold them gently in place while I trace round them. No pins, which can distort the shape.
Cut out with very pointed embroidery scissors.
I sew the pieces using backstitch, taking the smallest allowance I can for the fabric. I use a very fine needle to do this, and hold the fabric pieces together - again, no pins. Yes, I get some slippage sometimes, but not very often now that I've had more practice :cool:.
Turning - strangely enough I use a pair of scissors to help me with this!!!! They are blunt ended enough not to do damage but fine enough for the fiddly corners. The long pile fabrics slide against one another and i find this (and a lot of patience) helps.
Stuffing - I use heavy polyfibre for extra weight, and a small amount of glass beads or steel shot in the tummy.
For the neck joint - a 10mm hardboard cotter pin serves me well. I attach the completed head to the body, then stuff the body and sew up.
Joints are attached by threads, strong ones doubled or trebled. I pull the limbs in as tight as I can and do a 'double knot' to hold them, with a dab of glue just to be safe! I prefer the sculptured look that thread jointing gives.
For eyes, I use 3mm english glass eyes with the pre-crimped loops. You can even get these in the coloured variety! I buy mine from http://www.christiebears.co.uk/ .
I hope this helps a little....I think you should just 'give it a go' and I'm sure your little 'uns will be as gorgeous as your big 'uns! Look forward to seeing them!
Oh, nearly forgot!!! Lighting....I find it extremely important to have good lighting when making minis!! But maybe it's just my failing eyesight
 Flying Fur Studios
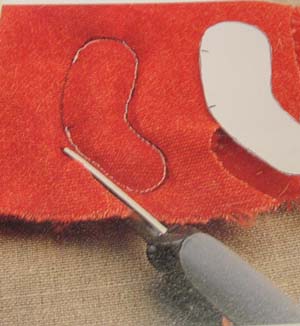 Shelli,
I like to fray check after I cut out my pieces, I find the fray check will bleed the pen I use, so I find it's better to put it on after I cut away the pen lines. But really, either way will work.
Also, I did say earlier that you could sew the pieces together BEFORE you cut them out. I've done 2 bears this way, because I don't trust my hand sewing so much. Works like a charm.
see the picture?
Heather
Kim-Bee BearsShelli - I guess the answer is, whatever way works best for you
Heather, thanks for the awesome picture. Pictures = good.
Kim, you're right; whatever works. Problem is, with this little experience, I don't KNOW what works!
Thanks again, all, for your incredibly detailed, friendly, sharing, input. I love this board.
 Country Bears
Shelli,
I made these 3 this week, they're 3" from the same pattern...........
Working with miniature fabrics such as cashmere is really easy as it's got a grid back and it doesn't fray......you should try it, you'd be great!! It's really surprisingly easy to work with, I've got to be honest, if I see something I want to try I try it until I can do it, may not be as good as others but I won't be beaten!!!
I have made a 4" bear from mohair and am making another at the moment, the one on my website is called Tims, and looks huge in his picture but is only 4"!! I did fraycheck him, and I always fraycheck AFTER I cut out, and use a GEL PEN because they don't bleed into the fabric.
The rest's just as usual - but smaller, stitches etc............
It's fun, give it a try 
I've never made three bears in one week. Wow!
I will give it a try. I'm just a researcher FIRST, when it comes to stuff like this. I like to figure as much as possible out beforehand, so I can make just twenty screwups on the real thing, instead of fifty!
 Upstate New York
I'm lucky to crank out 3 in a year. 
Ha! 

Country Bears Tee! Hee!! Don't be fooled I making bears out of sheer panic fo my up and coming (TOO QUICKLY) show :pray:
Country Bears
This is the smallest mohair bear I've made, 4", he did need fray checking!! Looks huge in the pic, but really was 4"
Wild Thyme OriginalsHey Shelli & anyone else that it interested.... if you are like me.... research & read before sticking a toe in the water? Have you purchased / checked out the books on the subject? There are a few....
Making & Dressing Miniature Bears by Julie K. Owen
Creating Miniature Teddy Bears by Linda Mullins
How to Make Enchanting Miniature Teddy Bears by Debby Kesling....
These are not the most recent of publications, but much of what has evolved in the mini world since then is stuff that you really already know from making larger bears... thread sculpting, etc,.... Okay.. now I really do need to get off the computer... I've been saying that all day! We have so much going on here this weekend! Like I said.... I'm certainly always ready willing and able to answer questions.... especially mini questions (as I have more experience in those than the larger). If they come up this weekend just e Mail me, I'll be more likely to get those!
Kim Basta
Wild Thyme Originals
 Apple Dumpling Designs
Got that mini made yet Shelli? 
 bears by beesley TM
You ladies are all amazing! I admire all of you who can and do make the mini bears! I have neither the guts or the talent to tackle this field. You are all my inspiration!!!! :teddybear:
Many Hugs Louise
Pandy Potter BearsAnother thing I do (with my big bears too) is because using ladder stitch to close limbs after stuffing can make the shape a bit messy I do it another way. I sew my limbs all the way around. I make a little vertical slit, at the top of the limb where the joint would go, having fray checked this before. I turn through here, stuff, put my joint in, then ladder stich up. The joint hides the stitching against the body and you have a lovely smooth shaped limb.
You have got me started now, when I finish the bear I am on now, I think I will try one slightly smaller than my usual 4". It keeps things interesting. Thanks everyone. :clap:
 Matilda Huggington-beare
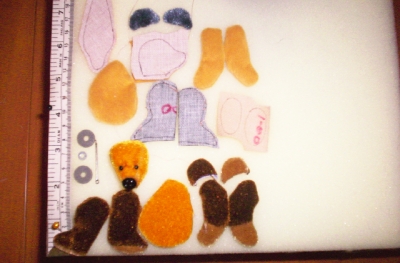
 This last photo are of the makings of two minis. They've been waiting for a few years now to be finished.
As you may see. I was trying out new ideas, on how to put them together. These bears are 2 1/2inches .The joint disks are 6mm.They were so fiddly I have no idea how I got the foot pads sewn on.
I "m not really fussed with making the little ones. They make my fingers ache.
I made these two about 4years ago.they are 4 1/2 & 5 1/2 inches standing.(the tan ones)
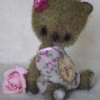
Rosey was my very first mohair bear, also my first mini. She's such a silly little thing :)
I admire all mini makers :clap: Give me 6inch or bigger, Thankyou Matilda
Marion I love your clowns
Ricki your bears are just so cute &
Terri what lovely little scruffs. :clap: :clap: :clap:
you are all so clever!!!
I sew my limbs all the way around. I make a little vertical slit, at the top of the limb where the joint would go, having fray checked this before. I turn through here, stuff, put my joint in, then ladder stich up. The joint hides the stitching against the body and you have a lovely smooth shaped limb.
Me too!! and everyone thinks I'm crazy but it is so much easier. You can use this method on fairly titchy bears - I used it on my rabbit which was 1.5 inches. I use a really fine sinew to close up the seams as I find it places less stress on the fabric than thread does.
 Singapore
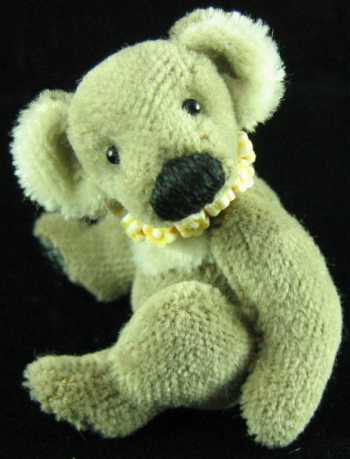 Here's a koala bear I made using the Edinburgh upholstery mohair.
The fabric does fray so remember to fray check!
http://www.edinburghimports.com/shopping/FU5.asp
Some of my miniature favorite patterns/Kits
Andrea Brewer (ebay id brewersbruins)
Roberta Kasnick Ripperger (ebay Id rkr4cds)
Emily Farmer kits (ebay ID emilyfarmer)