Banner Sponsors


For artists and collectors sponsored by Intercal...your mohair supplier and Johnna's Mohair Store
 Winneybears and Friends
Jill....At the time I sot of missed asking you how you go about printing a picture of your finished bear to use for its hang tag. This would be great to do for each bear....Winney
 West Palm Beach, FL
Hi Winney -
I actually tried this because some of the other artists here do it. I only did it once, but I printed a small picture of my bear on cardstock and then handwrote the information on the back, punched a hole in the tag and inserted a ribbon. I am sure there are programs to make this easier but I do not have them. I also am not that familiar with my digital camera photo program yet. Hope someone jumps in here with some easier instructions.
Jill
I use an actual photo, cropped small and glued to my hangtag. The hangtags themselves were printed up by a printer -- after my friend Andrea designed them for me.
It takes me a few minutes to create and assemble a OOAK hangtag. I print the photo; crop it using a square punch. Glue it to the hangtag, which I then fold. I fill out the handwritten information (date/name/my signature) and check appropriate boxes (on the back; they confirm materials used.) Then I laminate the entire thing and hole-punch it, tying it to my bear's wrist.
Many moons from now, when my hangtag supply runs low, or when/if I redo my logo and business cards, too (which match my hangtags), I will probably attempt to create some kind of "template" on my computer which will allow me to print out each hangtag, with a digital photo of the bear embedded within it, from home. However, that will compromise quality, since there's just no way to print the same quality tags from home that I could get at a professional print shop. So I'll have to decide, at that point, whether this is a good business decision.
I do like the crisp and professional, OOAK presentation of my hangtags and have gotten some nice compliments on them. I'll try to photograph and post one here one of these days just to share.
 Just Us Bears
Shelli,
I'd sure love to see a pic of one of your hang tags.
Winneybears and FriendsThank's Jill...I will have to play around with that idea, its a good one..
Shelli...I too like the OOAK hand tag with real photo on the pro printed hand tag.. I suppose you could have larger business cards / tags printed up , to fold , with the material boxs on the back to check off... so you could use a real photo on the front then laminate it yourself.
I noticed long ago how nice the real photo looks for some of my doll and bear friends at the time designed patterns to sell. She had the photos printed in bulk then glued them herself to the front of a one color folded page., the backside has all the materials listed. This was slid into a pre holed plastic hanging zip lock...looks professional and the color photo entices the buyer to buy better I think.I can see how a smaller card could be made just like this....Winney
 Canna Bear Paint
I redid our hang tags design a while back with input from folks on another bear board. We are very pleased with the result, and did incorporate individual photos of each bear on the front of the tag. I created a Word template to do this, so each bear's hantag is unique. We use using very good quality business card printer paper, print out the first side (each card is half the bear's photo and the other half our company information). Then we flip the paper and put it back through to print on the back side, which has a printed form for entering information like name, height, materials, then a place for us to sign and date it as the artists. When they're all printed, I fold each business card individually so that the front side is the photo, you open it up to the bear's information, and the back side is our business info. Punch a little hole on top, put a string through and voila... all done. The photo images are still high quality even printed at home, we have a nice printer and put through a higher dpi image to maintain good print quality.
Hope this helps!
Kelly
Kelly, this is where I ultimately would like to land with my own hangtags, so that there is less cut-and-paste legwork to be done. It's only a small time savings, but every bit counts.
This is a dummy question, but how do you get your front and back sides to align precisely when you turn the paper over and print them out? I can never seem to get that just right.
Canna Bear PaintHi Shelli,
It took a while to figure out what I needed to do for alignment front and back, but once I figured it out it was kind of a 'duh' moment  The trick is in letting the computer do all of the alignment work for you by using one of its built-in templates. For anyone else who wants to try this (printing your own 2-sided folded over hangtags on your computer), here's what I do:
Step 1. Buy a nice package of business card paper for your printer. I am currently using Avery Matte Ivory Business Cards, #8376. There are 10 business cards on every sheet. They separate very nicely along the edges when you pull them apart, which is also a good thing. You need to buy the paper before you start your template, so you know what dimensions you are working with.
2. To originally create the template that I now use, I went into Word and did the following:
a. Select 'Tools' on the upper menu. On the dropdown list that appears, select 'Letters and Mailings'. On the next list that appears, select 'Envelopes and Labels'.
b. The Envelopes and Labels window will now open. Select the 'Options' button on the right side of this new window. A new window 'Label Options' will appear. Where is says 'Label Products', you should be able to select the brand of the business cards you just bought. In my case, I choose the option for 'Avery Standard'. The product numbers directly below this now fills in automatically with all of the available Avery product numbers. By selecting one of these product numbers, the computer knows exactly how large my business cards are, how much space is in between each, how many are on the page, and so forth. Scroll down the list of product numbers and select whatever number your cards are, for mine I selected '8376 - Business Cards'. All of the good standard brands of paper should tell you what code to use. My package tells me I can also use template 8371 and get the same result. Click the 'OK' button to select your template and return to the 'Envelopes and Labels' window.
c. Here's the trick that makes it all work. Don't just type your information into this window. Instead, click the 'New Document' button on the right side of the 'Envelopes and Labels' window. Joy! A brand new Word document opens, preformatted to be an exact match to my very own business cards. Each little rectangle on the screen is the exact size of one business card. However, if I'm not just printing business cards but I want folded over hangtags, I need to continue on.
3. OK, now I have my business card template (by the way, now would be an excellent time to design your news business cards!). For my hangtags though, I want to take my business cards and fold them over EXACTLY in half when they are printed, so I have one more step to do. Right click inside one of the business card rectangles on the screen. Click on the option to 'Split Cells'. Indicate that you want 'Number of columns' to be 2, and 'Number of rows' to be 1. Click 'OK'. My business card rectangle splits into two exact halves. Do this until every rectangle on the screen is split the same way. Now SAVE the document so you keep the original template, then start designing your new hangtags like a mad woman!
4. If you do what I do with a front and back to your folded over hangtag, you will ultimately wind up saving two different custom document templates off this original template. The first template will contain your design for Side 1, the front and back of your folded hangtag. Remember that because it will be folded along the center of each rectangle, the design you want on the front of the hangtag (I use the bear's picture) needs to be on the RIGHT side of the divided rectangle. The information you want on the back side of the hangtag needs to be on the LEFT side of the divided rectangle. Once you have these all worked out, run this through the printer to get an entire sheet of hangtags for those bears. Side 1 has been completed.
5. You're not quite done yet. Your hangtag needs a Side 2. The second template you will design will include the information you want to show on the INSIDE of your folded hangtag. Take your divided rectangle template again and work from there, I include information such as the bear's name, materials, space for a signature and date, and whatever else you need to include. I also have a line of small text on the bottom of one side that mentions that the bear is not for children. Remember that this is the inside of the hangtag, so the left side of the divided rectangle is still the left side of your hangtag, and the right side of your rectangle will print on the right side of the hangtag (this is the reverse of what Side 1 required). In other words, left stays left and right stays right, so you don't have to reverse anything like you did before. Once you get all of your information prepared, take the sheet that you just printed a page of Side 1 hangtag information on and FLIP it over in the printer so you are ready to print out Side 2 (you might want to make sure your ink is dry before doing this, to avoid smears). Make sure the top side of the sheet is still the top, you're just changing the front side of the paper to the back side. Print out Side 2. Fold the business cards along the template lines to remove them from the sheet. Fold each business card in half to get your folded hangtag. Hole punch in the corner, run a string through. Done!
I probably hopelessly confused everyone with this, but hope it provides a bit of help!
Kelly
Just Us BearsKelly,
THANKYOU!!!! You are such a sweetheart to take the time to write such detail. I'm sure I'm not the only one besides Shelli who will benefit from your comprehensive instructions....heck I'm blonde and I understood it all!!!:lol:
I have been doing my swingtags with PUBLISHER, which allows the flipside thingy, and I have been doing fine with that for them...but the business cards are a whole new equation! I have tried over and over to use the pre-perforated ones, and out of a sheet of ten cards, I seem to be able to get two or four that line up well enough to use them, and have to toss the rest. I measure and calculate just like it says to do on the back of the business card packs...but what a headache! So..I'm going to try again...this time using WORD!!!!
Ten thousand hugs for you!!!!:D:D:D:cool:
Just Us BearsOh...now I have a question about the photos...I'm, assuming they need to be fairly small to fit on a swingtags without looking yukky....so do you set it up to print say 4 pics to a 6x4 picture when you get it printed at the shop and then chop one pic out for the swing tag?? My printer is a B&W laser printer so I can't print colour.
Winneybears and FriendsKelly, This info. is sure a big help...thank you mucho !....Winney
 Upstate New York
How about those pics of hang tags Shelli? Daphne? Anyone else ... I'd love to see samples. I'm currently using just a 1-3/8” x 1-1/2” little tag that I mail ordered from Kimmeric Studio. They're very nice (quality), but I'd like something ... different. Maybe larger, easier to include info. http://www.kimmericstudio.com/gif/teddy/b86.gif
What info do you folks all include on your hangtags? Tushtags?
Thanks! :hug:
I'm making hangtags later today... will try to remember to snap pix and post. Thanks for the reminder.
 BEAR ME SHOOTKA
 I also do pict for a hang tag for each bear.
I actually have three paper "sheets" for each bear.
card, certificate and bear's pict. It's my latest design
Winneybears and FriendsPlushkin, I like that idea then I could paste one picture in my Artists record book.  ....Winney
 College Place, WA
If you use Publisher ( or probably home publisher) You can go to lables and then print whatever you want on light weight photo paper, making sure you use the same borders and indents on both sides, then cut with paper cuter and you can design anything you want that way and not be limited to a templet.  Bev
Bev
Hi Kelly
Everything went well following your directions until the screen with the little rectangles was supposed to come up- no rectangles????????? What to do??
Hugs
Gail
Thanks for writing up all these superb directions- they are a big help  :clap: :clap: :clap: :clap:
Canna Bear PaintHi Gail!
If after you select 'New Document', a new page opens that looks blank instead of having little rectangles on it, try this...
With that same 'New Document' open, go to the upper menu bar and select 'Table'. In the submenu that appears, down near the bottom, is an option that says either 'Show Gridlines' or 'Hide Gridlines'. If your option says 'Show Gridlines', click on it and the lines should appear. Hopefully.
Let me know if this works for you! If not, we'll think of something else to try
:)
Kelly
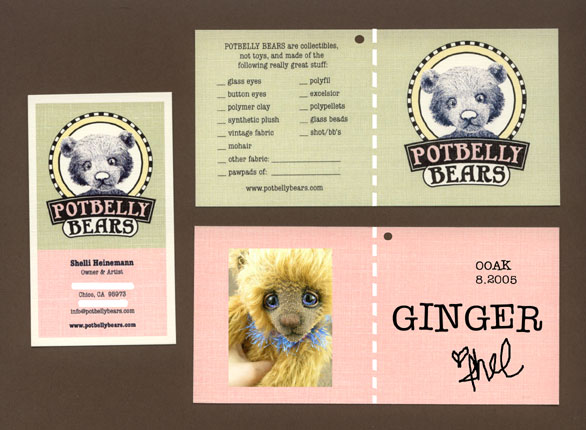
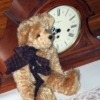
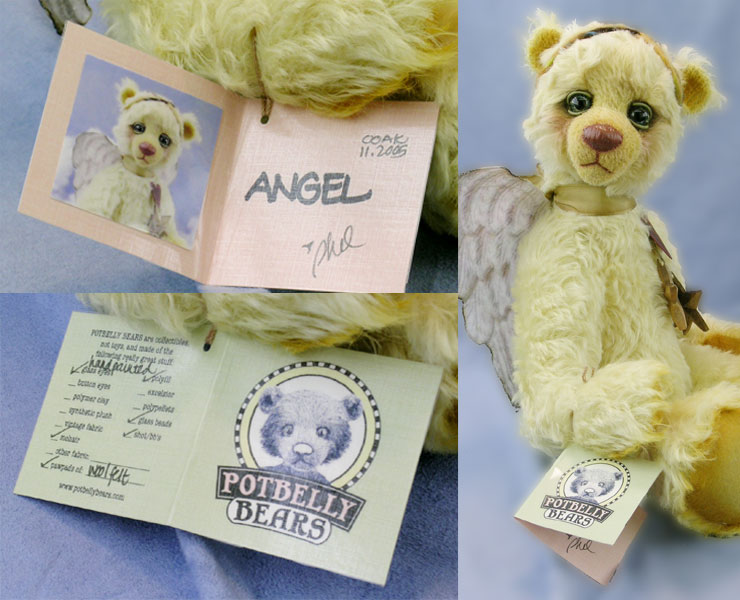 The first photo montage is an example of my hangtag, as assembled and attached to my most recent bear, ANGEL. I use my printer to produce a small photo which I then crop into a square, using a scrapbooking punch. That photo gets glued with acid-free adhesive to the left inside of the tag. I hand-write the name of the bear, the date, and my signature; then turn the tag over and check off the appropriate boxes for contents.
When that's finished, I roll the tag thru my Xyron laminator and trim to size. Et voila!
The second photo montage is a scanned example of my hangtags as they arrived from the print shop; totally flat, sorta like a large business card. Compare to my actual business card, at left. I digitally added the text to this hangtag (which I had scanned blank), and white dotted lines, which indicate where to fold in half.
Thanks for asking about this. It's fun to share.
 Past Time Bears
Great, wonderful, super duper tags, Shelli!! :clap: :clap: :clap:
 Apple Dumpling Designs
Lovely, thank you for always being so generous and sharing your secrets 
Upstate New YorkThank you Shelli! :hug:
I really like the checkboxes!
 West Sussex, England
 Jare Hares & Bears
Ok I was reading everything and thought I would chip in.
I use MS Publisher I set up a template and then I added a second page. This is a tag that folds in half. On the first page I put my business name, logo and contact information. On the second page which is the inside I list the bunny's vitals, name, height, and price. I print them on nice card stock. I don't have any trouble with aglinment issues. My printer's smallest margin was 1/2", so I set up the template to accomidate this, that way when I print the back side everything will line up. I have a printer that will duplex automatically, but I don't use this as it will not line up poperly. The printer does not like to duplex cardstock. Duplex=print on both sides of the paper. So I print the first page, then place the cardstock in the printer again and print just the second page. This works every time.
I then use my paper cutter to trim 1/2" off all the edges. Then I cut down the centre at 5", then I have two columns of 3 tags each. Which I then cut at the 5" mark and then again at the 2.5" mark. I end up with six custom tags. Then I use no heat laminate to protect them. I fold them in 1/2, then punch a hole, and then attach them to my bunnies.
This is a big time saver when I am filling my wholesale orders. I can print as many as I need ahead of time and get them ready.
I will scan a copy of mine & mum's and post later today and if anyone would like I can also post the template that I created.
As for the pictures. I set mom's up so that the picture prints as a watermark. All she needs to do is change the picture that is used as the background in the textbox. If we get pictures of every piece then she can print each bear's face on his tag, otherwise she uses a picture that is close. It still gives a custom made feel that looks professional.
Microsoft Publisher can be purchases at most office supply stores and it usually runs around $150 ~ $200, it has tons of templates, layouts, and premade documents that make it real easy to set up and customize to you needs. It is worth every penny.
My next project is to make a wall calender. HA! That will take some time. I need to get 12 bunnies and bear pictured. maybe next year. I found a place online where I can have them done professionally for $15.00 each. I don't think so. I would like to sell some and give some to my customers.
Well we shall see.
Hugs to all,
Jared :hug:
Jared, share some photos, if you can, if it's not an imposition or encroachment on your trade secrets. I have such a hard time getting to bear shows -- they're few and far between, far away, interfere with weekend plans or school dates, etc. Plus I really just have a very busy, hectic, life, with a lot of travel built in (I drive my sons to meet their dad, who lives out of town, at a half-way point every other weekend, Fri/Sun both ... two hours away! YES, you read that right; that's 8 hours on the road, in the car, per alternate weekend!) So I don't get to see very many examples of how people wrap or present their items.
I mostly made up my own stuff on a whim, according to my own tastes and preferences, and based on... nothing at all. Like most of the decisions in my life. Laughing here....
I like the way you can print yours out en masse, from a template. Mine are fairly labor-intensive to create and must be created individually, in a multi-step process (edit photo/print/crop/glue/write/laminate/holepunch/string/tie), although I like the outcome a lot.
I had them printed, very much NOT FOR FREE, at a local print shop. They did a fabulous job, using a digital printer to shoot ink onto a textured linen paper, which gives a nice "linen" effect -- for those of you exploring doing professionally printed tags, digital printing is generally much cheaper than plate printing. Just FYI.
My friend Andrea did all the design work for me; this was in my early days, when I didn't have a clue how to use PhotoShop. I love her designs, which I got to be "art director" for, but which would never have come to fruition if I had attempted to produce them myself. I could do it now, but then, had no clue how to even make a colored rectangle in a design program!
Originally, I envisioned my hangtags as something that could serve as both a hangtag and a sort of "certificate of authenticity," mostly because, as a collector, I never know quite what to do with all the paperwork that some collectible bears and dolls come with. So I figured, smaller is better!
I'd love to see more examples. I know previously Sue Ann posted hers somewhere. Judi? Kelly? Wanda? Hayley? Daphne? Laura? Kims? Anyone? Not to put you girls on the spot or anything... ;)
One of my favorite things about this board is not just the great spirit of support and sharing and camaraderie, but the fact that Intercal had the GENIUS to allow us to upload photos, so everyone can participate in sharing digital images, without requiring web hosting, or knowledge of how to link to hosted images. <hint, hint, to all>


