Banner Sponsors


For artists and collectors sponsored by Intercal...your mohair supplier and Johnna's Mohair Store
 Apple Dumpling Designs
I've been trying some new techniques on mouths and I can't seem to get it quite right. I'm wanting those adorable sculpted mouths...the ones that Michelle Lamb, Shelli and Kim (Wild Thyme) all seem to create so beautifully. I'm sure I'm making it more difficult than it really truly is.
Can you ladies please give me some insight...then I promise to stop asking questions for awhile... :lol:
Thanks!!!
Shantell, my love... the entire point of the board is to generate discussion about bearmaking, most of which comes from someone -- some brave someone, such as yourself -- asking a question. So knock that kind of self-doubting stuff off. It's what the board is made of.
I wish I had some special secret to share on mouth sculpting but for my part, all it is, is lots of PULLING REALLY HARD on the embroidery floss, to create those mouth indentations. I usually mark all endpoints with ball-headed pins first, before taking any stitches, because once you start stitching the mouth, the entire muzzle distorts and it's literally impossible to find the symmetrical other side point without those pins having marked it before hand.
I stitch one side, pulling very tight... then use fingers twisted around the floss to keep that tension, and stitch the other side. When that's done -- the two sides, left and right, of the mouth -- I usually take a stitch from endpoint, thru the muzzle, to endpoint, and back again, to secure the stitching, before exiting somewhere near the neck and tying off.
Nothing magical about it, on my part; just lots of tension. Which, I should mention, hurts like the Dickens. My fingers, especially my index finger, are all sliced up with little vertical cuts, and callouses!, from this process, as well as from the generally high-tension amount of threadwork otherwise required in bearmaking, to pull tightly closed such things as limb openings, and to needle sculpt eyes and nose bridges, etc. Ouch, ouch, ouch!
GOOD QUESTION!
Apple Dumpling DesignsThanks Shelli
I know...I was kidding...you think I could seriously stop...HA HA  Just thought I should give others a chance to ask a question or two.
Actually what you described is pretty much what I've tried but I seem to worry too much about causing so much stress on the backing and having it rip or just create a big gap in the backing threads. Is there any technique to avoid that or hide it?
My daughter told me my bears look like voodoo doll victims when I'm doing their faces...pins everywhere...I assured her it was NOT the case...just a little plastic surgery 
P.S. You new avatar is very cute...angelic!!!
 Jare Hares & Bears
I found that running sclupting threads first can help too.
But on the few bunnies that I make with claws I just put tenison on the floss.
I have calluses (or is that calli?) all over my hands. My pinkie fingers each have 2 to 3.
The tops of my fingers on the right hand get calluses from using the forceps to stuff.
And my left hand just gets crankie.
Apple Dumpling DesignsShelli,
Hopefully you see this...
I applied your method here...and was so happy with the outcome....UNTIL...I broke the stupid embroidery thread AUGH!!!...and nearily gave myself a black-eye!!! 
I tried a second time...and it broke AGAIN!!!

Hmmm... Are you using all the strands at once? I think I use six-strand floss, straight out of the ... well, whatever it's called, when they come all rolled up.
So maybe I should amend my statement. I use tension -- lots of tension. But I never YANK or move quickly. I always pull tight, maintaining tension, securing with little stitches back and forth where I just entered or exited. Maybe you're pulling too hard, too fast, without any securing in between?
Sorry to hear it didn't work out well for you. 
 Debonaire Bears
How firmly/ with what material do you stuff the muzzle before doing the needle sculpture? I usually stuff my muzzles as firmly as I can with excelsior, but I want to try doing a sculpted mouth. Should I leave it a little softer?
Apple Dumpling DesignsIt was actually pretty hysterical...I'm sure I looked like a wild woman holding a bears head between my knees...all hunched over with a big needle in one hand, my other hand pushing and holding all the while trying to keep everything steady while I take my securing stitches when all of sudden...well you get the picture...lucky I didn't give myself a black eye...how would one explain that?
I'm using DMC #5 (which I already had)...all 6 strands...I'm guessing I just found a weak spot in the thread or something. Who knows...
Just thought you'd be amused...the things we do for fun  Perhaps this bear just wants a simple mouth.
Shantell
Jare Hares & BearsShantell -
Do you use bee's wax on the floss?
That might help.
 Kim-Bee Bears
I have wanted to know the answer to this as well, Shantell! Sorry that you almost knocked yourself out! I will have to be careful when i attempt this.... LOL ... so where do you secure your stitches to??? I am a "beginner" mouth artist LOL... I have only done a few (check out my avatar, no mouth!! HA HA!) My newest bear has a mouth but I want a more "sculpted" "indented" one....
Shelli
You should get yourself either an old pair of leather gloves or two of those leather thimbles that quilters use Both work well to protect your fingers when closing seams and pulling the threads tight. I realize that it may not work for sculpting but sure does for everything else including sinking the eyes.
Hugs
Gail
 Flying Fur Studios
Just something small to add,
I use that waxed stuff I put my eyes on with. I always break the perle cotton and I don't think it's very strong. Where that waxed floss never breaks, and it sticks so I find it's easier to hold everything.
That will help you for sure Shantell
Jare Hares & BearsJust something small to add,
I use that waxed stuff I put my eyes on with. I always break the perle cotton and I don't think it's very strong. Where that waxed floss never breaks, and it sticks so I find it's easier to hold everything.
That will help you for sure Shantell
Good Grief how hard are you pulling.
Perle Cotton wasn't designed to take heavy amounts of tenison.
 Winneybears and Friends
This is very interesting...I use to cut my hands all up too..I say USED to because I don't anymore and I get the sculpting done even better.
I used to use upholstery thread ...I now use waxed linin thread or artificial sinew, it doesn't slip ..it holds those stitches really firm plus my hands are not all beat up...Give it a try and you will never go back to upholstery thread again.....Winney
 Pijangibears
Shelli
Where do you start, when you make the mouth - do you twist the tread under the nose before stitching.
Do you sew with the tread left from the nose - or do you start with a new one?
Perhaps you can draw, how you do your bear`s mouth?
I have some difficulty in understanding. just love the way your bears are looking.Specially
the mouth.
Hugs Birgitte
PijangibearsPLEASE, SHELLI
Hugs Birgitte
Hi Birgitte... haven't been avoiding you, have just been busy.
I'm afraid I don't have any special technique or order or stitches to share. When it comes to doing mouths there are only a few things I do in precisely the same way each time.
First, I ALWAYS use the same floss I used for my nose. I finish the nose off and then insert at one edge of the nose and exit at the midpoint of the mouth, where the septum and the L and R sides meet up.
Then I take a mouth stitch, either to the L or to the R, and exit back at that midpoint again.
The most important thing is to pull the embroidery floss really, really tight, and maintain that tension, by taking a stitch back thru the muzzle somewhere, or just by holding it tight. I don't have a "prescribed" way I do this; it depends on the bear, what I'm trying to do in the mouth area, the mohair, how tightly I stuffed that particular face, etc.
When I'm finished, keeping all stitches super-tight the entire time, I exit down near the neck joint and make a knot, then bury the threads in the head.
I also use a long doll needle that's about 5 inches to do all this work, including the nose.
I'm sorry I don't have a more specific method to recommend but I don't use one myself.
Hope this helps!
PijangibearsHi Shelli
I know, that you have been very busy - with the show and all that - I was just afraid, you didn't
see the topic. There is a lot to catch up with, when you have been away for a short while.
It was not meant to sound ruthless. I am sorry, if it sound like that.
First, I ALWAYS use the same floss I used for my nose. I finish the nose off and then insert at one edge of the nose and exit at the midpoint of the mouth, where the septum and the L and R sides meet up.
I do not understand this - do you start with a new tread ( of the same material )in the septum ( I can't find that word in the book)
You do not twist the treads first?
You cut off the tread and start again?
I am sorry, I have some difficulties of understanding this.
But thank you for explaining it again.
You are an angel.
Hugs Birgitte
NO worries! You don't sound ruthless. Just wanted you to know I wasn't ignoring you!
Let me explain better. And add that I thoroughly admire your willingness to discuss this in English, because I'm afraid it would be utterly hopeless in Danish. My Danish isn't up to par. In fact, I don't think I know a single word in Danish. Intercal's owner, Kjeld, who hails from there, would be appalled. You'd better teach me some Danish but quick, Birgitte!
Here goes:
I embroider the nose.
When I'm done embroidering the nose, I do NOT cut the embroidery floss off.
I take my needle and insert it somewhere along side the nose... and then EXIT at the bottom of what will become the septum. The septum is the spot BETWEEN your nostrils; your own nose has one as well. You can pinch it with your fingers by sticking one finger in each nostril (ew!.) On a teddy bear, I'm calling "the septum" the straight vertical line that comes down from the nose. That's what it's called in animals, I believe.
Sooo.... I EXIT with my needle/nose floss at the bottom of the septum, where it meets the two sides of the mouth (Left and Right.)
Then I mark, with ball-headed straight pins, where I will ENTER with my needle/floss. This will be the CORNERS of the mouth. You need to mark with pins because once you start stitching and pulling everything gets distorted and you can't find where the mirror opposite spot is to insert your needle when stitching the other side.
Once I've marked the insertion locations with straight pins, I stitch one side of the mouth, and then, the other.
Then, I go back to that midpoint at the bottom of the septum, and stitch UP to the nose, to form the septum itself.
After that, I EXIT at the neck joint area; knot; and bury my threads.
I'm gonna attach a pic here that I have on my computer from some other discussion a long time ago, which will hopefully make things a bit clearer. The septum is the straight line running from nose to mouth. The mouth sides angle off to the left and the right. I exit with my thread at the midpoint where these three strands of floss meet in one place. Ignore the writing on the photo as it was for another topic.
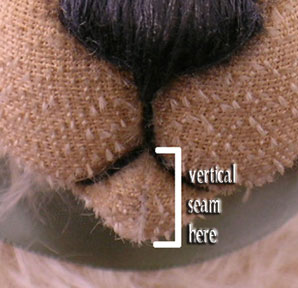
I do not twist my floss at all; I just use all six strands as they come.
Let me know if you need to know more.
It's not that complicated and I don't do it the same every time. The important thing is to keep the tension consistent and strong to really pull that mouth into a sculpted shape and keep it there. After I stitch one side of the mouth, I sometimes take a stitch or two, with the embroidery floss, from side to side, somewhere that I can hide it, to secure the stitching. I can't really explain it any better than that. Sorry.
Hope this helps.
 Country Bears
I'm going to sound really :doh: now, but what's artificial sinew, can we get that in England?? :redface:
And Jared, I have 'those' callouses too!! You made me laugh - I thought I was turning into some old witch..... don't mention that to my husband, otherwise he'll CONFIRM that last statement!! 
Pijangibears Shelli
You are a darling.
Now, I do understand the hole thing. You are explaining so well.
I thank you so much.
I am making a sweet little bear with very long hair, and it will match that bear with such a mouth.
Hugs Birgitte
I'm afraid I can't be much help with sculpted mouths, but I have just found a fantastic cream to help deal with those grooves, split fingers and callouses. I think my mum got fed up with my hands looking like a plasterers and she turned up last week with a tube of Elizabeth Arden 8 hour cream. I put it on over night and miraculously by morning all those painful little splits had closed and the dry skin around them looked much better. I don't know what's in it, and you couldn't wear it while you're working (very oily), but it's definitely magic! I know Superdrug have it on special at the moment.