Banner Sponsors


For artists and collectors sponsored by Intercal...your mohair supplier and Johnna's Mohair Store
 Raccoon Creek Bears
Hi- I have been trying to draw new arms for one of my patterns and I have I nice down-turned paw shape ( at least, it looks nice on paper!) but I started to wonder about paw pads. Do those of you that do these paws put on regular paw pads? It almost seems like the inner arm should be the same shape as the outer arm with a sort of tear drop shape paw pad facing backwards. I have never seen a bear in person with this shape arms so I have no point of reference. I've seen plenty of photos on TT, but have never noticed or thought to look at these kind of arms. I hope I have described what I am imagining accurately- Thanks in advance for any feedback you can give me.  Suzanne
 Starlite Bears
Hi Suzanne,
I have only done this type of bear arm with pads a couple of times I used a tear drop with the pointy end cut off to give a straight edge - but the arm should have a straight edge like the outer of a normal arm with the paw end halved - if that make sense - to create a straight edge when the paw pad is to be inserted - I saw it illustrated in one of my tedy books but not sure which - if you get stuck let me know and I can find it and scan it. However I am pretty sure that soon you will have many much better explanations than mine.
For my miniatures I actually use down turned paws with no paw pads
:hug:
Anne
 Past Time Bears
Suzanne - do a SEARCH using "turned down paws" and you will find several posts that might be of help. Good luck.
 Back Road Bears
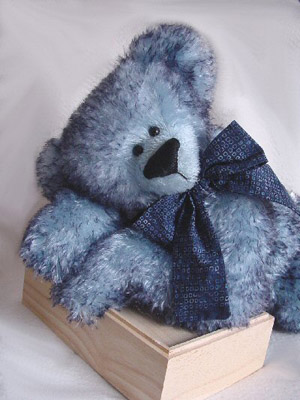
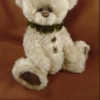
 1 "Samuel" with goofy paw pads.... from my earlier days.
2 "Bluebeary" (aren't you all sick of seeing him?) without pads
I've done a few with turned down paws and at first was giving them pads but decided it looked silly to give them full pads. The only alternative I could muster was to do half a paw pad.... one half on the turned down part of one arm side and the other half on the other arm side. Then there'd be a seam in the middle of the pad unless I stitched the arm together first, leaving a cut out open in the underside of the paw where they pad would go and hand sew it in sort of like a foot pad. But I haven't actually tried that yet. Instead I don't use pads on the arms. It's easy that way!!!! Not very interesting though I suppose.
I've since decided that the turned down paws on this pattern of mine are too long.... look like they should be metal hooks... hmm.... a pirate bear..... So, I'm working on new arms... perhaps I'll revisit the paw pads. Glad you brought this up!!
 Posts: 3,177
Then there'd be a seam in the middle of the pad.....
Hi Daphne & girls,
You can get rid of the problem of a seam running through the pad by actually roating the arm so that yu place the joint pin through near the side seam.
Penny 
 Kim-Bee Bears
I dont do paw pads on my underturned paws I rarely if ever do paw pads at all HA!
Daphne, I am not sick of seeing him... I LOVE HIM!! Oh if I had a lot of money, he would have been one of my first purchases... along with a bunch of other bears on my list
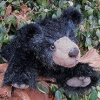
Raccoon Creek BearsThank you everyone. Sue Ann- I went to search, and although I didn't find what I was looking for, I did find some help- from you!  There is a picture in the multi- colored bear thread of one of your bears. (S)he is reddish and has similar paws.. and I love it!
Suzanne
 Flying Fur Studios
Suzanne
I was going to post this very question today. I'm trying to draw a pattern with turned down paws as well, but just didn't know how I was going to do the pawpad.
I'm going to do a search right now, although I like Daphine's idea of not using pawpads at all!! :clap:
Back Road BearsGreat suggestion, Pen!!!
You can get rid of the problem of a seam running through the pad by actually roating the arm so that yu place the joint pin through near the side seam.
Eureka! Genius! Duh, duh, DUH, Shelli! Penny, you have my undying gratitude.
My dear, I have been trying to figure out how to get a particular look to my down-turned paws for an eternity, and have gone thru permutation after permutation after permutation on pattern design, never quite getting what I wanted in the end in terms of either look, or ease of assembly.
And this absolutely BRILLIANT suggestion of yours -- so obvious, yet so elusive -- will now soothe the frustrated beast that is my creative process on this particular puzzler. YAY! You've provided me the miracle cure! I can see it perfectly!
The pure, uncluttered genius of this suggestion reminds me of a story I once heard; a parable, or something. I'm not sure it was true. It tells of a huge semi truck whose driver foolishly, without taking into account the height of the truck before proceeding, drove under a short overpass and, being too tall, quickly became stuck fast beneath it, instead.
Teams of rescue workers, and highway workers... local police and firemen... and civil engineers were called to the scene, to try and figure out how to get that truck un-wedged from beneath the overpass. They took measurements; drew diagrams; held conferences and meetings; and puzzled and puzzled over this dilemma, which was backing up traffic for miles.
Shortly, a little girl came walking by with her mother, to see what all the commotion was about. And, after hearing about all the trouble those experts were having, figuring out how to get that truck out, and after seeing all those people gathered, heads together, brows furrowed, in pursuit of the solution, the little girl had a thought.
She opened her little girl eyes wide, pointed at that big ol' semi truck, and simply said, "Why don't you just let a little bit of air out of the tires?"
Kim-Bee BearsI was waiting for someone else to ask... I am confused as well
 Ha ha, you guys. Actually, this probably makes more sense to those of us who have been struggling with a solution, and can "see" this more visually, because we've been cutting and twisting and turning pieces so much already!
Think of it this way.
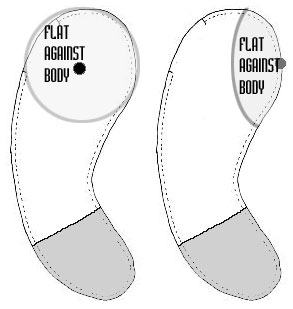
Imagine your "usual" arm pattern. One side is the outer arm; the other side, the inside arm, with the pawpad sewn on at the end.
Usually, you poke an awl hole for jointing on the inside arm, smack dab in the center of the "shoulder" part, where it rounds out.
Penny is saying... poke that awl hole in a different spot. Turn that arm so that the paw points DOWN, and you will see right away that the awl hole for jointing your "regular" arm pattern, once sewn up, with the paw pointing DOWN, will need to go DIRECTLY IN THE SEAM (or very near it, to keep the seam strong and avoid breaking threads.) That way, you are jointing the arm onto the body at a different place, with your awl hole poked into a different spot... but the pattern is otherwise unchanged.
Clearer???
Flying Fur StudiosEEEK! I only think I have a little idea of what's going on. Could someone draw a picture or something.
I'm going to fiddle around with it now....
Kim-Bee BearsYAY!!! I understand now!!!! Thanks Shelli, your explanation was prefect 
Just added a picture to my post. Hope it helps!
Posts: 3,177Well. I'm flabbergasted! 
Thanks Shelli, i'm really glad it helped. Do you know that i came across this accidently? I had made a bears arms and was just holding them against the body to get a general idea on how they would look when i happened to hold one of them the wrong way round and it suddenly dawned on me that there was NO STUPID RULES ABOUT WHERE YOU SHOULD PUT THE JOINT!!!!!!
So there you have it - i'm glad that i've been able to help there's nothing worse than struggling with something is there?
Maybe i should start keeping a log of all my mistakes that turn out to be good ideas and post them here? Should I?
Penny :hug:
Maybe i should start keeping a log of all my mistakes that turn out to be good ideas and post them here? Should I?
Absolutely! You know, penicillin was just part of a group of disgusting molds, until someone figured out it could cure infection.
Will anxiously await news of your next screwup, Penny. Laughing here....
Thanks again!
Posts: 3,177Okey Dokey Shelli - and i shall post them as disgusting moulds ha ha ha 
Penicillin Pen
Penny, I'm thinking this would be even more effective if the side where the joint will go was lopped off to more of an angle, so there's no extra "bunching" of fabric under the disc. Ever tried this? Visual to follow...
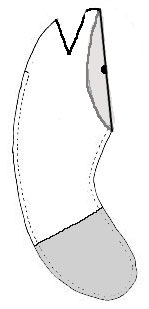 Maybe even a dart on this piece, AND on the outer arm piece, to increase roundness? PLEASE, nobody use this as a pattern; it's just a sketch I did in two seconds in PhotoShop to illustrate an idea.
What do you think?
Wheeeeeeeeeeeee!
Posts: 3,177 erm, Shelli - just iron the seam flat before fixing the joint - they lay beautifully flat then.
So far i have'nt found the need for darts or extra shaping but then i have only made small 8" bears with this type of arm.
Here's a pic of one - hopefully
Penny :hug:
 Wild Thyme Originals
Hi girls... I've actually done that whole jointing near the seam thing when I did a couple of ballerina bears some months ago.... I think the pic on on my old computer though. I wish I could show you the finished product.... I never thought of using it for arms either... even when I did it for legs! Anyway, it did give my ballerinas that perfect "are your legs on sideways?" toes pointed east to west, "first position" look! It does work! And yes... I jointed very near the seam, but not directly IN it to avoid breaking my stitches... Oh, i wish I had a picture, they were so cute!
Beary truly yours,
Kim Basta
Wild Thyme Originals
Wild Thyme OriginalsPenny... I remember that little cutie with the question mark shaped cowlick!!!!!
Beary truly yours,
Kim Basta
Wild Thyme Originals
Posts: 3,177When jointing on or near the seams just iron them flat to cut bulk and if you want to joint right through the seam leave a small gap in the stitching for either ther the cotter pin or bolt and glue a small piece of interfacing on - this will strengthen the area.
Penicillin Pen :dance: