Banner Sponsors


For artists and collectors sponsored by Intercal...your mohair supplier and Johnna's Mohair Store
Richy - That's BRILLIANT!!! I was going to comment on your excellent analogy about ironing, as to opening the seam when running the stuffing tool up the seams when placing the stuffing, especially along the forehead and top of the muzzle, because that's exactly what causes that awful line of the nap being 'folded over toward one side along a seam, and no amount of manipulation from the outside with fix it because the real fix is properly spreading apart the seam allowances.
That's best done in the earliest stuffing stages.But when you suggest a long running basting st in a contrasting color to hold the seam allowances apart until the stuffing will hold them there ——well that's sheer genius! One of those forehead-smacking moments when one says "Why didn't I think of that!"
Thank you SO much for sharing that!!!
You are very welcome! I used to have to restuff heads because of what you metioned the awfull nap being folded over to one side.. I found it difficult and took alot of time to stuff the seams open. So being a little lazy, I thought it stitch them open. If you leave your stitches long and use a knot on the outside, you litterally can pull the line of thread out in one go when you're done stuffing! So easy.
Richy~
I agree with everyone. She is so pretty too!!
I have sewn one bear for an antique conest on here. I did sew the nose on the side head peices just under the guesst point of the nose and thought it was pretty cute!
Your nose positioning is perfect! I don't think it matters it's not over the seam, it looks right, so it is :)
Richy~
I agree with everyone about cutting into the curves... Sort of. It is essential in sewing clothes so curves lay flat and don't bunch, but in bears, I've never had that problem.
I would be concerned cutting into the seams on a bear as you have the pressure of the stuffing putting allot of pressure on the seams, not something you encounter in clothes.
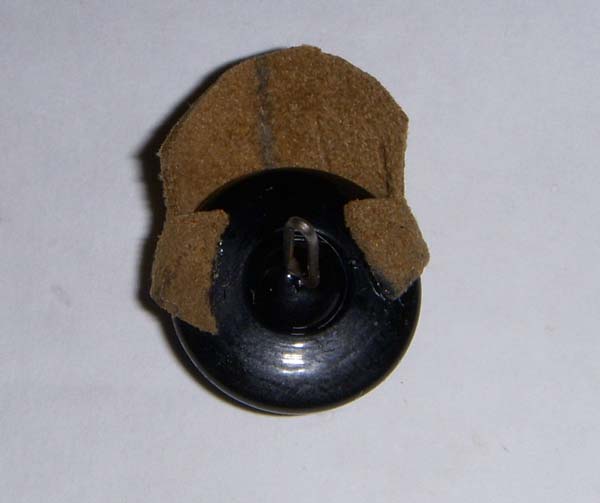
I had similar problems when I began. I realised my seams were not always "open". When I stuff I find it best to make sure the seam allowances are spread open. (See picture - Obviously don't iron them!)

You can do that by careful stuffing or stitching the seams open with a different coloured thread in a running stitch to the outside of the head, then you can pull the thread out once stuffed. Since I have done this I haven't had any lumpy heads at all and I don't use tiny bits of stuffing.
Richy~
Well, you wont need to worry about the head if you've recut it on the grain 
With the fur going in another direction, I have had quite a few pieces like that and all I do is gently steam them and brush. If you ever have mohair like that again, I'd reccomend steaming the mohair before cutting them out
Everyone else has said great stuff Just be careful when stuffing, else they will stretch oddly
Richy~
Hi,
I am totally out of Ultra suede and want to order just 1 piece. I usually buy a matching pawpad material when I buy fabric but I got this piece on Ebay.
Does anyone know where I can order just 1 piece of Ultra suede and not pay like £5 Postage and packaging up to a certain cost. I don't like buying bulk pawpad materials as I like to match when I buy fabric and I have allot of everything else, joints, eyes and nose thread etc.
Thanks guys,
Richy~
Hi ya,
This may sound a little silly but, do you push in your eyes when tying them off? I personally can't do it all myself so I get someone (my mom haha) to push the eyes in for me while i'm tying off so I can get them tight.
I use a long strand of thread, loop it into the eye so I end up with 2 tails of thread. I thread each strand separately and exit behind the ear about a 1/8th inch apart and tie. I don't hide the knots, just the tails.
Another thing that may help, waxing the thread, prevents slipping off the knots.
Richy~
I have taken the Extreme Sculpting class last year (or was it earlier this year??). I have just got around to using it in the last few days.... Why do we want to do everything all at once and never get around to anything?
I found it very informative, from stuffing for needle sculpting, an intro into needle felting and scissor sculpting. I am finding it very daunting even though all the information is there! I have spent hours, holding my scissors in my hand and brush in the other and just brushed the bear. It may not need scissor sculpting as it will be bald from all the brushing haha.
I reccomend anyone to take the classes full of information and the tutors are very willing to help.
I would love to take the airbrushing class one day
I use Woven Clothing labels. I worked out that it is a fraction more in cost to buy the woven lables, with my name and website on them, then to do it all myself.
Now just have to remember the website when I want to order some more... Hmmm 
Richy~
Oly wrote:One of the artist's that was just asking "How" to make claws. I think if you have never tried
it before, it is best to start out with the polymer clays. Some are quite flexible. I have used
three differrent brands. There is also the cost.
The Apoxie epoxie clay is fine but like JoAnn said, you have to wait 24 hrs for the complete
cure of the expoxy. It is sold in small quantities. The thread here is "the strongest clay" so
I would have to vote for expoxy as well. Now, if you want the absolute strongest claws, that
are completely unbreakable, you get a blank of polyurethane poured and carve them up. I will
be posting my Polar with Apoxie claws and I will let you know how the polyurethane goes..... :wacko:I would love to here more about pouring a blank of polyurethane, have you done this yet? Love this idea, would love more details and pictures.
Joanne
What Joanne said
I wouldn't recommend lining with Vlieseline. I have used it alot in making clothes and it does stretch under stuffing I've also used it to line my first bear and he is a blob haha. I would recommend a good muslin or thin calico lining.
Hello bearyfun,
I can't help with the needle felting questions as I've only made one small needle felted bear and have never felted onto fabric or mohair.
I have a little experience in clay although i'm not very good. I find really working in the clay so its soft and pliable is good but, worked against me as I have hot hands. If you get a basic shape in clay and then, Freeze it for a little while (an hour or so in a zip lock bag) I find it easy to work as it's harder and wont budge as easy. Well it helped me anyways. I could never get my finger prints out of them, I sanded mine with a high grit sand paper (1500 Grit) it is very very fine and only needed a little to make it smooth and then I varnished it. For shaping I guess its practice and I never got a hang of it.
For puffy cheeks as most call them, I had trouble trying to figure it out. I'm not much of a scissor sculptor and messed up a few heads doing it wrong. I took a class on Ebear University in extreme Sculpting. It taught me the right hardness too stuff bears for sculpting (I stuff Mega hard) Needle sculpting, How to do puffy cheeks, A little needle felting If i remember right. It was a very enjoying class and I haven't tried it out yet but it was explained very well and I'm sure I won't have any problems doing it. Also you could try putting darts in the side head piece to make it rounder. I think you would need to scissor sculpt and needle sculpt behind the cheeks even if you do add darts.
Link to the bear University lessons http://www.kranbearys.com/EbearZ/Extreme.htm
I'm sure you will get more people helping you out
Take care,
Richy~
Does anyone know the difference between Copic Ciao Marker Pens and Copic Original Markers? I know one is alot cheaper almost half the price, do you see much difference?
Richy~
If It's a smaller bear, I have also heard of using False nails. They already have the curve, It would be "shaving" each individual nail the same that would take a long time. I think they would be great for Birds of prey too :)
Take care,
Richy~
I think it wouldn't be a problem to re-dye mohair as long as its darker then the origional colour.
I hear you can use hair bleach applying to the tips of mohair as long as you don't leave it on too long as it will look damaged and take reallly good care not to get any on the backing as its not designed for cotton, look what it does it to your clothes!!!
Take care,
Richy~
Finally got some photos! Although, I didn't find my Gel Super glue and so used liquid and non permanent pens. I will show you what it does!
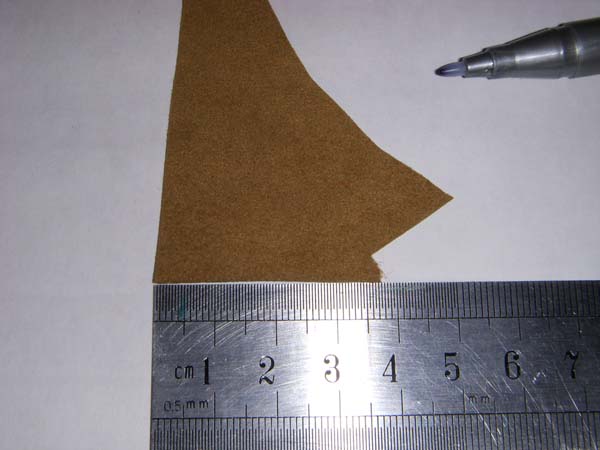
1.Find a straight edge, or cut one yourself. As the eye I was using is, 15mm . I drew a line to 30mm.
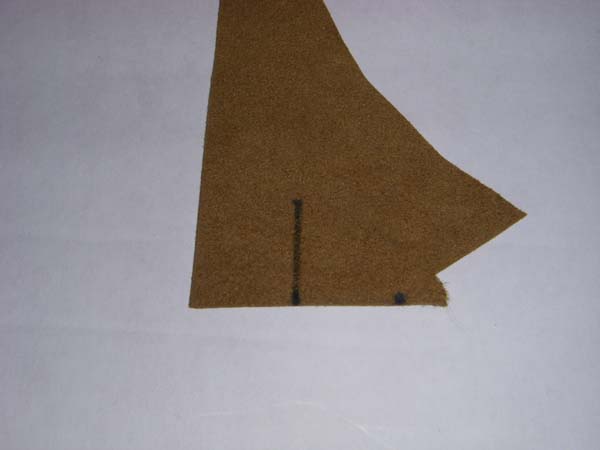
2.After drawing the dash mark at 30mm I then drew a mark half way at 15mm
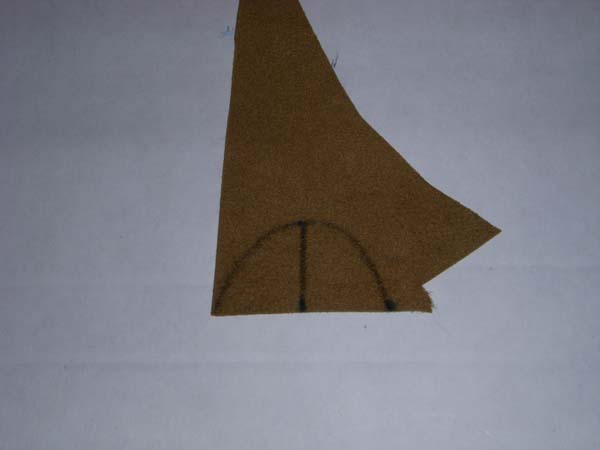
3.You then, draw the middle mark the same width of the eye (In this case 15mm) and round it down to each edge.
4.After cutting out the eye lid, I get a cocktail stick (Totally useless for liquid glue) and my super glue.
5.Place a line of super glue across the bottom edge. You then glue on your eye lid to your eye, as low, as high or where ever you want, for what effect you want to achieve. Getting about even fabric left either side of the eye. (As you can see a non perminant marker as I used a liquid super glue, you can see my center mark in the middle of the eye in blue )
6.Then turn over your eye and fold down your edges. (This took forever to dry with liquid super glue, as it just kept soaking into the fabric and it's super brittle)
7.Cut the sides across, but no further then your eye rim!
8.Cut straight down the sides and cut across some excess from the top if you have any.
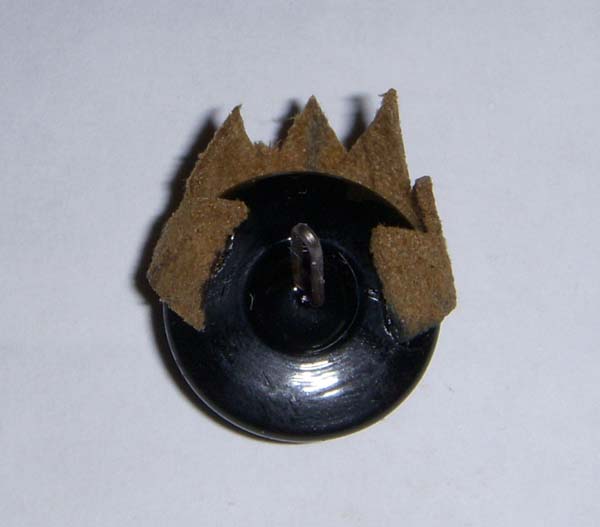
9.Cut a "crown" or notches out of the top of the eye lid, so they fit next to each other when folded rather then over lapping. Also take EXTRA care to not cut all the way down or passed the eye rim.
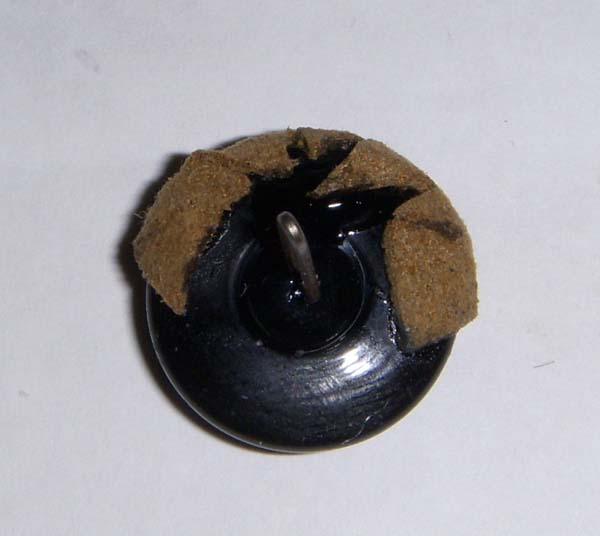
10.Glue down each, "spike" making sure it's kinda taught and smooth.
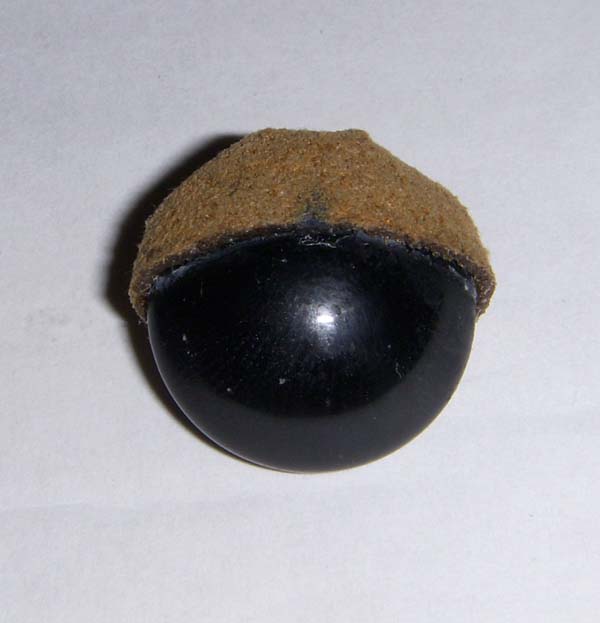
11.A kind of sleepy,Finished eye!
Notes:
-Don't know if I can get this through enough, but use GEL super glue. It doesn't seep into your fabric and it takes a little longer to dry so you can move it around. (Thank Shelli for the Gel super glue advice, I was going nuts before I found it)
-Use a permanent pen or better still, use a pencil!
-As you can see from my photo, the eyes aren't at all very smooth. The liquid super glue was so brittle and was so hard to work with, drying so fast, I couldn't get it smooth. Also you never get the colour line at the bottom of the eye lid , that is the seeping into the fabric.
-If you get any super glue on the eye itself or the edge of the fabric, gently scrap it off with the eye of a needle or if away from the fabric, use a q-tip (Cotton wool bud) soaked in nail varnish remover.
I will hopefully, get some better images when I finally buy some Gel super glue.
If you have any questions, Just ask:)
Take care,
Richy~
I use ultra suede, never tried felt.
http://www.monicasattictreasures.com.au … orial.html
I dont do it all the same ,I use the same mesuring system and attach the longest line across the eye using gel super glue (i dont fold) and i do it before inserting the eye. Pull in the sides of the eye lid and glue. i then cut V shapes out of the eye lid at the top so when you fold them behind the eye they dont overlap and lay flat. Leave to dry and insert as usual. :)
I will take some pics when I find my glue!
Take care,
Richy~
Well, there are are things like, Am I good enough? Do you accept lay away? If so do you take a deposit? (How much?) Do you accept cheques? What do you do, if you sell a bear online and the person doesn't like the bear as much as when looking at photos and wants to return it? What to do if a bear gets damaged in transit? Would you post a bear uninsured in case of losses? Do you barter or offer discounts?
Thanks about all I can think of right now, I will add more as I think of them!
Richy~
Well, I am assuming you are on about a gusset that has a seam down the middle of it?
You get a centre seam in the gusset, I believe, traditionally, to save on mohair. They would cut the gusset in half to not waste any mohair, well a piece that isn't big enough for a whole gusset. So it is more popular with traditional bear makers. Also you can add the pieces sideways on the fabric to get a centre hair parting for a more modern bear, I think it would look good in a longer fur, pretty funky :)
If you would like to do a centre seam, everyone has basic said it. All you do is cut the gusset in half, add seam allowance on each half and line up VERY carefully before sewing. Not difficult, just takes some preparation to get everything lined up, so the nose is level and they are the same length etc. There is another reason for a centre seam, you can curve each half of the gusset in the middle to make the top of the head rounder, but be careful, you may end up with a cone head shape, so less is more. Would be easier to just add darts in the gusset, in my opinion.
Hope things are a little more clear.... If not, we would be happy to try and explain more :)
Take care,
Richy~
bearyfun732 - No, I didn't stuff with woodwool. Also, I find that, if he was your so much loved childhood bear and back in the day, I bet every mother HAD to know how to sew if they had children. Would you want your presious bear to be holey and badly stitched, I wouldn't I did tea stain him, but the pictures are awful and didn't show up.
ScaliWagGrrs - Thank you so much, I know, superrrr fast for me, I am on my next one for this challenge too!
tindlebears - Thank you, I did kinda like him, My nephew more then me haha
edie - Thank you for your kind comments, Captain holly in my avatar isn't actually my creation, it's my brothers. He is always better at everything I do haha.
Thanks again everyone.
Onto my next one too!
Richy~
PeachtreeCottage - I Was going to say the same thing. Make sure the legs are wide enough apart and are horizontal to the body, no pulled in legs like a V.
Also well stuffed weighted feet and legs, also make sure you joints are VERY tight.
Richy~
Very interesting indeed!
tindlebears - Yes, it probably would change with time, but I've seen factory dyed mohair change shades over time too!
Sue Ann - I googled Dyeing with RED wine and not much came up. I did read through a few of the Dyeing with Wine and really didn't give me much info in the way of longlivity, I may just have to give it a whirl.
rkr4cds - Well, I am a fan of wine, not so much red (Gives me headaches). The cheaper the red wine it seems the more it stains.
I will give everyone my updates to see how it fares after some dye testing on some natural mohair that is unbleached and for dyeing.
Results in a few days I hope.
Do you think I would need to add vinegar and salt like usual?
Richy~
Here are a few patterns. I would sew them up in calico first to see if they need adjusting.
http://www.infinitefreedom.com/challeng … tions.html - Dress pattern
http://www.jessica-tromp.nl/freedollsew … edolls.htm - Lots of older dress and such patterns.
http://www.bellaonline.com/articles/art25370.asp - simple dress pattern
http://www.craftfreebies.com/sewing.htm … r-Fr-24026 - Have you tried baby patterns? well these links go off into PLENTY of websites with hundreds of patterns , a little adjusting and they will fit great.
Just sew up in Calico, adjust if needs be and also remember, if you are using none stretch fabrics, to leave opening large enough to get them on! :)
Take care and have fun,
Richy~
red wine? has anyone tried that. I know I have ruined many MANY white wool jumpers with red wine and haven't seen any ill effect to them.
I am guessing it would come out pretty mauve-ish... sounds good.
Do you think it may be too acidic?
Any suggestions or confirmation?
Take care,
Richy~
hehe He is small for me at 7"!
Well here are some awfull pics of -
My first prim/vintage old ted!
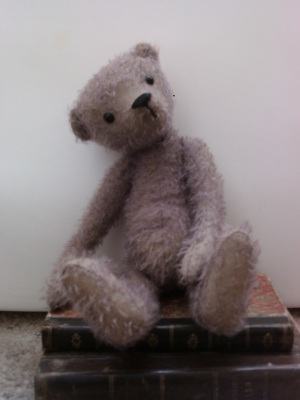
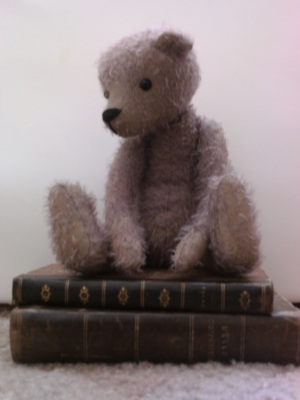
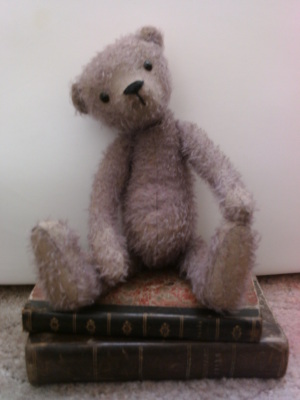
You can see perfet nose (Couldn't bring myself to destress it so the story is he had a seam blown on his nose and it had to be redone I even laddered a part of his nose to look more authentic)  :crackup: and see his rolly tummy but can't see his bald patches and his tea staining
  !
!
I think next time he will have no paw pads and not think about it too much just do it!
Would love some critasism!
Richy~
Lucky me - I think it would be alot of effort to convert the Goldie pattern into the type of pattern you want. I would suggest either, making as per the instructions and sewing on the arms and legs in place or buying some plastic doll joints, you can get them in most craft stores they are very simple to use :)
Have fun creating :)
Richy~

